
Advanced Intermediate
What the pattern's own author called it. Nothing here is graded again.
 Crochet·Rituals
Garments 56 Laid out for paper No account, no download
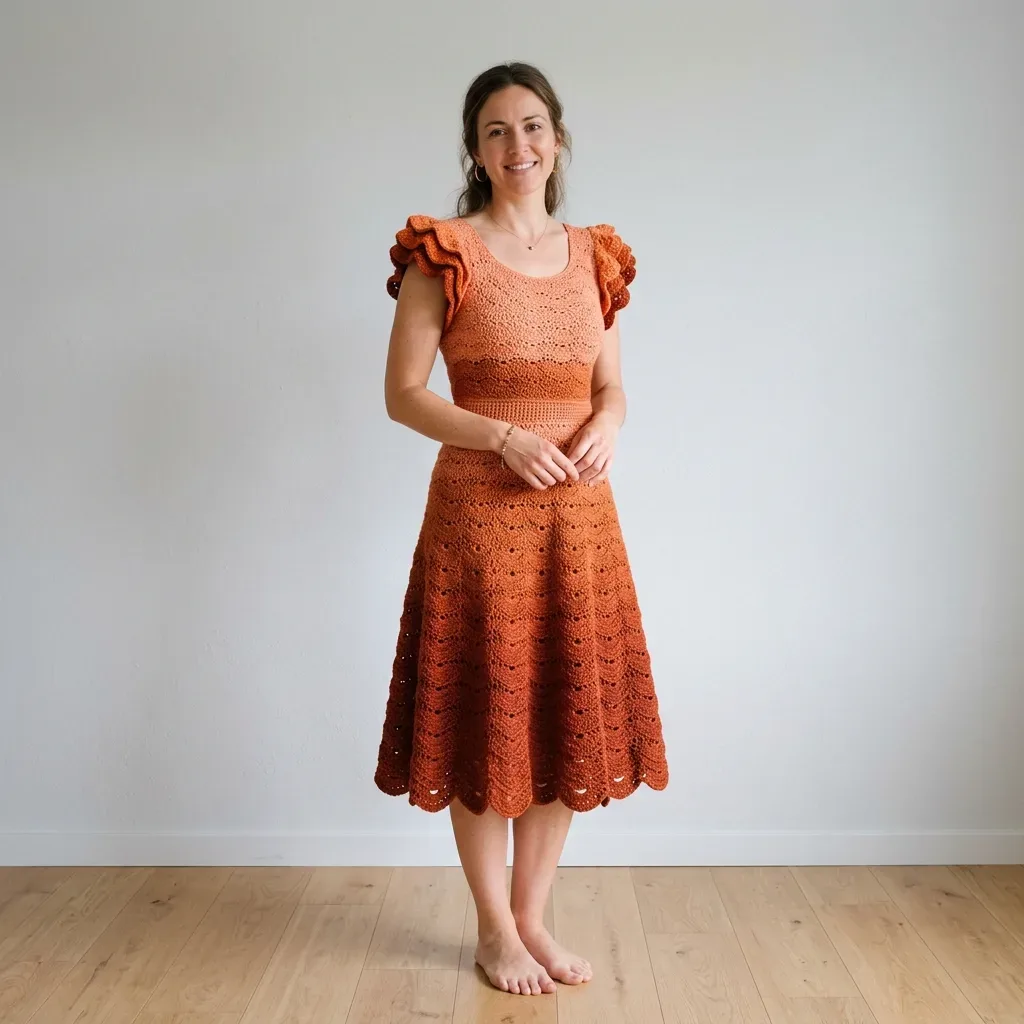
Seamless A-line dress: scoop-neck bodice, dense sc waistband, 4-round shell lace skirt. E-4 and F-5 hooks.
Crochet Rituals · retyped from the source and laid out for print · added 25 Oct 2026
What the pattern's own author called it. Nothing here is graded again.

What the sample was worked in. Any weight works; the size moves with it.

Each one is typed out whole and gets its own line.
This midi dress pairs a fitted, flat-worked bodice with a seamless, in-the-round skirt. The front and back panels shape the scoop necklines separately before a chain bridge joins them at the underarm; from there, a dense single crochet waistband sets the waist and a 4-round shell lace repeat flares into the A-line skirt, finished with a two-round scalloped edging. Before you begin, have both hooks ready (E-4 for bodice and waistband, F-5 for skirt and ruffles), a gradient or two-color DK yarn in the full yardage for your size, and at least 8 stitch markers for tracking shaping and shell repeats.
Listed by the pattern's own author, in their words.
Key to this pattern, 12 short forms
(RS): Ch 3 (counts as first dc), 2 dc in same st (half shell at beg), sk 2 sts, sc in next st, sk 2 sts, Shell in next st, sk 2 sts, sc in next st, sk 2 sts repeat to last 3 sts, 2 dc in same st as beg ch-3 (completes opening shell when joined), sl st to top of beg ch-3 to join.
Ch 1, sc in same st, ch 2, sc in center dc of Shell, ch 2, sc in sc between Shells, ch 2 repeat around, end sc in center dc of last Shell, ch 2, sl st to first sc to join.
Sl st into first ch-2 sp, ch 3 (counts as dc), 4 dc in same ch-2 sp (half shell), sc in next ch-2 sp, Shell in next ch-2 sp, sc in next ch-2 sp repeat around, sl st to top of beg ch-3 to join.
Ch 1, sc in same st, ch 2, sc in center dc of Shell, ch 2, sc in sc between Shells, ch 2 repeat around, end sc in center dc of last Shell, ch 2, sl st to first sc to join.Repeat Rounds 1 through 4 for pattern.
Sc evenly around edge, 1 sc per st, sl st to join.
Sl st into first sc, ch 3, 2 dc in same sc, sk 2 sc, sl st in next sc, sk 2 sc, 3 dc in next sc repeat around, sl st to join.
The front panel is worked flat, beginning at the center neckline chain. You will build up to shoulder width, then work downward to the underarm.
Front Neckline Setup: With E-4 hook and Color A, ch 61 [53 / 57 / 61 / 65 / 69 / 73].
(RS): Sc in 2nd ch from hook and in each ch across. Turn. (60 sc) [52 / 56 / 60 / 64 / 68 / 72 sc]
(WS): Ch 1, 2 sc in first st (inc), sc in each st to last st, 2 sc in last st (inc). Turn.(62 sc) [54 / 58 / 62 / 66 / 70 / 74 sc]
Ch 1, 2 sc in first st, sc to last st, 2 sc in last st. Turn. (64 sc) [56 / 60 / 64 / 68 / 72 / 76 sc]
Ch 1, 2 sc in first st, sc to last st, 2 sc in last st. Turn. (66 sc) [58 / 62 / 66 / 70 / 74 / 78 sc]
Ch 1, 2 sc in first st, sc to last st, 2 sc in last st. Turn. (68 sc) [60 / 64 / 68 / 72 / 76 / 80 sc]
Ch 1, 2 sc in first st, sc to last st, 2 sc in last st. Turn. (70 sc) [62 / 66 / 70 / 74 / 78 / 82 sc]
Ch 1, 2 sc in first st, sc to last st, 2 sc in last st. Turn. (72 sc) [64 / 68 / 72 / 76 / 80 / 84 sc]
Ch 1, sc in each st across (no increase). Turn. (72 sc) [64 / 68 / 72 / 76 / 80 / 84 sc]This completes the neckline curve. Rows 2 through 7 shape the gradual U-curve of the scoop neck.
Front Bodice Body:
through 11: Ch 1, sc in each st across. Turn. (72 sc each row)
Begin Shell Lace Pattern Row 1 worked flat: Ch 3 (counts as dc), 2 dc in same st (half shell at beg edge), sk 2 sts, sc in next st, sk 2 sts, Shell in next st, sk 2 sts, sc in next st across to last 3 sts, sk 2 sts, 3 dc in last st. Turn.(12 shells for M)
(Shell Lace Row 2): Ch 1, sc in first st, ch 2, sc in center dc of each Shell, ch 2, sc in sc between Shells, ch 2 across, sc in top of t-ch. Turn.
(Shell Lace Row 3): Sl st into first ch-2 sp, ch 3 (counts as dc), 4 dc in same sp (half shell), sc in next ch-2 sp, Shell in next ch-2 sp, sc in next ch-2 sp across, 3 dc in last ch-2 sp (half shell), ch 1. Turn.
(Shell Lace Row 4): Ch 1, sc in first st, ch 2, sc in center dc of Shell, ch 2, sc in sc, ch 2 across, sc in top of last st. Turn.
through 27: Repeat Shell Lace rows 1 through 4 three more times. Set aside. Do not fasten off.
The back panel mirrors the front with a slightly shallower scoop (4 increase rows instead of 6).
With E-4 hook and Color A, ch 67 [59 / 63 / 67 / 71 / 75 / 79].
(RS): Sc in 2nd ch from hook and in each ch across. Turn. (66 sc) [58 / 62 / 66 / 70 / 74 / 78 sc]
Ch 1, 2 sc in first st, sc to last st, 2 sc in last st. Turn. (68 sc)
Ch 1, 2 sc in first st, sc to last st, 2 sc in last st. Turn. (70 sc)
Ch 1, 2 sc in first st, sc to last st, 2 sc in last st. Turn. (72 sc)
Ch 1, sc in each st across. Turn. (72 sc)Rows 6 through 27: Work exactly as Rows 8 through 27 of the Front Bodice Panel. Do not fasten off.
Continue Shell Lace Pattern in joined rounds.
through 16: Work Shell Lace Pattern Rounds 1 through 4 four times total. (156 sts each round for M)
Work 5 dc (double crochet) all into the same stitch or chain space. This creates a fan-shaped cluster that forms the primary decorative texture throughout the dress.
Work 1 dc, ch 1, 1 dc all into the same stitch or chain space. This creates a small open V with a chain-1 space at its center.
Switch to E-4 hook. Work in sc only.
Transition round: Ch 1, sc in each st around. Join.
(156 sc)
Waistband Round 1: Ch 1, sc in each st around. Join.
(156 sc)
Waistband Round 2: Ch 1, sc in each st around. Join.
(156 sc)
Waistband Round 3: Ch 1, sc in next 24 sts, sc2tog 6 times. Join.
(150 sc)
Waistband Round 4: Ch 1, sc in each st around. Join.
(150 sc)
Waistband Round 5: Ch 1, sc in next 23 sts, sc2tog 6 times. Join.
(144 sc)
Waistband Rounds 6 and 7: Ch 1, sc in each st around. Join.
(144 sc)
Waistband Round 8: Ch 1, sc in next 22 sts, sc2tog 6 times. Join.
(138 sc)
Waistband Rounds 9 and 10: Ch 1, sc in each st around. Join.
(138 sc)
Switch to F-5 hook. The skirt uses Shell Lace Pattern with regular increases every 4 rounds.
Skirt Setup Round Ch 1, sc in each st around, placing markers at 6 evenly spaced points. Join.
(138 sc)
Work Shell Lace Pattern continuously. After every complete 4-round repeat, work an increase round.
Skirt Rounds 1 through 4: Shell Lace Pattern.
Increase Round A: Ch 1, sc in next 22 sts, 2 sc in next st 6 times. Join.
Skirt Rounds 5 through 8: Shell Lace Pattern.
Increase Round B Ch 1, sc in next 23 sts, 2 sc in next st 6 times. Join.
Continue this pattern, adding 6 stitches every increase round until you reach the desired length. For size M, continue through:
Increase Round C 156 sts Increase Round D: 162 sts Increase Round E: 168 sts Increase Round F: 174 sts Increase Round G: 180 sts
Increase Round H 186 sts Increase Round I: 192 sts Increase Round J: 198 sts Increase Round K: 204 sts Finish with Scallop Edging at the hem.
| Rounds | 56 |
|---|---|
| Parts | 9 |
| Level | Advanced Intermediate |
| Time | 60-80 hours |
| Hook | 3.5 mm |
| Yarn | DK |
The front and back bodice panels are worked flat, row by row with paired increases at each row edge, because the scoop necklines on both sides need curved shaping that is simpler to control outside of a joined round.
The shift from flat bodice panels to continuous rounds happens at the underarm, where a chain bridge joins front to back; everything below that join, including the waistband and skirt, is worked seamlessly in the round.
| Front and Back Bodice Panels | about 10-14 hours because the panels are worked flat across 14 and 5 rows with paired neckline shaping to track on each row |
|---|---|
| Waistband and Skirt (Shell Lace repeats) | about 30-40 hours because the skirt repeats the 4-round Main Pattern many times over while increasing for the A-line flare |
| Scallop Edging and finishing | about 4-6 hours because the 2-round hem edging, end-weaving, and blocking all happen after the last skirt round is complete |
These answers came from whoever first published the pattern, kept word for word.