
Intermediate
What the pattern's own author called it. Nothing here is graded again.
 Crochet·Rituals
Baby 49 Laid out for paper No account, no download
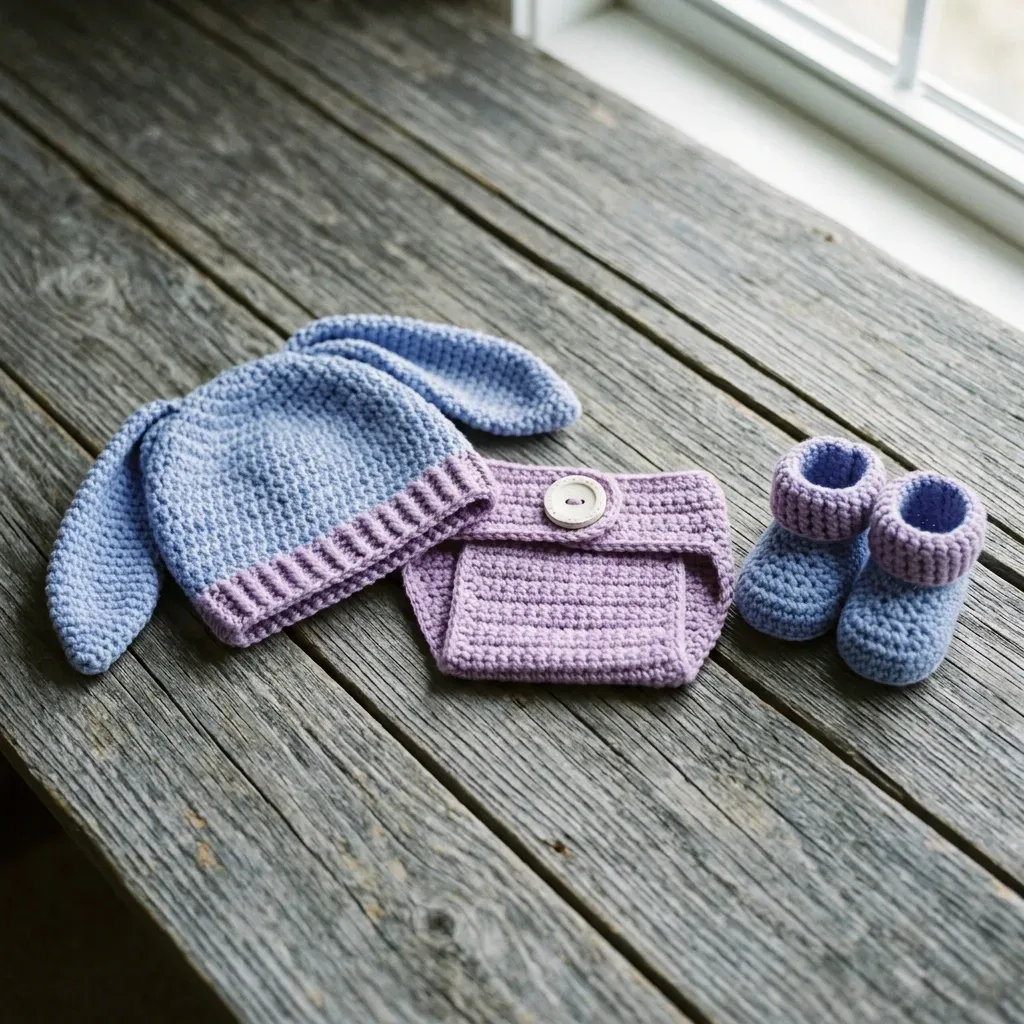
Hat, diaper cover, booties in two colors. G-6 hook, ribbed brim, 56-st hat body, bunny ears.
Crochet Rituals · retyped from the source and laid out for print · added 25 Oct 2026
What the pattern's own author called it. Nothing here is graded again.

What the sample was worked in. Any weight works; the size moves with it.

Each one is typed out whole and gets its own line.
This set builds three pieces from the same two skeins: a bunny-eared hat, a buttoned diaper cover, and a pair of cuffed booties. The hat starts as a sideways-worked ribbed strip, joined into a ring, then picked up for the body and shaped into a crown. The diaper cover works flat front to back with its own ribbed waistband; the booties start at the toe and build upward in the round. Periwinkle (Color A) carries the main hat body and bootie outers, while lavender (Color B) handles every ribbed edge and the full diaper cover. Before starting, have both colors wound, a G-6 hook, four stitch markers, and the button on hand.
Skill level: intermediate. The individual stitches are basic (single crochet and half double crochet), but the pattern requires working in the round, seaming pieces together, making clean color changes, shaping with increases and decreases, and reading stitch counts carefully across multiple pieces. A beginner who has completed a few small projects like dishcloths or simple hats can attempt it with patience, counting stitches at the end of each round.
Finished measurements: Hat approximately 13 inches / 33 cm circumference, 5.5 inches / 14 cm tall at the body (not including ears), ears measure 4 inches / 10 cm long each. Diaper Cover approximately 14 inches / 35.5 cm waist circumference (unstretched), 6 inches / 15 cm rise. Booties approximately 3.5 inches / 9 cm sole length. The finished set fits newborn through three months and makes an ideal photo prop or baby shower gift. This pattern is written for newborn to 3-month size only.
Listed by the pattern's own author, in their words.
Key to this pattern, 19 short forms
This technique creates a stretchy, ribbed texture that mimics knitted ribbing. The piece is worked sideways and then seamed or attached to the main body.
Chain the required number of stitches plus 1 for the turning chain.
Foundation Sc in second ch from hook and in each ch across. Turn. All subsequent rows: Ch 1, sc in BLO of each st across. Turn.
Foundation ch: With Color B, ch 9.
Sc in second ch from hook and in each ch across. Turn. (8 sc)
through 56: Ch 1, sc in BLO of each st across. Turn. (8 sc each row) After Row 56, do not fasten off. You will have a long ribbed strip approximately 13 inches / 33 cm long.Seam the brim: Fold the strip so the short ends meet. Sl st through both layers of the corresponding stitches to join into a ring. Fasten off, weave in ends.
Checkpoint: The joined brim ring should measure approximately 13 inches / 33 cm in circumference and 1.75 inches / 4.5 cm wide.
With Color A, join yarn to any stitch along one long edge of the brim ring (the top edge). Work into the row-end edge of the brim.
Sc evenly around the top edge of the brim, working 1 sc per row end. (56 sc) Place marker in first stitch and work in a continuous spiral from here.
through 20: Sc in each st around. (56 sc) Checkpoint: The hat body should now measure approximately 4 inches / 10 cm tall from the top of the brim. You should have 56 stitches in the round.Begin crown shaping:
(Sc in next 5 sts, dec) rep 8 times. (48 sc)
Sc in each st around. (48 sc)
(Sc in next 4 sts, dec) rep 8 times. (40 sc)
Sc in each st around. (40 sc)
(Sc in next 3 sts, dec) rep 8 times. (32 sc)
Sc in each st around. (32 sc)
(Sc in next 2 sts, dec) rep 8 times. (24 sc)
(Sc in next st, dec) rep 8 times. (16 sc)
(Dec) rep 8 times. (8 sc) Fasten off, leaving a 12-inch tail. Thread the tail onto the yarn needle and weave through the remaining 8 front loops. Pull snug to close the top. Weave in end securely on the inside.
Checkpoint: The completed hat body should measure approximately 5.5 inches / 14 cm from the bottom edge of the brim to the crown tip.
Each ear is an elongated rectangle with a rounded top, worked flat then seamed.
With Color A, ch 5.
Sc in second ch from hook and in next 3 chs. Turn. (4 sc)
through 18: Ch 1, sc in each st across. Turn. (4 sc each row)
Shape top Ch 1, dec, dec. Turn. (2 sc)
Ch 1, dec. (1 sc) Fasten off, leaving a 10-inch tail. Make a second ear identical to the first.Joining ears: Fold each ear in half lengthwise (wrong sides together) so it is 2 stitches wide. Using the tail or a separate strand of Color A, whip stitch the long side edges together to create a narrow tube that is closed at the top.Attaching ears: Position both ears on the top of the hat crown, centered and spaced approximately 2 inches / 5 cm apart. The ears should stand or flop naturally. Using Color A yarn and a yarn needle, stitch the base of each ear firmly to the crown stitches over approximately 4 stitches wide at the base. Weave in all ends.
The finished ears measure approximately 4 inches / 10 cm in height.
Foundation ch: With Color B, ch 31.
(RS): Sc in second ch from hook and in each ch across. Turn. (30 sc)
through 10: Ch 1, sc in each st across. Turn. (30 sc) Checkpoint: The back panel should measure approximately 2 inches / 5 cm tall and 7 inches / 18 cm wide after Row 10.Begin leg shaping (decrease on both ends to form the crotch):
Ch 1, dec, sc in each st across to last 2 sts, dec. Turn. (28 sc)
Ch 1, dec, sc in each st across to last 2 sts, dec. Turn. (26 sc)
Ch 1, dec, sc in each st across to last 2 sts, dec. Turn. (24 sc)
Ch 1, dec, sc in each st across to last 2 sts, dec. Turn. (22 sc)
Ch 1, dec, sc in each st across to last 2 sts, dec. Turn. (20 sc)
through 18: Ch 1, sc in each st across. Turn. (20 sc) Checkpoint: The crotch section should measure approximately 1.5 inches / 4 cm wide at the narrowest point.Begin front rise (increase on both ends to shape the front):
Ch 1, inc, sc in each st across to last st, inc. Turn. (22 sc)
Ch 1, inc, sc in each st across to last st, inc. Turn. (24 sc)
Ch 1, inc, sc in each st across to last st, inc. Turn. (26 sc)
Ch 1, inc, sc in each st across to last st, inc. Turn. (28 sc)
Ch 1, inc, sc in each st across to last st, inc. Turn. (30 sc)
through 29: Ch 1, sc in each st across. Turn. (30 sc) Do not fasten off.
Foundation ch: With Color B, ch 7.
Sc in second ch from hook and in each ch across. Turn. (6 sc)
through 60: Ch 1, sc in BLO of each st across. Turn. (6 sc each row) After Row 60, the waistband strip should measure approximately 14 inches / 35.5 cm long and 1.25 inches / 3 cm wide.Fasten off, leaving a 20-inch tail for seaming.
Seam the waistband: Align the long edge of the waistband with the top edge of the back panel (Row 1 edge) and the top edge of the front panel (Row 29 through 30 region, on the non-flap side). Using the long tail and a yarn needle, whip stitch the waistband to the top edges of the diaper cover body. The waistband short ends meet at the center front, on either side of the flap. Seam the short ends of the waistband to the top corners of the front panel.
Work in a continuous spiral. Place marker in first stitch of each round.
Foundation: With Color A, make a magic ring (adjustable loop).
6 sc in magic ring. Pull tail to close ring. (6 sc)
Inc in each st around. (12 sc)
(Sc in next st, inc) rep 6 times. (18 sc)
(Sc in next 2 sts, inc) rep 6 times. (24 sc) Checkpoint: After Rnd 4, the oval sole should measure approximately 3.5 inches / 9 cm in length and 2 inches / 5 cm in width.
through 7: Sc in each st around. (24 sc)
(BLO only): Working in BLO only: sc in each st around. (24 sc) This creates the fold ridge at the toe.
Toe decrease round Sc in first 8 sts, (dec) 4 times, sc in rem 8 sts. (20 sc)
Sc in first 7 sts, dec, dec, dec, sc in rem 7 sts. (17 sc)
through 16: Sc in each st around. (17 sc) Checkpoint: The foot of the bootie should measure approximately 3.5 inches / 9 cm in total length.
At the end of Rnd 16, join Color B with a sl st to the first stitch of the round.
With Color B, ch 1 (does not count as a st), sc in each st around. Sl st to first sc to join. (17 sc)
From this point the cuff is worked in joined rounds with a turning chain so the cuff can be folded down and show the right side on both faces.
through 23: Ch 1, turn. Sc in each st around. Sl st to first sc to join. (17 sc)Fasten off. Weave in all ends.Fold the Color B cuff down over the Color A ankle section so the right side of the cuff faces outward. The cuff should be approximately 0.75 to 1 inch / 2 to 2.5 cm deep when folded.
Checkpoint: Each completed bootie should measure approximately 3.5 inches / 9 cm from heel to toe and approximately 2.75 inches / 7 cm tall from sole to top of cuff.
Continue working on the 30 stitches from Row 29.
through 32: Ch 1, sc in each st across. Turn. (30 sc)
Buttonhole row Ch 1, sc in first 14 sts, ch 2, skip 2 sts, sc in rem 14 sts. Turn. (28 sc + 2 ch sp = 30 sts total)
Ch 1, sc in first 14 sts, 2 sc in ch-2 sp, sc in rem 14 sts. Turn. (30 sc)
Ch 1, sc in each st across. Turn. (30 sc) Fasten off, weave in ends. Checkpoint: The full diaper cover piece should measure approximately 6 inches / 15 cm in total rise when laid flat.
With Color B yarn and a yarn needle, align the side edges of the back panel and front panel. The leg opening shaping should match symmetrically. Whip stitch the side seams from the waistband down approximately 2 inches / 5 cm on each side, leaving the remaining leg opening free.
Button: Sew the button to the center of the front flap approximately 0.5 inches / 1.25 cm below the top edge of the flap, centered over the buttonhole. The flap folds down over the front body.
Note: the button on the diaper cover is decorative. If the diaper cover will be used functionally and not just as a photo prop, sew the button on top of the buttonhole securely and use a snap underneath.
| Rounds | 49 |
|---|---|
| Parts | 10 |
| Level | Intermediate |
| Time | 4-6 hours |
| Hook | 4.00 mm |
| Yarn | Worsted |
The hat brim is worked sideways as a 56-row ribbed rectangle, then its row-end edge (not a chain edge) becomes the 56 stitches picked up for Rnd 1 of the hat body, which is what gives the brim its stretch while the body stays a firm spiral.
The diaper cover is built in two pieces, a back panel and a separate front flap, joined afterward by side seams, which is why the waistband is worked sideways on its own rather than as part of the panel.
| Hat (brim, body, and two ears) | about 2.5 to 3 hours because the brim alone is 56 rows before the 20-round body and crown shaping begin |
|---|---|
| Diaper cover (back panel, front flap, waistband, seams) | about 2 to 2.5 hours because the back panel runs 14 rounds and the two side seams need careful alignment |
| Booties (pair, sole through cuff) | about 1.5 to 2 hours because each bootie repeats 9 rounds of toe shaping plus a 2-round cuff, doubled for the pair |
| Total for the complete set | plan for approximately 6 to 9 hours total, perfect for a weekend project or a few evenings of stitching while watching your favorite show |
These answers came from whoever first published the pattern, kept word for word.