Skip to the patterns
Crochet·Rituals
Menu

Bags 19 Laid out for paper No account, no download

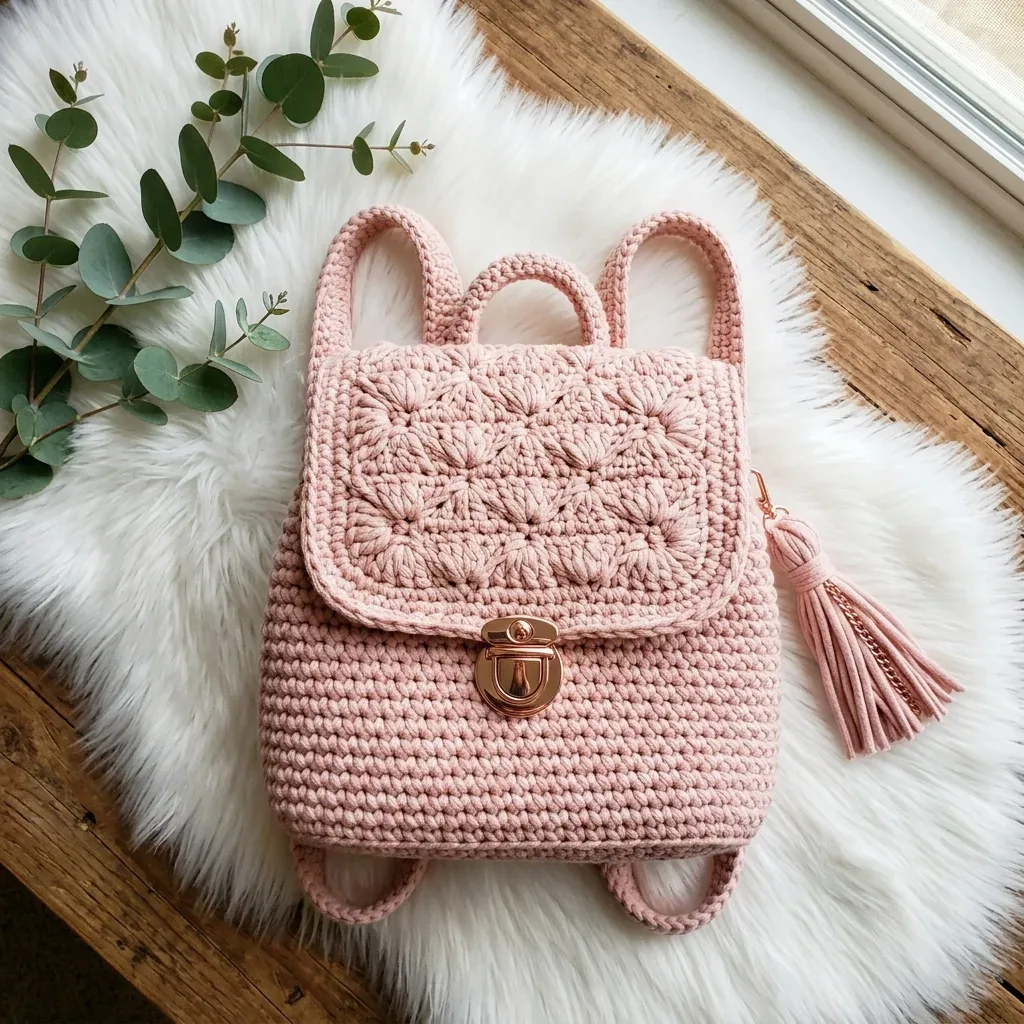
Blush pink crochet mini backpack with shell-stitch flap

Mini backpack pattern: oval sc base, 4mm hook, shell-stitch flap, 16x18 gauge. Finished size 8x9x3 inches.

Jump to the rounds Pin it
Blush pink crochet mini backpack with shell-stitch flap
Bags · Worsted
Skill
Intermediate
Time
8-12 hours
Yarn weight
Worsted
Hook
4.0 mm
Rounds
19

Intermediate

What the pattern's own author called it. Nothing here is graded again.

Worsted

What the sample was worked in. Any weight works; the size moves with it.

19

Each one is typed out whole and gets its own line.

This mini backpack builds from an oval base worked in continuous rounds of single crochet, climbing into a body sized to hold a phone, wallet, and keys at roughly 8 inches wide, 9 inches tall, and 3 inches deep. The back panel gives rise to a flat, turned-row flap where shell stitches take over from plain sc, adding the piece's one decorative flourish. Two long straps and a short top handle are worked separately in sc and sewn on at the end. Have about 250 to 300 yards of worsted cotton, a 4.0 mm hook, 4 to 6 stitch markers, and a lock clasp on hand before starting.

Common mistakes and their fixes

Losing the round marker on the base
Because the base and body are worked without a joining stitch, a dropped marker makes it easy to drift a round early or late. Move the marker up into the first stitch of every new round the moment you complete it.
Miscounting skips in the shell rows
Each shell depends on skipping exactly 2 stitches on either side of the 5-dc group; count the skipped stitches out loud or mark them before placing the 5 dc. A one-stitch error on Row 3 throws off every shell row after it.
Straps worked to inconsistent length
85 rows worked flat, strap length is easy to misjudge by eye alone. Measure against the 19-inch target periodically rather than waiting until the last row, and err shorter since straps stretch with wear.

The materials list

Yarn

  1. Approximately 250 to 300 yards of worsted weight (#4) cotton or cotton blend yarn in your chosen color
  2. The sample uses a soft dusty pink shade that photographs beautifully

Hook

  1. 4.0 mm (US G-6) crochet hook
  2. You may need to adjust your hook size to match gauge

Notions

  1. Yarn needle for weaving in ends
  2. Scissors
  3. Stitch markers (4 to 6 recommended)
  4. One push lock closure or twist lock clasp (approximately 25mm)

Optional

  1. tassel or tassel-making supplies

Optional

  1. lining fabric if desired

Gauge

  1. 16 sc × 18 rows = 4 inches (10 cm) in single crochet

Listed by the pattern's own author, in their words.

Key to this pattern, 9 short forms

The Base

The backpack starts with an oval base that creates the structured bottom.

Foundation: Ch 21.

Round 1

Sc in 2nd ch from hook and in each of the next 18 ch, 3 sc in last ch (this creates the turn at the end). Working along the opposite side of the foundation chain, sc in each of the next 18 ch, 2 sc in the last ch. Do not join. Place a stitch marker in the first sc to mark the beginning of your rounds. (42 sc)

Round 2

2 sc in the first st, sc in the next 18 sts, 2 sc in each of the next 3 sts, sc in the next 18 sts, 2 sc in each of the last 2 sts. (48 sc)

Round 3

Sc in the first st, 2 sc in the next st, sc in the next 18 sts, [sc in the next st, 2 sc in the next st] 3 times, sc in the next 18 sts, [sc in the next st, 2 sc in the next st] twice. (54 sc)

Round 4

Sc in the first 2 sts, 2 sc in the next st, sc in the next 18 sts, [sc in the next 2 sts, 2 sc in the next st] 3 times, sc in the next 18 sts, [sc in the next 2 sts, 2 sc in the next st] twice. (60 sc)Your base should now measure approximately 3 inches wide by 7 inches long. If it is significantly different, check your gauge and adjust your hook size if needed.

The Flap

The flap is where the magic happens! That beautiful shell texture gives your backpack its charming character. The flap is worked flat in turned rows.

Round 1

With the back of the backpack facing you, join yarn to the 8th stitch from the right side seam along the back top edge. Ch 1, sc in the same st and in each of the next 23 sts. Turn. (24 sc)

Round 2

Ch 1, sc in each st across. Turn. (24 sc)

Round 3

Ch 1, sc in the first st, sk 2 sts, 5 dc in the next st (shell made), sk 2 sts, [sc in the next st, sk 2 sts, 5 dc in the next st, sk 2 sts] 3 times, sc in the last st. Turn. (4 shells + 5 sc)

Round 4

Ch 3 (counts as first dc), 2 dc in the first st, sc in the center dc of the next shell, [5 dc in the next sc, sc in the center dc of the next shell] 3 times, 3 dc in the last st. Turn.

Round 5

Ch 1, sc in the first st, 5 dc in the next sc, [sc in the center dc of the next shell, 5 dc in the next sc] 3 times, sc in the last st. Turn.Rows 6 through 11: Repeat Rows 4 and 5 three more times.

Round 12

Ch 1, sc evenly around the entire flap edge, working 3 sc in each corner to keep it flat. Fasten off and weave in ends.

The flap should measure approximately 4 inches tall and 6 inches wide.

The Straps (Make 2)

Each strap is worked flat and then attached to the bag.

Foundation: Ch 7.

Round 1

Sc in the 2nd ch from hook and in each ch across. Turn. (6 sc)

Round 2

through 85: Ch 1, sc in each st across. Turn. (6 sc) Your strap should measure approximately 19 inches long and 1.5 inches wide. You can adjust the length by adding or removing rows. Remember that the straps will stretch slightly with use, so err on the shorter side if you are between sizes.Fasten off, leaving a long tail for sewing.

The Top Handle

This small loop at the top lets you hang your backpack or grab it quickly.

Foundation: Ch 6.

Round 1

Sc in the 2nd ch from hook and in each ch across. Turn. (5 sc)

Round 2

through 20: Ch 1, sc in each st across. Turn. (5 sc) Fasten off, leaving a long tail.

The Body

Now we build up the sides of the backpack. This section is wonderfully meditative, just round after round of single crochet.

Round 5

Working in the back loops only for this round (this creates a nice defined edge at the base), sc in each st around. (60 sc)

Round 6

through 35: Sc in each st around. (60 sc) That is 30 rounds of single crochet for the body. The body should measure approximately 6.5 to 7 inches tall from the base edge.

Tip: If you lose track of your rounds, count the ridges on the outside of your work. Each ridge represents one round.

Shaping the Top Opening

Round 36

Sc in each of the first 15 sts, ch 5, sk 5 sts (this creates the first strap opening), sc in the next 20 sts, ch 5, sk 5 sts (second strap opening), sc in the remaining 15 sts. (50 sc + 2 ch-5 spaces)

Round 37

Sc in each sc and in each ch around. (60 sc)

Round 38

and 39: Sc in each st around. (60 sc) Sl st in the next st. Fasten off and weave in this end.

Assembly, in order

Step 1Attaching the Straps: 1. Thread the strap tail onto your yarn needle. 2. Position the bottom ends of both straps at the base of the bag, approximately 1.5 inches apart on the back panel. 3. Whip stitch each strap end securely in place, going over the join several times for strength. 4. Thread the top ends of the straps through the ch-5 openings you created earlier. 5. Fold the top end of each strap down about 1 inch and stitch it to itself to create an adjustable loop. Alternatively, you can use small D-rings or slider hardware for easier adjustment.
Step 2Attaching the Top Handle: 1. Fold the handle piece in half to form a loop. 2. Position it at the center top of the back panel, just below the flap attachment point. 3. Stitch both ends securely to the inside of the bag.
Step 3Installing the Closure: 1. Position the push lock clasp on the center of the flap, about 1 inch from the bottom edge. 2. Mark where the prongs will go through. 3. Carefully create small holes for the prongs using your hook or a small pointed tool. 4. Push the prongs through and fold them flat on the inside of the flap. You can back this with a small piece of felt or fabric for a cleaner finish. 5. Position the catch plate on the front of the bag body, aligning it with the clasp. 6. Install as directed by your hardware.
Step 4Adding the Optional Tassel: A tassel adds such a sweet finishing touch! To make one: 1. Wrap yarn around a 4-inch piece of cardboard about 30 times. 2. Thread a 12-inch piece of yarn under the wraps at one end and tie tightly. 3. Cut the wraps at the opposite end. 4. Wrap another piece of yarn around the bundle about half an inch from the top and tie securely. 5. Trim the ends evenly. 6. Attach to the zipper pull, strap, or flap corner with a small chain or jump ring.

Check these before you start

  • The body is worked in continuous rounds with no join, so the stitch marker carried at the start of Rnd 1 of the base is the only thing telling you where one round ends and the next begins; move it up every round without fail.
  • Gauge matters more here than in a typical amigurumi because the finished width and depth depend on 16 sc by 18 rows holding steady; a looser or tighter hook will change the 8 by 9 by 3 inch result.
  • The shell rows on the flap rely on precise skip counts (sk 2 sts between shells), so miscounting by even one stitch will shift the whole shell pattern out of alignment for every row that follows.

On one line

Rounds19
Parts6
LevelIntermediate
Time8-12 hours
Hook4.0 mm
YarnWorsted

Set-up

  • Work up a 4-inch sc swatch and check it against 16 sc by 18 rows before committing to the body; adjust hook size if your count runs high or low.
  • Confirm you have 250 to 300 yards of worsted cotton on one spool or dye lot, since the base, body, flap, straps, and handle all draw from the same ball.
  • Set out 4 to 6 stitch markers before Rnd 1 of the base; you will need one immediately to mark the start of continuous rounds and others to track increase points.
  • Read through Row 3 of the flap before you reach it so the shell placement (sk 2, 5 dc, sk 2) is familiar before you are mid-row counting stitches.

Finishing

  1. Weave in all ends from the base, body, flap, straps, and handle separately before assembly, since the straps alone run 85 rows and leave long tails that need securing.
  2. Sew the lining, if using, pressing the top edge under by half an inch before slipping it inside the bag with wrong sides together.
  3. Attach the straps with whip stitch at the base, thread the top ends through the ch-5 openings, fold each down about 1 inch to form an adjustable loop, then attach the clasp and tassel last.

Construction

The oval base increases happen only at the two short ends (3 sc in the last ch, then paired and then single increases around those same points in Rnds 2 and 3), which is what turns a straight chain of 21 into a rounded footprint rather than a flat oval strip.

Time per section

The Baseabout 30-45 minutes because the 4 rounds are short but the increase placement at each end needs careful counting
The Flapabout 1.5-2 hours because the 6 rows alternate between plain sc and shell stitch, and each shell row depends on an exact skip count
The Straps (Make 2)about 2-3 hours total because each strap runs through 85 rows of plain sc, worked flat and then sewn in place

Common questions

Can the backpack be made without the fabric lining?
Yes, the lining is optional and only affects polish and shape retention, not the crochet structure itself. The bag holds its shape well on its own since the body is worked in dense single crochet.
What happens if gauge comes out looser than 16 sc by 18 rows?
A looser gauge will produce a bag larger than the stated 8 by 9 by 3 inches and may use more than the 250 to 300 yards listed. Swatch first and size down the hook if your stitch count runs low.
Why does the flap require joining yarn partway along the top edge instead of continuing from the body?
The flap starts 8 stitches in from the right side seam along the back top edge because it is worked flat in turned rows, a different structure from the continuous rounds of the body. Joining at that specific point positions the flap correctly over the opening before the shell rows begin.

These answers came from whoever first published the pattern, kept word for word.