
Intermediate
What the pattern's own author called it. Nothing here is graded again.
 Crochet·Rituals
Bags & Totes 13 Laid out for paper No account, no download
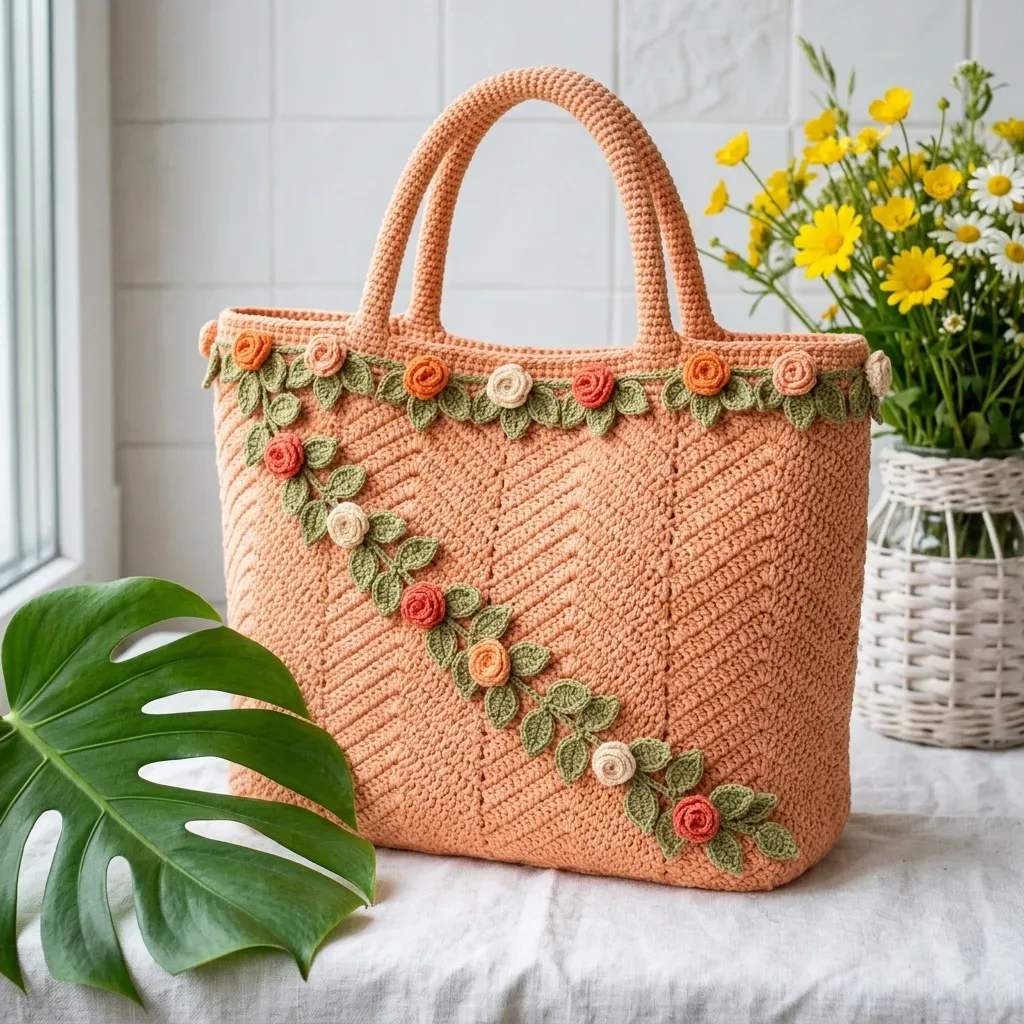
Flat 61-sc base, G-6 herringbone sides, E-4 rolled roses and vine appliqué trim.
Crochet Rituals · retyped from the source and laid out for print · added 20 Oct 2026
What the pattern's own author called it. Nothing here is graded again.

What the sample was worked in. Any weight works; the size moves with it.

Each one is typed out whole and gets its own line.
This tote starts flat: a rectangular base of 61 single crochet worked over 18 rows gives the bag a proper bottom that sits upright. From there, stitches are picked up around the entire perimeter and worked upward in continuous rounds using a herringbone half double crochet that produces a diagonal chevron texture across the body without changing the stitch count. Two handles are worked flat, folded into tubes, and sewn on, while rolled roses and leaves made on a smaller E-4 hook form the top-edge garland and vine trim. Have both hook sizes, five colors of worsted cotton, and stitch markers ready before starting.
Listed by the pattern's own author, in their words.
Key to this pattern, 17 short forms
Herringbone Single Crochet (HBsc) This stitch creates the diagonal texture across the bag body. Here is how to work it:
Step by step: Step 1: Insert your hook into the designated stitch. Step 2: Yarn over and draw up a loop. You now have 2 loops on your hook. Step 3: Instead of completing a normal single crochet, draw through only the first loop on your hook (the one closest to the tip). You still have 2 loops. Step 4: Yarn over and draw through both remaining loops to complete the stitch.
The offset pull-through creates a diagonal slant. When you work this stitch continuously in rounds, you get that beautiful chevron texture.
With your rose color and E-4 hook, ch 16. Sc in 2nd ch from hook, hdc in next ch, (2 dc in next ch) 6 times, (2 hdc in next ch) 3 times, sc in last 3 ch. (21 sts) Fasten off, leaving a 10-inch tail.Step by step: Starting from the sc end, roll the strip tightly into a coil. Thread the tail onto a yarn needle and stitch through the base of the coil multiple times to secure the rolled shape. Keep the tail attached to sew the rose to the bag later.
With CA and E-4 hook, ch 10. Sl st in 2nd ch from hook, sc in next ch, hdc in next ch, dc in next 2 ch, hdc in next ch, sc in next ch, sl st in next ch. (8 sts for first leaf) Ch 10 again from the same base point. Repeat Step 2 for a second leaf. Ch 8 from the same base. Sl st in 2nd ch from hook, sc in next ch, hdc in next 2 ch, sc in next ch, sl st in last ch. (6 sts for smaller third leaf) Fasten off leaving a 10-inch tail for attachment.
With CA and E-4 hook, ch 9. Sl st in 2nd ch from hook, sc in next ch, hdc in next ch, dc in next 2 ch, hdc in next ch, sc in next ch, sl st in last ch. (8 sts) Ch 1, do not turn. Working back along the opposite side of the foundation chain: sl st in first ch, sc in next, hdc in next, dc in next 2, hdc in next, sc in next, sl st in last. Fasten off leaving a tail for attachment.
The base is rectangular and worked flat in rows.
Foundation: With MC and G-6 hook, ch 62.
(RS): Sc in 2nd ch from hook and in each ch across. Ch 1, turn. (61 sc)
Sc in each st across. Ch 1, turn. (61 sc) After Row 18, do not ch 1 and do not turn.
Your base should measure approximately 14 inches wide x 4.5 inches deep.
Now you will pick up stitches around the entire perimeter of the base and work upward in continuous rounds.
With RS facing and continuing from the last stitch of Row 18: Work 1 sc in the end of each row along the right short side: 18 sc. Work 1 sc in each of the 61 foundation chain stitches along the bottom: 61 sc. Work 1 sc in the end of each row along the left short side: 18 sc. Work 1 sc in each of the 61 sts across Row 18: 61 sc. Place marker, sl st to join. (158 sc total)
Ch 1 (does not count as a st). HBsc in each st around. Pm at beginning of round. (158 HBsc)
HBsc in each st around. (158 HBsc)After Round 30, your body wall height should be approximately 6 inches. Total bag height including base should be approximately 11 inches.
Top Edge Preparation Sc in each st around. Sl st to join. (158 sc) Fasten off, leaving a 6-inch tail. Weave in the tail.
Foundation: With MC and G-6 hook, ch 62.
Sc in 2nd ch from hook and in each ch across. Ch 1, turn. (61 sc)
Sc in BLO of each st across. Ch 1, turn (except after Row 4). (61 sc) After Row 4, do not turn. Work around the entire piece: Work 3 sc in the last st (corner), sc in the end of each of the 3 rows along the short edge (3 sc), 3 sc in corner st at the foundation chain end, sc back along the opposite side of the foundation chain for 61 sc, 3 sc in corner, sc in the 3 row ends along the other short edge, 3 sc in corner, sl st to join.Fold the strip lengthwise so the two long edges meet. Sl st through both layers along the entire length to create a rounded tube. Fasten off.Attachment: Position each handle centered on the front and back panels. The inner edges should be approximately 3 inches apart. Sew handle ends securely with whipstitch, reinforced with cross-stitches for durability.
Join CA to any st of the top edge with sl st. Ch 1, sc in each st around. Sl st to join. (158 sc)
Leaf Tab Row Ch 1. Working into Garland Row 1 sts: Ch 5, sl st in 2nd ch from hook, sc in next ch, hdc in next ch, dc in last ch of ch-5, sl st in same base sc, sl st in next sc. Repeat around. Sl st to join. Fasten off CA. (79 leaf tabs around)Rose Placement: Make the following roses: 7 roses in CB (Coral)
5 roses in CC (Cream)
6 roses in CD (Burnt Orange)
Space these 18 roses evenly around the top edge, approximately every 8 to 9 stitches. Alternate colors so no two adjacent roses match.
Make 9 Three-Leaf Clusters in CA and sew them between rose groupings with leaves extending slightly downward.
The diagonal vine runs from the upper left of the front panel to the lower right.
Components needed: 9 Single Leaves in CA 3 roses in CB (Coral)
2 roses in CC (Cream)
2 roses in CD (Burnt Orange)
Mark your diagonal path with pins before sewing. Start approximately 1 inch from the top edge and 1 inch from the left side seam. End approximately 1 inch from the bottom edge and 1 inch from the right side seam.
Space leaves and roses at approximately 2 to 2.5 inch intervals along the diagonal. Position 2 leaves flanking each rose, with solo leaves between roses.
Sew each piece through both layers of the bag body for durability.
Roses needed: Top edge garland: 18 roses (7 CB, 5 CC, 6 CD)
Diagonal vine: 7 roses (3 CB, 2 CC, 2 CD)
Total: 25 roses Leaves needed: Three-Leaf Clusters for garland: 9 clusters Single Leaves for diagonal vine: 9 leaves
| Rounds | 13 |
|---|---|
| Parts | 7 |
| Level | Intermediate |
| Time | 6-8 hours |
| Hook | 4.0 mm |
| Yarn | Worsted |
The base is worked flat in 18 rows of 61 sc rather than in the round because a flat rectangle gives the bag a true bottom edge to pick up stitches from, rather than a rounded shape that would roll.
The Body Sides Setup Round picks up stitches at a fixed ratio around the base perimeter: 18 sc along each short row-end side and 61 sc along each long side. This matched count is what keeps the walls rising straight instead of pulling the corners out of square.
| Base (Section 1) | about 1 to 1.5 hours because 18 rows of 61 sc each is steady, repetitive single crochet. |
|---|---|
| Body Sides in herringbone (Section 2) | about 2 to 3 hours because continuous rounds in herringbone stitch demand close attention to the offset pull-through to keep the diagonal lines even. |
| Handles, roses, leaves, and trim (Sections 3 to 5) | about 2 to 3 hours because rolling and securing each coil tightly, then placing the garland and vine appliqué, is fiddly, detailed work. |
These answers came from whoever first published the pattern, kept word for word.