
Intermediate
What the pattern's own author called it. Nothing here is graded again.
 Crochet·Rituals
Baby & Kids 23 Laid out for paper No account, no download
Two triangular shell-stitch panels seamed at the shoulders; 11 rounds of shells, I-9/5.5mm hook, worsted weight yarn.
Crochet Rituals · retyped from the source and laid out for print · added 2 Oct 2026
What the pattern's own author called it. Nothing here is graded again.

What the sample was worked in. Any weight works; the size moves with it.

Each one is typed out whole and gets its own line.
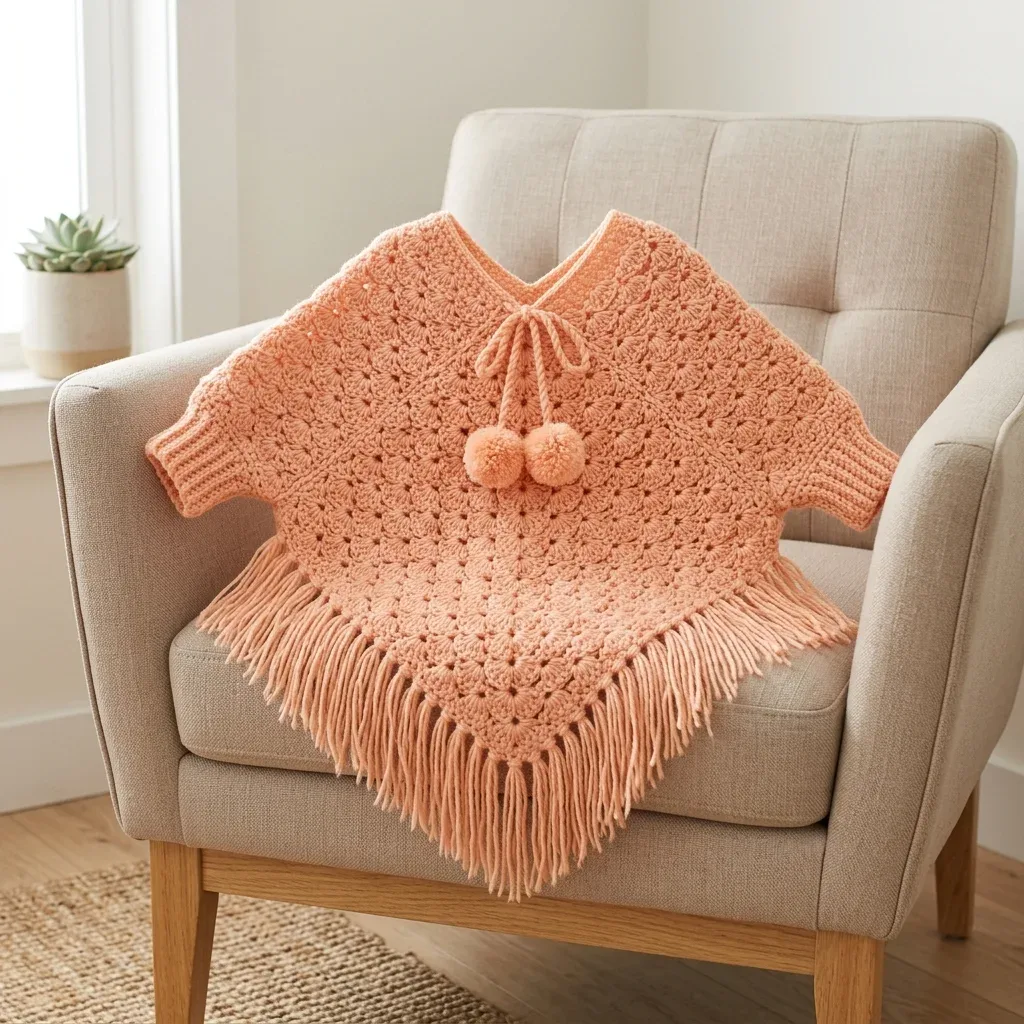
This baby poncho is built from two identical triangular panels, each starting narrow at the neckline and widening through six rows of shoulder shaping before eleven rounds of shell stitch take over the body. Seam the panels at the shoulders, then work ribbed cuffs into each sleeve opening, a neckline edging with a drawstring channel, two small pompoms, and fringe along the entire hem. Before starting, have worsted weight yarn (300 to 350 yards), an I-9/5.5mm hook, stitch markers, and a pompom maker on hand. This pattern is rated intermediate and the written instructions are for the 3 to 6 month size, with notes for adjusting to newborn-3 months or 6-12 months.
Listed by the pattern's own author, in their words.
Key to this pattern, 19 short forms
This solid double crochet section creates the shoulder area and will be partially seamed.
(RS): Ch 5. Dc in 4th ch from hook and in last ch. Turn. (3 dc) The chain 3 at the beginning counts as your first dc.
(WS): Ch 3, turn. Dc in same st (increase made), dc in next dc, 2 dc in top of t-ch (increase made). Turn. (5 dc)
(RS): Ch 3, turn. Dc in same st (increase), dc in each dc across to last st, 2 dc in last st (increase). Turn. (7 dc)
(WS): Ch 3, turn. Dc in same st (increase), dc in each dc across to last st, 2 dc in last st (increase). Turn. (9 dc)
(RS): Ch 3, turn. Dc in same st (increase), dc in each dc across to last st, 2 dc in last st (increase). Turn. (11 dc)
(WS): Ch 3, turn. Dc in same st (increase), dc in each dc across to last st, 2 dc in last st (increase). Turn. (13 dc)Checkpoint: Your shoulder section should measure approximately 3 inches (7.5 cm) tall and approximately 4 inches (10 cm) wide. This solid dc area forms the shoulder and sleeve region.
With right side facing and working along the open end of each sleeve tube, join yarn at the seam.
Ch 1, sc evenly around the sleeve opening, placing approximately 24 sc total. Join with sl st to first sc. (24 sc)
(RS): Ch 8. Hdc in 3rd ch from hook and in each ch across. Sl st in next 2 sc of sleeve opening to anchor. Turn. (6 hdc)
(WS): Ch 2, turn. Hdc in back loop only (BLO) of each hdc across. Do not sl st. Turn. (6 hdc)
Ch 2, turn. Hdc in BLO across. Sl st in next 2 sc of sleeve opening. Turn. (6 hdc)Repeat rows 2 and 3, anchoring 2 sc of the sleeve opening every RS row, until all 24 sc have been attached (approximately 12 RS rows total). Join the short ends of the ribbing strip with a sl st or mattress stitch seam.Fasten off. Repeat for second sleeve.
With right side facing, join yarn at right shoulder seam.
Ch 1, sc evenly around the entire neckline V-shaped opening. Place approximately 2 sc per row along each slanted edge, working into row ends. At the inner point of each V, work 3 sc in the bottom corner space to keep the neckline flat. Join with sl st to first sc. Do not fasten off.
Drawstring channel Ch 3, (dc, ch 1) evenly around neckline, keeping total a multiple of 2. Join with sl st to top of beg ch-3.Drawstring: Cut a length of yarn approximately 36 inches (91 cm). Thread onto yarn needle and weave in and out through ch-1 sps of rnd 2 all the way around the neckline. Pull both ends out at the center front of the neckline V.Tie an overhand knot at each end of the drawstring to secure, then attach one pompom to each end.
Now you will transition into the beautiful shell stitch pattern. With 13 dc after row 6, you have the perfect stitch count for 2 full shell repeats per row (13 equals 6 times 2 plus 1). A shell is simply five double crochets worked into the same stitch, creating a fan-shaped cluster; these shells are separated by chain spaces and single crochets, giving the fabric its lacy, open quality.
RS, begin shell pattern Ch 1, turn. Sc in first dc. (Ch 2, sk 2 dc, shell of 5 dc in next dc, ch 2, sk 2 dc, sc in next dc) across. Last sc falls in top of t-ch. Turn. (2 shells, 3 sc)
(WS): Ch 6 (counts as dc plus ch 2, creating an edge extension increase). Turn. Sc in first sc. (Shell in next ch-2 sp, ch 2, sc in 3rd dc of shell, ch 2) across to last sc. Shell in last sc. Ch 2, dc in last sc (edge increase). Turn. (3 shells plus 2 edge dc plus 2 ch-2 sps at edges)The ch-6 at the start creates a new ch-2 edge space and dc, adding one shell position at the right edge. The dc at the end mirrors this at the left edge.
(RS): Ch 1, turn. Sc in first dc (of edge dc). Ch 2, shell in ch-2 sp at edge, ch 2, sc in 3rd dc of first shell. (Ch 2, shell in next ch-2 sp, ch 2, sc in 3rd dc of shell) across to last ch-2 sp. Ch 2, shell in last ch-2 sp, ch 2, sc in top of t-ch. Turn. (4 shells, 5 sc)
(WS): Ch 6, turn. Sc in first sc. (Shell in next ch-2 sp, ch 2, sc in 3rd dc of shell, ch 2) across to last sc. Shell in last sc. Ch 2, dc in last sc. Turn. (5 shells plus 2 edge dcs)
(RS): Ch 1, turn. Sc in first dc. Ch 2, shell in ch-2 sp, ch 2, sc in 3rd dc of first shell. (Ch 2, shell in next ch-2 sp, ch 2, sc in 3rd dc of shell) across to last ch-2 sp. Ch 2, shell in last ch-2 sp, ch 2, sc in top of t-ch. Turn. (6 shells, 7 sc)
(WS): Ch 6, turn. Sc in first sc. (Shell in next ch-2 sp, ch 2, sc in 3rd dc of shell, ch 2) across to last sc. Shell in last sc. Ch 2, dc in last sc. Turn. (7 shells plus 2 edge dcs)
(RS): Ch 1, turn. Sc in first dc. Ch 2, shell in ch-2 sp, ch 2, sc in 3rd dc of shell. (Ch 2, shell in next ch-2 sp, ch 2, sc in 3rd dc of shell) across to last ch-2 sp. Ch 2, shell in last ch-2 sp, ch 2, sc in top of t-ch. Turn. (8 shells, 9 sc)
(WS): Ch 6, turn. Sc in first sc. (Shell in next ch-2 sp, ch 2, sc in 3rd dc of shell, ch 2) across to last sc. Shell in last sc. Ch 2, dc in last sc. Turn. (9 shells plus 2 edge dcs)
(RS): Ch 1, turn. Sc in first dc. Ch 2, shell in ch-2 sp, ch 2, sc in 3rd dc of shell. (Ch 2, shell in next ch-2 sp, ch 2, sc in 3rd dc of shell) across to last ch-2 sp. Ch 2, shell in last ch-2 sp, ch 2, sc in top of t-ch. Turn. (10 shells, 11 sc)Checkpoint: After row 15, each panel should measure approximately 9 inches (23 cm) wide at the widest point and approximately 8 inches (20 cm) tall. The shell stitch pattern should be clearly visible in fans across the fabric.
WS, final body row Ch 6, turn. Sc in first sc. (Shell in next ch-2 sp, ch 2, sc in 3rd dc of shell, ch 2) across to last sc. Shell in last sc. Ch 2, dc in last sc. Turn. (11 shells plus 2 edge dcs)
RS, hem row Ch 1, turn. Sc in first dc. Ch 2, shell in ch-2 sp, ch 2, sc in 3rd dc of shell. (Ch 2, shell in next ch-2 sp, ch 2, sc in 3rd dc of shell) across to last ch-2 sp. Ch 2, shell in last ch-2 sp, ch 2, sc in top of t-ch. Turn. (12 shells, 13 sc)Fasten off. Weave in ends on this panel.
Repeat all rows 1 through 17 for the second panel. Do not fasten off the second panel if you want to continue directly to joining.
Final Checkpoint: Both panels are complete. Each should be a rough right triangle with the narrowest point at the top (neckline corner) and the widest straight edge at the bottom (hem). Each panel is approximately 9 inches (23 cm) along the hem edge and 11 inches (28 cm) along the longest slanted side edge.
| Rounds | 23 |
|---|---|
| Parts | 4 |
| Level | Intermediate |
| Time | 8-12 hours |
| Hook | 5.5 mm |
| Yarn | Worsted |
The Shoulder Section (Rows 1-6) increases one stitch at each edge of every row, from 3 dc up through 9 dc and beyond; this is what carries the panel from a narrow neckline into a widening triangle before the Body Section's shell stitches take over.
The sleeve cuff rows alternate between a plain turn and a slip stitch anchored into two sc of the sleeve opening; this joins the ribbed cuff to the tube edge as you work it, rather than requiring a separate seam afterward.
| Shoulder Section, both panels | about 1 hour, because each panel is only 6 rows of solid dc but the increases at both edges need tracking as you go |
|---|---|
| Body Section with shell stitch, both panels | about 4 to 5 hours, because 11 rounds of shell stitch repeated across two full panels make up the bulk of the project |
| Sleeve cuffs, neckline edging | about 3 to 4 hours, because of picking up stitches for the cuffs, weaving the drawstring through the chain-1 spaces, and tying fringe across the entire hem |
These answers came from whoever first published the pattern, kept word for word.