
Intermediate
What the pattern's own author called it. Nothing here is graded again.
 Crochet·Rituals
Garments 6 Laid out for paper No account, no download
One-piece Suzette stitch cardigan, worked flat from a 72-chain foundation with a 5mm hook.
Crochet Rituals · retyped from the source and laid out for print · added 28 Sep 2026

What the pattern's own author called it. Nothing here is graded again.

What the sample was worked in. Any weight works; the size moves with it.

Each one is typed out whole and gets its own line.
This cardigan starts as a single flat panel, built from one long foundation chain divided into front, side, back, side, and front sections, with corners marked as you go. Suzette stitch carries the body until a designated row splits the fabric for the armholes, after which the piece continues flat to the hem and the sleeves are picked up around each opening. Before the first stitch, have weight 3 yarn, a 5mm hook, stitch markers, a measuring tape, a darning needle, snippers, and pen and paper on hand, since the chain count and panel widths are calculated to your own neck and body measurements. The pattern is customizable, so feel free to experiment with different yarns and colors to make it your own.
Listed by the pattern's own author, in their words.
Key to this pattern, 5 short forms
Foundation Chain Chain an even number long enough to wrap comfortably around the base of your neck (e.g., 72 chains).
Front Panels: 14 stitches each Back Panel: 28 stitches Sides: 8 stitches each
(Single Crochet Row): Chain 1, single crochet into the second loop from the hook.Single crochet for Front Panel (14 stitches), Corner 1: Chain 1, single crochet into the next chain, mark the chain-1 space.Single crochet for the Side (8 stitches), Corner 2: Chain 1, single crochet into the next chain, mark the chain-1 space.Single crochet for the Back Panel (28 stitches), Corner 3: Chain 1, single crochet into the next chain, mark the chain-1 space.Single crochet for the Side (8 stitches), Corner 4: Chain 1, single crochet into the next chain, mark the chain-1 space.Single crochet for the last Front Panel (14 stitches).
Yoke Construction (Suzette Stitch)
Suzette Stitch: (Single Crochet + Double Crochet) in the same stitch, skip the next stitch.
Or until ready to split Chain 1, turn, start the row with (Single Crochet + Double Crochet) combo in the first stitch.Continue Suzette Stitch until you reach the chain-1 space marked by a stitch marker.Corner Increase: Work (Single Crochet, Chain 1, Double Crochet) into the chain-1 space.Continue Suzette Stitch until the next corner, repeating the Corner Increase process at all four corners.End the row with a Single Crochet in the last stitch.Repeat until the yoke fits comfortably from the base of your neck to just under your armpits.
Carving Out the Sleeves (Armholes)
Continue Suzette Stitch until you reach the first corner stitch marker.
Work one single crochet into the first corner's chain-1 space.
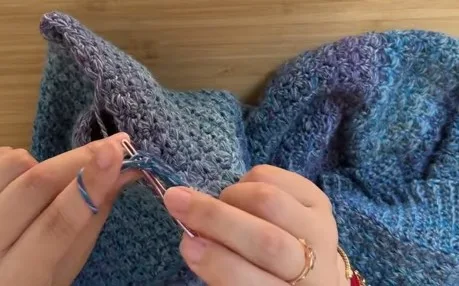
Chain the number of stitches for the armhole width (e.g., 14 chains), then work into the next stitch marker to connect the armhole.
Continue Suzette Stitch across the Back Panel and repeat for the second armhole.
Finish the row with Suzette Stitch across the Front Panel.
Body Construction
of Body: Chain 1, turn, work Suzette Stitch until the stitch right before the chain section.Single crochet into the chain-1 space, then continue Suzette Stitch across the Back Panel and Front Panel.Finish the row with a single crochet in the last stitch.
Chain 1, turn, continue Suzette Stitch across the row, skipping the first single crochet in the chain section.Repeat until the body reaches your desired length.
Sleeves
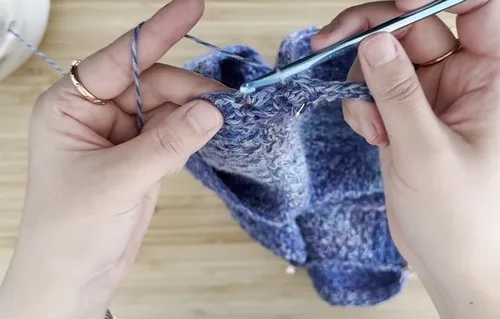
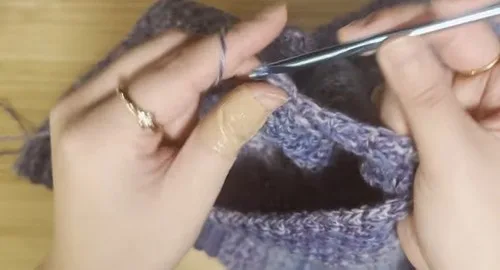
Join yarn at the bottom of the armhole, chain 1, and work (Single Crochet + Double Crochet) combo in the same stitch.Step by step: Continue Suzette Stitch around the armhole, placing combos in the tops of the chains. End the round by joining with a slip stitch and chain 1.
Subsequent Sleeve Rounds
, joining and turning after each round.Continue until the sleeve reaches the desired length.
Chain the height of the ribbing (e.g., 10 chains), and single crochet into each chain.
Slip stitch into the next stitch of the base, turn, and single crochet back up the row in the back loop only.
Repeat until the ribbing is complete, then seam the sides together.
Front Panel Ribbing (Button/Zipper): Work ribbing along the front edges and collar.
For buttonholes, chain the number of stitches you want to skip when reaching the desired button placement.
| Rounds | 6 |
|---|---|
| Parts | 4 |
| Level | Intermediate |
| Time | 4-6 hours |
| Hook | 5 mm |
| Yarn | Worsted |
The four corner markers placed in Row 1 correspond exactly to the seams between front, side, back, and side panels, so the marker positions carry through every row until the armhole row is reached.
The armhole row replaces a marked corner stitch with a chain of armhole width, which is why the body is worked flat rather than in the round up to that point, then the sleeves are added afterward by joining yarn at the base of the new opening.
| Calculations for Panels | about 45 minutes because the foundation chain and four corner markers must be measured, chained, and placed accurately before any shaping starts |
|---|---|
| Body rows through the armhole row | about 2 to 3 hours because Suzette stitch is worked flat across many rows before the armhole chains are added |
| Sleeve setup and ribbing | about 1 to 2 hours because each armhole is joined separately and the combo stitch pattern is worked around before ribbing finishes the edges |
Every one was taken by whoever published the pattern, in the order the source listed them.
These answers came from whoever first published the pattern, kept word for word.