
Beginner
What the pattern's own author called it. Nothing here is graded again.
 Crochet·Rituals
Garments 4 Laid out for paper No account, no download
A top-down tank top worked in two flat panels with alternating double crochet and mesh rows, shaped by increase rows on
Crochet Rituals · retyped from the source and laid out for print · added 8 Oct 2026

What the pattern's own author called it. Nothing here is graded again.

What the sample was worked in. Any weight works; the size moves with it.

Each one is typed out whole and gets its own line.
This tank top takes shape as two flat panels, worked from the shoulder down to the underarm, then joined at the sides and straps. Each panel alternates a solid double crochet row with an open mesh row, so the fabric builds drape without extra weight. Rows repeat until you reach your desired length to the underarm; the front panel also works increase rows to flare the sides, while the back panel repeats the same stitch pattern without shaping. Before picking up the hook, have cotton yarn, a 5mm hook, scissors, a yarn needle, and stitch markers ready, along with a chest measurement for your starting chain.
Listed by the pattern's own author, in their words.
Key to this pattern, 4 short forms
Chain (ch) an even number of stitches that span from one shoulder to the opposite side of your chest. For example, if the measurement is 44 chains (ch), ensure it's an even number for the stitch pattern to work. Add 2 additional chains (ch) as your turning chain.
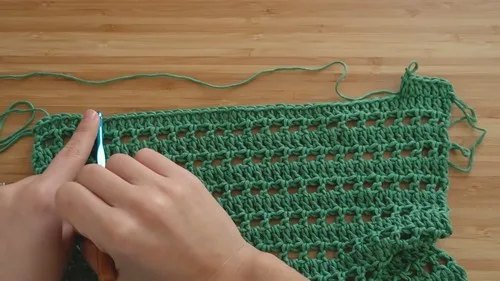
(Double Crochet Row): Turn your chain, and starting from the third ch from the hook, make a double crochet (dc) into the back bumps of the chain. Continue with dc all the way across. Turn your work, preparing for the next row.
Mesh Stitch Row Start with ch 3 (counts as dc and ch 1). Skip the first dc, dc in the next stitch, ch 1, skip 1 stitch. Repeat from * to * across, ending with a dc in the last stitch.Repeat Row 1 and Row 2 until you reach your desired length down to where your armpits would be, alternating between the solid dc row and the mesh stitch row.After establishing the basic fabric, you'll begin to make increases to accommodate the width of the back.
For each increase row: Work 2 dc in the first stitch and 2 dc in the last stitch of the row, creating a gradual flare.Alternate an increase row with a regular row of the established stitch pattern to maintain the shape of the tank top.
Replicate the front panel stitch pattern and row count but without increases for a simple fit across the back.
| Rounds | 4 |
|---|---|
| Parts | 2 |
| Level | Beginner |
| Time | 4-6 hours |
| Hook | 5 mm |
| Yarn | Worsted |
The front panel's Increase Row adds stitches at both edges and alternates with a plain repeat row, so the flare at the underarm builds gradually rather than in one jump.
Both panels are worked flat, row by row, because the two-piece construction only becomes a wearable tube once the side seams are sewn after each panel is complete.
Every one was taken by whoever published the pattern, in the order the source listed them.


These answers came from whoever first published the pattern, kept word for word.