
Intermediate
What the pattern's own author called it. Nothing here is graded again.
 Crochet·Rituals
Hats 19 Laid out for paper No account, no download
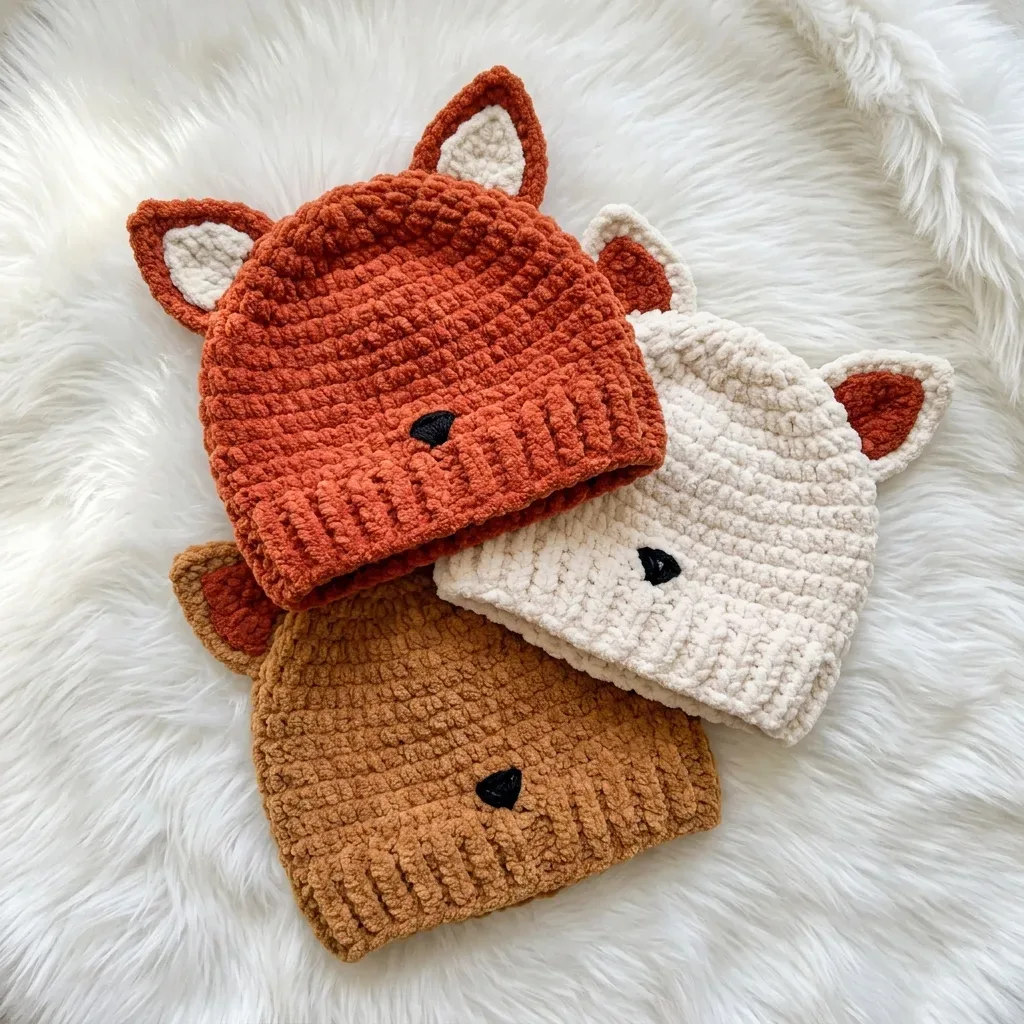
Top-down fox beanie: 6-round crown, ribbed brim, pointed ears. Hook K-10.5 for body, J-10 for brim.
Crochet Rituals · retyped from the source and laid out for print · added 21 Oct 2026
What the pattern's own author called it. Nothing here is graded again.

What the sample was worked in. Any weight works; the size moves with it.

Each one is typed out whole and gets its own line.
Top-down fox beanie: 6-round crown, ribbed brim, pointed ears. Hook K-10.5 for body, J-10 for brim.
Listed by the pattern's own author, in their words.
Key to this pattern, 12 short forms
Using MC and larger hook (K-10.5 / 6.5 mm): Start with a magic ring.
Ch 2 (does not count as a stitch throughout), work 8 hdc into magic ring, pull ring closed tight. Do not join. Pm in first stitch. (8 hdc)
Work 2 hdc in each stitch around. (16 hdc)
(2 hdc in next st, hdc in next st) 8 times. (24 hdc)Step by step: Ch 1, sc in each st across, turn. (7 sc).Ch 1, sc in each st across, turn. (7 sc) Fasten off, leaving a long tail for sewing. The liner is narrower and shorter than the outer ear, creating a visible MC border.
(2 hdc in next st, hdc in each of next 2 sts) 8 times. (32 hdc)
(2 hdc in next st, hdc in each of next 3 sts) 8 times. (40 hdc) For size 0 to 3 months only: Skip to Round 6.For size 3 to 6 months: Work one additional round: (2 hdc in next st, hdc in each of next 4 sts) 8 times. (48 hdc) Then skip the second half of Round 6 below.For size 6 to 12 months: Work two additional rounds. First extra round: (2 hdc in next st, hdc in each of next 4 sts) 8 times. (48 hdc) Second extra round: (2 hdc in next st, hdc in each of next 5 sts) 8 times. (56 hdc) Then skip Round 6 entirely.
(size 0 to 3 months only): (2 hdc in next st, hdc in each of next 4 sts) 8 times. (48 hdc)Stitch counts after all increase rounds: 0 to 3 months: 48 hdc 3 to 6 months: 48 hdc 6 to 12 months: 56 hdcCheckpoint: Lay your work flat. The crown should measure approximately 4.75 inches (12 cm) for smaller sizes or 5.5 inches (14 cm) for 6 to 12 months in diameter.
The brim is a separate flat piece. You will seam it into a tube and then attach it to the body.
Using MC and smaller hook (J-10 / 6.0 mm): Foundation chain: Ch 9 (for all sizes).
(RS): Sc in second ch from hook and each ch across, turn. (8 sc)
(WS): Ch 1, sc in blo of each st across, turn. (8 sc) Repeat Row 2 for the following total row counts: 0 to 3 months: 48 rows total3 to 6 months: 52 rows total 6 to 12 months: 56 rows total After the final row, do not fasten off.To seam the brim: Fold the brim strip with right sides together, aligning the first and last rows. Sl st or sc through both layers across the 8 stitches to seam. Fasten off and weave in ends. Turn right side out. You now have a ribbed tube.
Using MC and larger hook: Foundation chain: Ch 2.
(RS): Work 3 sc in second ch from hook, turn. (3 sc)
(WS): Ch 1, 2 sc in first st, sc in next st, 2 sc in last st, turn. (5 sc)
Ch 1, 2 sc in first st, sc in each of next 3 sts, 2 sc in last st, turn. (7 sc)
Ch 1, 2 sc in first st, sc in each of next 5 sts, 2 sc in last st, turn. (9 sc)
Ch 1, sc in each st across, turn. (9 sc)
Ch 1, sc in each st across, turn. (9 sc) Do not fasten off. Set aside and make ear liner.
Work hdc in every stitch around with no increases or decreases.
For 0 to 3 months: Work Rounds 7 through 14, 8 even rounds total. (48 hdc each round)
For 3 to 6 months: Work Rounds 7 through 15, 9 even rounds total. (48 hdc each round)
For 6 to 12 months: Work Rounds 7 through 16, 10 even rounds total. (56 hdc each round)
Checkpoint: The hat measured from magic ring to current working row should be approximately 3.5 inches (9 cm) for 0 to 3 months, 4 inches (10 cm) for 3 to 6 months, or 4.5 inches (11.5 cm) for 6 to 12 months.
Do not bind off. Set aside and continue to Section 2.
Hold the hat body with the magic ring crown at the top and the open working edge at the bottom. Hold the brim tube with the seam at the back.
With MC and larger hook, working through the top long edge of the brim, join yarn. Insert hook into one brim top edge stitch and one corresponding hat body stitch simultaneously and sl st together around. Work 48 (48, 56) sl sts total to join brim to body. Fasten off and weave in ends.
Checkpoint: The finished hat with brim should measure approximately 5.5 inches (14 cm) for 0 to 3 months, 6 inches (15.25 cm) for 3 to 6 months, or 6.5 inches (16.5 cm) for 6 to 12 months from brim bottom to crown.
Hold one outer ear piece (MC) with RS facing you. Place one liner piece (CC) on top with RS facing you, centered so that one stitch of MC shows on each side and one row of MC shows at the bottom edge.
Pin liner to outer ear. Using MC yarn and yarn needle, or using the live loop from the outer ear, sl st the two pieces together along the outer edge of the outer ear piece, working through both layers. Work up one side, across the top, and down the other side. Leave the bottom edge open for attachment.
Do not stuff. The ear should be flat and pointed at the tip. Repeat for the second ear.
Lay the finished hat flat with RS up and the brim at the bottom. Locate the center front (where the nose will go) and center back. Place the ears symmetrically, approximately 1.5 inches (3.8 cm) to the left and right of the center top, with each ear base spanning approximately 5 to 6 stitches wide.
Pin each ear in place at the crown, with the open bottom edge flush against the hat surface. Angle each ear very slightly outward, approximately 5 to 10 degrees from vertical.
Using MC yarn and yarn needle, whipstitch the bottom edge of each ear securely to the hat through both layers. Pull firmly so ears stand upright. Weave in all ends inside the hat.
Embroidered Option (Recommended):
Thread a yarn needle with black bulky yarn or 6 strands of black embroidery floss. Locate the center front of the hat, approximately 1 inch (2.5 cm) above the top of the brim ribbing.
Create a small inverted triangle shape, approximately 0.5 inch (1.3 cm) wide at the top and 0.4 inch (1 cm) tall. Fill it with satin stitches, which are parallel straight stitches placed side by side. Knot securely on the inside and weave in ends.
Crocheted Button Option:
Using black yarn and smaller hook, make a magic ring, ch 1, work 6 sc into ring, pull tight, sl st to join. (6 sc) Fasten off, leaving a long sewing tail. Sew the crocheted circle onto the hat in the same position described above.
| Rounds | 19 |
|---|---|
| Parts | 8 |
| Level | Intermediate |
| Time | 3-4 hours |
| Hook | 6.5 mm |
| Yarn | Bulky |
The Hat Body increases by exactly 8 stitches every round in the early rounds — 8, then 16, then 24 — spacing each new stitch evenly so the crown lies flat without a visible seam, since the round is worked continuously rather than joined.
The Brim is worked as a separate flat strip in back-loop-only single crochet, which builds the ribbed texture a joined round could not produce, and is seamed into a tube before being attached to the bottom edge of the Hat Body.
| Hat Body | about 45 to 60 minutes because the 6 rounds increase quickly and bulky yarn covers ground fast |
|---|---|
| Brim | about 1 to 1.5 hours because the ribbed strip runs 48 to 56 rows in single crochet before seaming |
| Ears and assembly | about 45 minutes because each of the two outer ears works up in 6 short rows, with seaming, attaching, and the nose still to go |
These answers came from whoever first published the pattern, kept word for word.