
Intermediate
What the pattern's own author called it. Nothing here is graded again.
 Crochet·Rituals
Amigurumi 46 Laid out for paper No account, no download
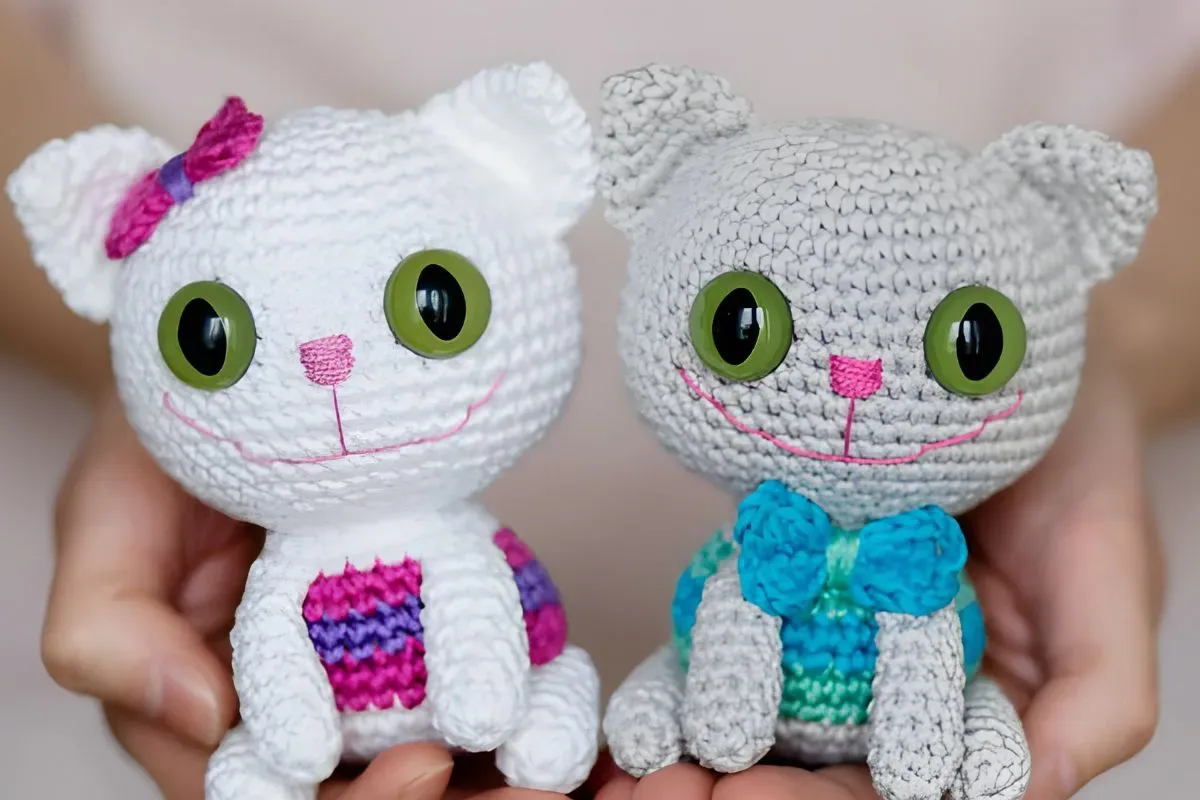
Amigurumi cat, 24-round head, 2.5 mm hook, folded ears sewn closed with connecting columns.
Crochet Rituals · retyped from the source and laid out for print · added 30 Sep 2026
What the pattern's own author called it. Nothing here is graded again.

What the sample was worked in. Any weight works; the size moves with it.

Each one is typed out whole and gets its own line.
This cat is built in seven separate pieces worked in continuous rounds, then assembled by sewing: a 24-round head knit from the top down with eyes set between rounds 11 and 12, a 14-round body that shifts through three colors as it rises from the bottom, two 6-round ears folded and closed with connecting columns, and short front legs, hind feet, and a tail. Before picking up the hook, have DROPS Muskat cotton in color A with small amounts of B and C, 18 mm safety eyes with slit pupils, polystyrene filler, pink embroidery floss, and a 2.5 mm hook on hand.
Listed by the pattern's own author, in their words.
Key to this pattern, 12 short forms
Color A.
Fold the ear and knit 8 connecting columns behind the front walls of the loop through both layers, covering the hole. Fasten the thread and leave a long end (20 cm) for sewing.
Amigurumi ring with 3 sc and slip a loop. (3)
[inc.] x3. (6)
[inc., sc] x3. (9)
[2sc, appr.] x3. (12)
[sc, appr., 2sc] x3. (15)
[appr., 4sc] x3. (18)
Color A. Knitting of the head starts from the top.
Insert safety eyes between rows 11 and 12, leaving 8 sts (7 holes) between the eyes. Securely fasten the eyes with washers inside the head.
Stuff the head after row 22.
Place the ears on the sides between rows 4 and 11 and attach them with sewing pins to determine the correct position. Sew ears to head.
Embroider the nose between the eyes with embroidery silk. Make small horizontal stitches, keeping them the same length and close together, with the thread tension even.
Start embroidering the mouth below the nose, from the middle.
Add more filler if necessary before continuing to row 23.
Fasten the thread and hide the end inside the head after row 24.
Amigurumi ring with 6 sc and slip a loop. (6)
[inc.] x6. (12)
[inc., sc] x6. (18)
[2sc, inc.] x6. (24)
[sc, inc., 2sc] x6. (30)
[inc., 4sc] x6. (36)
[2sc, inc., 3sc] x6. (42)
[4sc, inc., 2sc] x6. (48)
Row 9 – Row 17: sc in each n. (48)
[dec, 6sc] x6. (42)
[2sc, dec, 3sc] x6. (36)
[4sc, dec] x6. (30)
[sc, dec, 2sc] x6. (24)
[dec, 2sc] x6. (18)
[sc, dec] x6. (12)
[dec] x6. (6)
Color A. Knit the body from the bottom.
Change the color of the yarn to B in the last sc of row 6. To do this, insert the hook into the last loop, pull up the loop in color A, work yarn in color B over and pull it through the loops in color A.
Change color to C in the last sc of row 8.
Change color to B in the last sc of row 10.
Change color to A in the last sc of row 12. Fasten all the free ends of the threads inside the body.
Fill the body after row 14.
Fasten the thread and leave a long end (30 cm) for sewing.
Amigurumi ring with 6 sc and slip a loop. (6)
[inc.] x6. (12)
[inc., sc] x6. (18)
[2sc, inc.] x6. (24)
[sc, inc., 2sc] x6. (30)
[inc., 4sc] x6. (36)
Row 7 – Row 8: sc in each n. (36)
[dec., 4sc] x6. (30)
sc in each n. (30)
sc in each n. (30)
[2sc, dec, sc] x6. (24)
sc in each n. (24)
[dec., 6sc] x3. (21)
Color A.
Stuff the foot. Use scissors or something long and thin to stuff the foot with stuffing. Do not fill the foot to the very edge (Row 8).
Fold the top of the foot and knit 3 sc, closing the hole. Fasten the thread and leave a long end (20 cm) for sewing.
Amigurumi ring with 6 sc and slip a loop. (6)
[inc., 2sc] x2. (8)
Row 3 – Row 8: sc in each n. (8)
[dec, 2sc] x2. (6)
Color A.
Stuff the foot. Use scissors or something long and thin to stuff the foot with stuffing. Do not fill the foot to the very edge (Row 8).
Fold the top of the foot and knit 3 sc, closing the hole. Fasten the thread and leave a long end (20 cm) for sewing.
Amigurumi ring with 6 sc and slip a loop. (6)
[inc., sc] x3. (9)
Row 3 – Row 8: sc in each n. (9)
[dec, sc] x3. (6)
Color A.
Do not stuff the tail. Fold the top of the tail and knit 3 sc, closing the hole. Fasten the thread and leave a long end (20 cm) for sewing.
Amigurumi ring with 6 sc and slip a loop. (6)
Row 2 – Row 10: sc in each n. (6)
Color B. Knit on both sides of the warp chain.
Fasten the thread and hide the end inside.
(starting with ch 11, the slip knot counts as the 1st ch): dc in the 4th ch from the hook, dc, sc, conn. Art., sbn, psn, ssn, 3 ch and conn. Art. in the 1st ch (pull the first ch well by pulling the end of the thread, and continue to knit from the back of the chain), ch 3, dc, dc, sb, conn. Art., sbn, psn, ssn, 3 ch and conn. Art.
| Rounds | 46 |
|---|---|
| Parts | 7 |
| Level | Intermediate |
| Time | 4-6 hours |
| Hook | 18 mm |
| Yarn | Worsted |
Both the Head and Body open with the same increase sequence, [inc.] x6 through [sc, inc., 2sc] x6, spreading each round's increases evenly around the ring so the piece grows as a flat, even circle before the sides rise straight.
The Ears are worked flat-topped rather than closed at the last round, then folded and joined with 8 connecting columns through both layers; this seam closes the hole and gives the ear its curved, doubled edge instead of a single-layer point.
| Head | about 60-75 minutes, because 24 rounds include steady increases, an eye placement step, and stuffing partway through |
|---|---|
| Body | about 45-60 minutes, because 14 rounds carry two color changes that need careful joining to keep the color blocks even |
| Ears, legs, feet, tail, and bow | about 60-90 minutes total, because each small piece is quick to work but the ear fold-and-seam step and the sewing-on of six limbs take longer than the stitching itself |
These answers came from whoever first published the pattern, kept word for word.