
Intermediate
What the pattern's own author called it. Nothing here is graded again.
 Crochet·Rituals
Accessories 20 Laid out for paper No account, no download
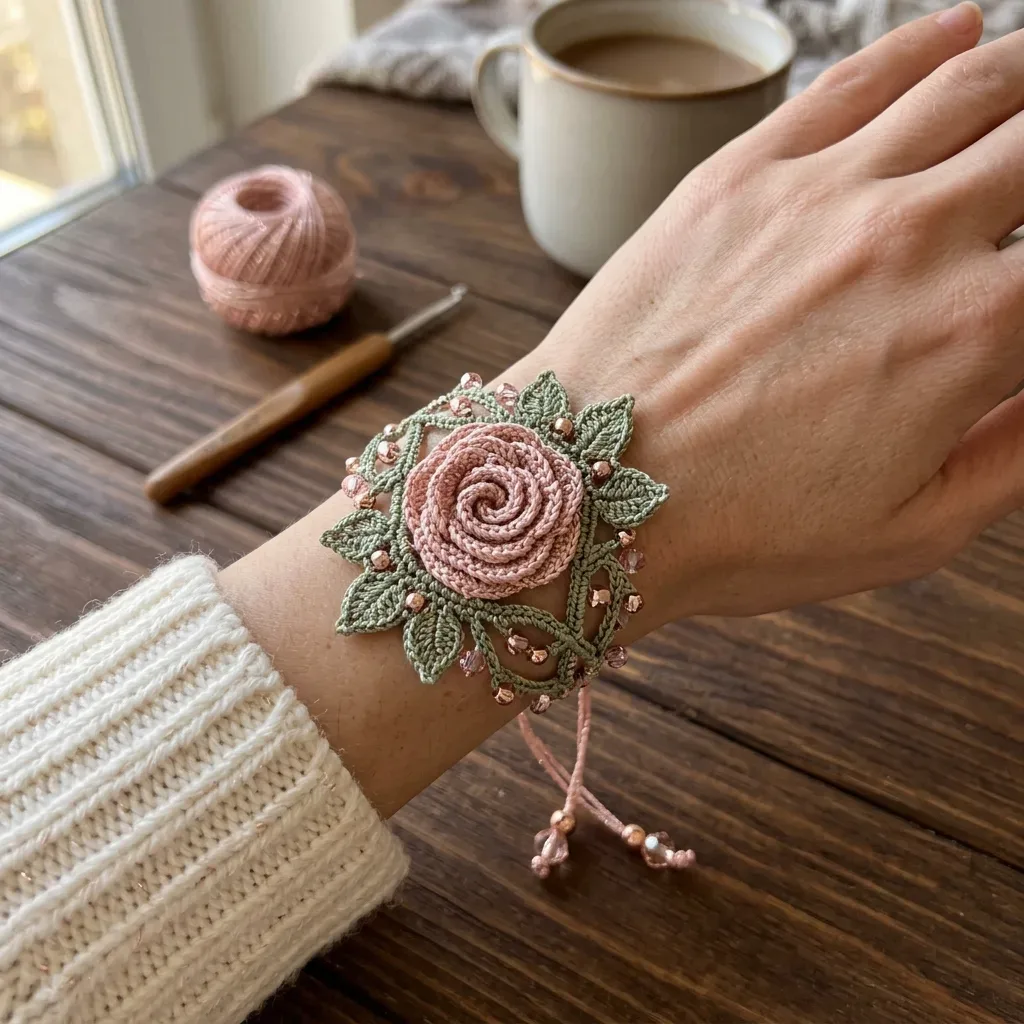
Lace diamond panel, rolled rose, 4 leaves. 12-round base, size 7 steel hook, beaded edge.
Crochet Rituals · retyped from the source and laid out for print · added 16 Oct 2026
What the pattern's own author called it. Nothing here is graded again.

What the sample was worked in. Any weight works; the size moves with it.

Each one is typed out whole and gets its own line.
This bracelet builds from four separate pieces: a sage green lace diamond worked in 12 rounds, a dusty pink rose rolled from two tapered petal strips, four long and four short leaves, and a beaded edging worked directly onto the base panel. Have sage green and dusty rose size 10 thread on hand, a size 7 steel hook, pre-strung beads on a beading needle, and a blocking board ready before the first stitch, since the panel is pinned and dried flat while the rose stays unblocked.
Listed by the pattern's own author, in their words.
Key to this pattern, 21 short forms
The base panel is a flat diamond-shaped lace grid measuring approximately 2.75 inches by 2.75 inches (7 cm by 7 cm). It is worked in sage green thread.
Foundation: With sage green thread and size 7 steel hook, ch 6, sl st in first ch to form a ring.
(RS): Ch 1, work 8 sc into ring, sl st to first sc to join. (8 sc) Checkpoint: You have a small flat ring of 8 sc. This is the center anchor for the lace panel.
Ch 5 (counts as first dc plus ch 2), skip 1 sc, dc in next sc, (ch 2, skip 1 sc, dc in next sc) 2 times, ch 2, sl st in 3rd ch of beg ch-5 to join. (4 dc, 4 ch-2 spaces)
Sl st into first ch-2 sp, ch 1, (sc, ch 3, sc) in each ch-2 sp around, sl st to first sc. (8 sc, 4 ch-3 loops)
Sl st into first ch-3 loop, ch 1, (sc, ch 5, sc) in each ch-3 loop around, sl st to first sc. (8 sc, 4 ch-5 loops)
Sl st into first ch-5 loop, ch 1, (sc, hdc, dc, hdc, sc) in each ch-5 loop around, sl st to first sc. (20 sts total, 5 sts per loop, 4 loops)
Ch 1, sc in first sc, (ch 5, skip 3 sts, sc in next sc, ch 5, sc in next sc) 3 times, ch 5, skip 3 sts, sc in next sc, ch 5, sl st to first sc. (8 sc, 8 ch-5 loops)
Sl st into first ch-5 loop, ch 1, (sc, hdc, 3 dc, hdc, sc) in each ch-5 loop around, sl st to first sc. (56 sts total, 7 sts per loop, 8 loops)
Ch 1, sc in first sc, (ch 6, skip 5 sts, sc in next sc) 7 times, ch 6, sl st to first sc. (8 sc, 8 ch-6 loops)Checkpoint: After Row 8, your lace base should be roughly circular with 8 scallop loops radiating outward. It should measure approximately 1.75 inches (4.5 cm) across at this point.
Sl st into first ch-6 loop, ch 1, (sc, hdc, dc, ch 2, dc, hdc, sc) in each ch-6 loop around, sl st to first sc. (48 sts, 8 ch-2 corner picots)Row 10 (establishing diamond corners): This row shapes the piece from circular to diamond by working longer chains at four corner positions and shorter chains at four side positions.Sl st into first ch-2 sp, ch 1.Corner position 1: (sc, ch 7, sc) in ch-2 sp.Sc in each of next 6 sts.Side position 1: (sc, ch 4, sc) in next ch-2 sp.Sc in each of next 6 sts.Corner position 2: (sc, ch 7, sc) in next ch-2 sp.Sc in each of next 6 sts.Side position 2: (sc, ch 4, sc) in next ch-2 sp.Sc in each of next 6 sts.Corner position 3: (sc, ch 7, sc) in next ch-2 sp.Sc in each of next 6 sts.Side position 3: (sc, ch 4, sc) in next ch-2 sp.Sc in each of next 6 sts.Corner position 4: (sc, ch 7, sc) in next ch-2 sp.Sc in each of next 6 sts.Side position 4: (sc, ch 4, sc) in next ch-2 sp.Sc in each of next 6 sts.Sl st to first sc.Total sts in Row 10: 4 corner ch-7 loops plus 4 side ch-4 loops plus 48 sc = 56 sc, 4 ch-7 loops, 4 ch-4 loops.
Leaf accent row Work (sc, hdc, 5 dc, hdc, sc) in each ch-7 corner loop. Work (sc, hdc, dc, hdc, sc) in each ch-4 side loop. Work sl st across the 6 sc between loops (do not increase or decrease the sc).Total sts: 4 corner shells of 9 sts = 36, plus 4 side shells of 5 sts = 20, plus 4 sets of 6 sl sts = 24 sl sts. (80 working sts and sl sts)
Outer lace diamond edge Ch 1, sc in first sc of corner shell, (ch 5, skip 3 sts, sc in next st) across each shell section, placing ch 3 between corner and side shell segments, ending each side with sc in last st of shell.Work as follows: Corner shell: sc, (ch 5, skip 3, sc) twice. (2 ch-5 loops per corner)Between corner and side: ch 3.Side shell: sc, ch 5, skip 3, sc. (1 ch-5 loop per side)Between side and corner: ch 3.Rep 3 more times around to complete diamond outline.Sl st to first sc.Total loops: 8 ch-5 loops (2 per corner, 4 corners) plus 4 ch-5 loops (1 per side) = 12 ch-5 loops total, plus 8 ch-3 connector arches.
Final outer edge shells (sc, hdc, dc, hdc, sc) in each ch-5 loop. (sc, ch 2, sc) in each ch-3 connector arch.Total sts: 12 shells of 5 sts = 60 sts, 8 connector arches of 2 sc each = 16 sc plus 8 ch-2 picots.Fasten off sage green. Weave in ends.
Checkpoint: The finished base panel should be a clear diamond shape measuring approximately 2.5 to 2.75 inches (6.5 to 7 cm) across the widest points. The center hole is approximately 0.75 inch (2 cm) in diameter. The outer edge has pointed leaf-like shells at each corner and smaller shells along each side.
With dusty rose thread and size 7 steel hook, ch 32.
Starting in 2nd ch from hook, work as follows: sc in first 5 ch. (5 sc) hdc in next 4 ch. (4 hdc)dc in next 8 ch. (8 dc) hdc in next 4 ch. (4 hdc) sc in next 4 ch. (4 sc)(29 sts total)
Ruffle row Ch 1, turn. Work 2 sc in each sc, 2 hdc in each hdc, 2 dc in each dc across. Do not work into turning chain.Total sts: 10 sc plus 16 hdc plus 16 dc = 42 sts. (42 sts)Do not fasten off. Begin rolling strip from the narrow sc end, with RS facing outward. After rolling approximately 2 full rotations, secure the base with 3 to 4 whipstitches through the lower edge. Continue rolling and securing every half rotation until the full strip is used. Fasten off and weave end into base of rose.
With dusty rose thread, ch 48.
Starting in 2nd ch from hook: sc in first 5 ch. (5 sc) hdc in next 4 ch. (4 hdc)dc in next 10 ch. (10 dc) tr in next 8 ch. (8 tr) dc in next 8 ch. (8 dc) hdc in next 4 ch. (4 hdc) sc in next 8 ch. (8 sc)(47 sts total)
Ruffle row Ch 1, turn. Work 2 sc in each sc, 2 hdc in each hdc, 2 dc in each dc, 2 tr in each tr across.Total sts: 26 sc plus 16 hdc plus 36 dc plus 16 tr = 94 sts. (94 sts)Begin rolling the outer strip around the base of the completed inner rose, with RS facing outward. Secure with whipstitches every half rotation through the combined lower edge. Fasten off and weave in all ends through the base.
Checkpoint: The finished rose should be approximately 1 to 1.25 inches (2.5 to 3 cm) in diameter and stand approximately 0.5 inch (1.3 cm) tall from base to highest petal tip.
With sage green thread, ch 12.
Starting in 2nd ch from hook, sc in first st, hdc in next 2 sts, dc in next 3 sts, hdc in next 2 sts, sc in next 2 sts, 3 sc in last ch (tip of leaf). Do not turn. Work back along the opposite side of the foundation chain: sc in next 2 sts, hdc in next 2 sts, dc in next 3 sts, hdc in next 2 sts, sc in next st, sl st to first sc to join leaf base. (25 sts around leaf plus sl st join)Fasten off, leaving a 6-inch (15 cm) tail for sewing.
With sage green thread, ch 9.
Starting in 2nd ch from hook, sc in first st, hdc in next 2 sts, dc in next 2 sts, hdc in next st, sc in next st, 3 sc in last ch (tip). Do not turn. Work back along opposite side: sc in next st, hdc in next st, dc in next 2 sts, hdc in next 2 sts, sc in next st, sl st to first sc to join. (19 sts around leaf plus sl st join)Fasten off, leaving a 6-inch (15 cm) tail for sewing.
Pre-string 30 seed beads and 20 crystal beads alternating (seed, crystal, seed, crystal) onto a new length of dusty rose thread.
Join dusty rose thread at any outer shell tip on the base panel.
Edging Round 1: Ch 1, bsc in first st (slide one bead into place), sc around entire outer edge working into the tip of each shell and into each connector arch. Place one bead every 3rd stitch until all beads are used or the round is complete. Sl st to first sc to join.Place approximately 1 bead every 3 stitches around the perimeter. With approximately 80 outer sts, you will use approximately 26 to 28 beads in this round, which matches the pre-strung count.Fasten off. Weave in end.
The rose is made from two petal spiral strips: one small inner strip and one larger outer strip, both in dusty rose thread.
Make 8 leaves total in sage green thread. Four leaves will be longer and four will be shorter.
Cut 6 strands of dusty rose thread, each 40 inches (102 cm) long. Group into 2 sets of 3 strands. Braid each set for approximately 5 inches (12.7 cm). Both braided sections will serve as the two sides of the wristband passing through the base panel.
Thread one braided cord through the upper left side of the base panel, passing under the lace on the back, and bring both ends out to the right side. Thread the second braided cord through the lower right side of the base panel in the same manner. The two cords cross behind the panel.
Create a sliding knot closure on each pair of cord ends as described in the Special Stitches section. Thread one seed bead and one crystal bead onto each cord tail and knot to secure the decorative end.
Checkpoint: With the closure slid fully open, the bracelet should comfortably accommodate a wrist up to 8 inches (20.5 cm). Slid closed, it sits snug on a wrist as small as 5.5 inches (14 cm).
| Rounds | 20 |
|---|---|
| Parts | 9 |
| Level | Intermediate |
| Time | 6-9 hours |
| Hook | 1.65 mm |
| Yarn | Lace |
Part A's Row 1 forms a ring of 8 sc that anchors four repeating ch-2 and ch-3 lace rounds outward, so the diamond shape grows symmetrically from a single center point over its 12 rounds.
Both petal strips are worked flat along a foundation chain with stitch heights rising from sc to tr across each row, then doubled in Row 2; this graduated ruffle is what allows the strip to roll from its narrow end into a rose shape rather than lying flat.
| Part A: Lace Vine Diamond Base Panel | about 2-3 hours because the panel runs 12 rounds in fine size 10 thread on a size 7 steel hook |
|---|---|
| Inner and Outer Petal Strips (Dimensional Rose) | about 1-2 hours because each strip's stitch heights change within the row and then double in the ruffle row, which slows the count |
| Leaves, Beaded Edging, and Assembly | about 2-3 hours because 8 leaves must be worked individually, beads must be pre-strung and placed one at a time, and the panel needs drying time before the band is threaded |
These answers came from whoever first published the pattern, kept word for word.