
Intermediate
What the pattern's own author called it. Nothing here is graded again.
 Crochet·Rituals
Accessories 20 Laid out for paper No account, no download
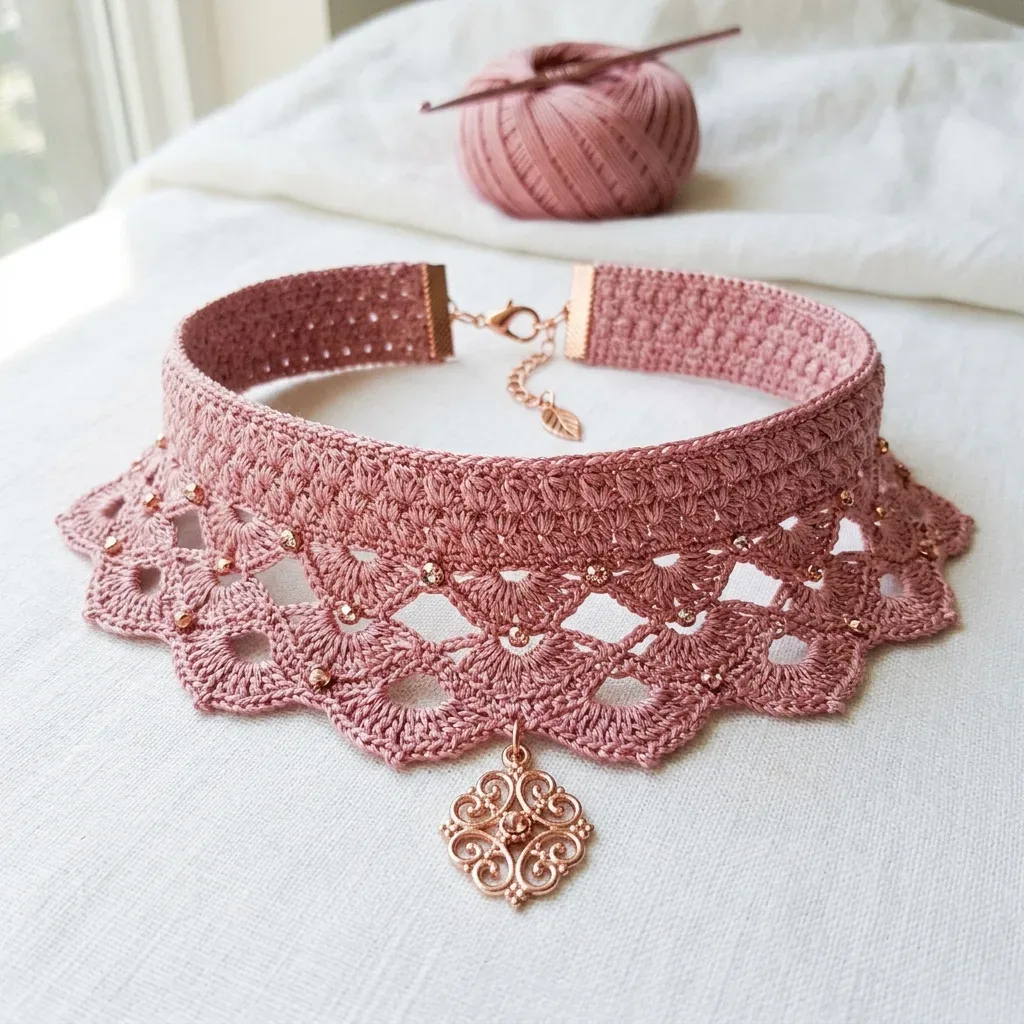
Thread choker, 13-round band plus lace border, US Steel Hook 7 / 1.65mm, pre-strung beads.
Crochet Rituals · retyped from the source and laid out for print · added 3 Oct 2026
What the pattern's own author called it. Nothing here is graded again.

What the sample was worked in. Any weight works; the size moves with it.

Each one is typed out whole and gets its own line.
This choker builds a straight, structured band across 13 rows of single crochet, then turns to the foundation edge and fans a scalloped lace border downward, with rose gold seed beads caught inside the stitches as they form. A filigree pendant anchors the center front, and ribbon crimps with a lobster clasp finish the back for an adjustable fit. Before starting, pre-string 80 to 100 size 6/0 beads onto the thread, confirm gauge with the Size 7 steel hook, and set aside a blocking board and rust-proof pins for the final shaping.
This pattern is rated intermediate to advanced. You need to be comfortable working with fine thread and a small hook, reading lace instructions, pre-stringing beads onto thread, placing beads precisely within your stitchwork, maintaining even tension over many rows, and attaching hardware findings to a finished textile piece. No garment shaping is involved, but the stitch density and materials demand patience and practice; if you've never worked with thread crochet before, practice with a small swatch first to get comfortable with the tension. Plan for 6 to 10 hours total depending on your experience with thread crochet and bead work.
Length (excluding clasp and extender): 13 inches / 33 cm. Length (including extender chain): adjustable to 14.5 inches / 37 cm. Band height (straight upper section): 1.25 inches / 3.2 cm. Total choker height including lace border: 2.5 inches / 6.4 cm. These measurements produce a choker that fits a neck circumference of approximately 13 to 14.5 inches / 33 to 37 cm.
Listed by the pattern's own author, in their words.
Key to this pattern, 25 short forms
Before beginning, decide whether to use the Foundation Single Crochet method or a standard chain foundation. Both produce the same result. Instructions below use the standard chain method.
Chain 146. (This creates a foundation chain. The working stitch count will be 143 single crochets after the first row is established.)
(RS): Starting in the second chain from hook, single crochet across. Do not skip the turning chain at the beginning of this row. Turn. (143 sc)
(WS): Chain 1 (does not count as stitch throughout band section). Working in both loops, single crochet across. Turn. (143 sc)
(RS): Chain 1. Working in back loops only, single crochet across. Turn. (143 sc)
(WS): Chain 1. Working in both loops, single crochet across. Turn. (143 sc)
(RS): Chain 1. Working in back loops only, single crochet across. Turn. (143 sc)
(WS): Chain 1. Working in both loops, single crochet across. Turn. (143 sc)
(RS): Chain 1. Working in back loops only, single crochet across. Turn. (143 sc)
(WS): Chain 1. Working in both loops, single crochet across. Turn. (143 sc)
(RS): Chain 1. Working in back loops only, single crochet across. Turn. (143 sc)
(WS): Chain 1. Working in both loops, single crochet across. Turn. (143 sc)
(RS): Chain 1. Working in back loops only, single crochet across. Turn. (143 sc)
(WS): Chain 1. Working in both loops, single crochet across. Turn. (143 sc)
(RS): Chain 1. Working in back loops only, single crochet across. Do not turn and do not fasten off. This is the final row of the band. (143 sc)
After Row 13, the band should measure 13 inches / 33 cm wide and 1.25 inches / 3.2 cm tall. The alternating BLO and both-loop rows create a subtle ridge texture across the band. If your band does not reach 13 inches / 33 cm in width, your tension is too tight. Try a larger hook. If wider, try a smaller hook. Do not proceed until the band width is correct.
The lace border is worked directly from the lower edge of the completed band. The lower edge is the foundation chain edge at the bottom of Row 1. After completing Row 13 of the band, fold your work and return to the bottom of Row 1. Alternatively, fasten off at end of Row 13, leaving a tail, and rejoin with a slip stitch to the right end of the foundation chain edge with RS facing.
The lace border is worked with RS facing throughout. Do not turn between rows of the border.
Row (RS, working along foundation chain edge): Join thread with slip stitch at right end of lower foundation chain edge. Chain 1. Work 143 single crochets evenly across the lower edge by inserting hook into each remaining loop of the original foundation chain. Turn. (143 sc)This row establishes the base for the lace pattern. The 143 stitches divide into 11 repeats of 13 stitches.
Ch 3 (counts as dc), dc in same first sc, [ch 1, sk 1 sc, dc in next sc] 71 times. Turn. (73 dc counting ch-3, 71 ch-1 sps)
Ch 3, 2 dc in first dc (edge half-shell, 3 dc total), ch 2, sc in next dc, ch 2, 5 dc in next dc repeat between asterisks 10 times, ch 2, sc in next dc, ch 2, 3 dc in top of turning chain. Turn. (12 shell groups: two 3-dc half-shells at edges plus ten 5-dc shells in center plus 11 sc in valleys)
Diamond and bead row Ch 1. Sc in first dc (top of edge half-shell). Ch 3, bead-ch (slide 1 bead up, ch 1 to lock bead), ch 3, sc in center dc of 5-dc shell repeat 10 times, ending ch 3, bead-ch, ch 3, sc in top of final edge 3-dc group. Turn. (12 sc, 11 beaded arch repeats)
Second shell tier with bead accents Ch 3. 2 dc in first sc (edge 3-dc). Bead-sc in center of next arch (the bead-ch position), 5 dc in next sc (work shell into the sc between arches) repeat 10 times. Bead-sc in center of last arch. 3 dc in last sc. Turn.
Note: The bead-sc placements add 11 beads across this row.
(scallop points with picots): Ch 1. Sc in first dc. Ch 2. In center (3rd) dc of next 5-dc shell work: (dc, ch 1, dc, ch 1, dc). Ch 2. Sc in sc between shells. Repeat from asterisk across, ending after final 5-dc shell. After last repeat: ch 2, in center of last edge half-shell work (dc, ch 1, dc), ch 2, sc in last dc. Do not turn. Do not fasten off yet.
Along final row: Working back along the tops of the fan points just made, slip stitch to first ch-1 sp of first V-fan. Work picot (ch 3, sl st in first ch of ch-3) in each ch-1 sp across each fan. Sl st to move along connecting sc and ch-2 sps. Continue to each fan point across the full row. Fasten off.
After completing all 5 lace rows, the border should hang approximately 1.25 inches / 3.2 cm below the lower edge of the band. The total choker height should be approximately 2.5 inches / 6.4 cm. The scallop points should be visible and distinct. Count 11 complete fan points across the full length. If any points are pulling or puckering, the piece needs blocking before proceeding.
| Rounds | 20 |
|---|---|
| Parts | 4 |
| Level | Intermediate |
| Time | 6-10 hours |
| Hook | 1.65 mm |
| Yarn | Lace (Size 10 Crochet Cotton) |
The band is worked flat from a 146-chain foundation because the straight upper edge needs to stay clean and uncurled, which only a flat, turned row structure can guarantee across 13 rows.
The lace border picks up stitches from the original foundation chain edge rather than the last row of the band, so the join runs along the very first row worked — this is why the pattern instructs rejoining or folding back to Row 1 instead of continuing from Row 13.
| Part 1: The Band | about 2 to 3 hours because 13 rows of fine-thread single crochet across 143 stitches takes steady, slow tension |
|---|---|
| Part 2: The Lace Border | about 2 to 3 hours because the ch-3/ch-1 repeat and precise bead placement across 11 pattern repeats is fiddly work |
| Finishing and hardware | about 1 to 2 hours because blocking, drying time, and attaching crimps, clasp, and pendant each need care |
These answers came from whoever first published the pattern, kept word for word.