
Intermediate
What the pattern's own author called it. Nothing here is graded again.
 Crochet·Rituals
Footwear 25 Laid out for paper No account, no download
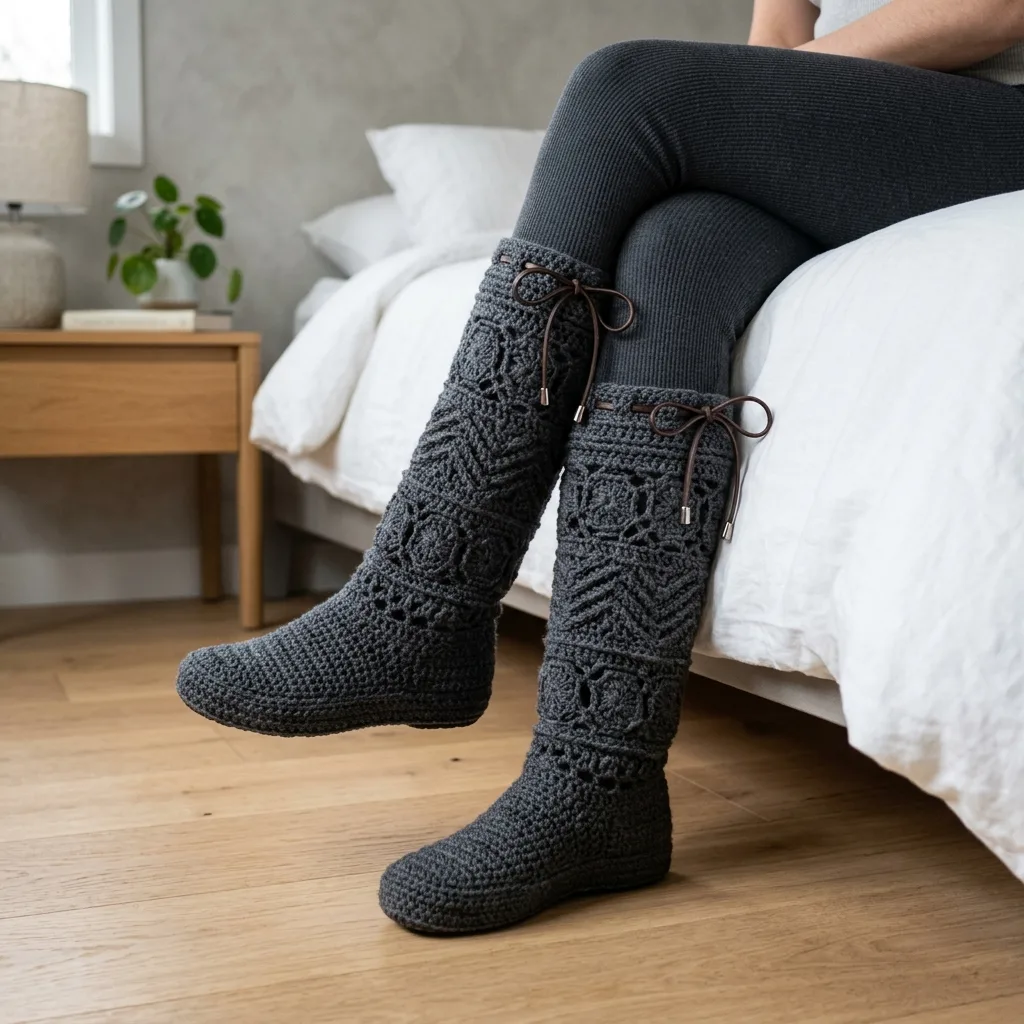
Lace-panel crochet boots: flat sole, 6-round cuff, 4-round tr lace motif. 5.0mm hook, worsted weight.
Crochet Rituals · retyped from the source and laid out for print · added 16 Oct 2026
What the pattern's own author called it. Nothing here is graded again.

What the sample was worked in. Any weight works; the size moves with it.

Each one is typed out whole and gets its own line.
This boot starts flat, with a shaped sole worked in rows for a true toe-to-heel fit, then turns upward into a seamed, rounded upper built by single crochet rounds that decrease toward the ankle. A separate lace panel, worked from a center ring outward in treble and double crochet corners, forms the decorative cuff before leather cord lacing finishes the look. Before picking up a hook, have both hook sizes on hand, at least four stitch markers, a tapestry needle, and the two 18-inch leather cord pieces ready for the closure stage.
Listed by the pattern's own author, in their words.
Key to this pattern, 10 short forms
The sole is worked flat in rows, shaping at the toe and heel for a comfortable fit.
Ch 28 (32, 36). Sc in 2nd ch from hook and in each ch across. (27, 31, 35 sc)
Ch 1, turn. 2 sc in first st, sc in each st to last st, 2 sc in last st. (29, 33, 37 sc)
Ch 1, turn. Sc in each st across. (29, 33, 37 sc)
Repeat Rows 2 and 3. (31, 35, 39 sc after Row 4)
(6-20, 6-22): Ch 1, turn. Sc in each st across. (31, 35, 39 sc)
(21, 23): Ch 1, turn. Sc2tog, sc to last 2 sts, sc2tog. (29, 33, 37 sc)
(22, 24): Ch 1, turn. Sc in each st across.
(23-26, 25-28): Repeat last 2 rows twice more. (25, 29, 33 sc)
(27, 29): Ch 1, turn. Sc2tog, sc to last 2 sts, sc2tog. (23, 27, 31 sc) Fasten off, leaving a long tail for seaming.
Foot Section The foot section is worked in continuous rounds around the sole.
Join yarn at center back heel. Ch 1, sc evenly around entire sole edge, working approximately 3 sc for every 2 row ends along sides. Place marker at beginning of round. Join with sl st. (Approximately 72, 80, 88 sc)Don’t stress about hitting this exact number. Just keep your stitches even and consistent.
Ch 1, sc in each st around. Join with sl st. (72, 80, 88 sc)
Ch 1, sc in first 54 (60, 66) sts, sc2tog 9 (10, 11) times. Join. (63, 70, 77 sc)
Ch 1, sc in first 54 (60, 66) sts, sc2tog across remaining sts. Join. (58, 65, 71 sc)
Continue decreasing over toe area only until opening measures approximately 8 (9, 10) inches around. (Approximately 48, 54, 60 sc)
Ch 1, sc in each st around. Join. (48, 54, 60 sc) Fasten off. Lace Panel Motifs (Make 6)
These beautiful openwork panels create the signature look of these crochet boots. Each motif is worked from the center out.
Ch 4, sl st to first ch to form ring. Ch 3 (counts as dc), 2 dc in ring, ch 2, *3 dc in ring, ch 2. Repeat from * 2 more times. Join to top of ch-3. (12 dc, 4 ch-2 spaces)
Sl st to ch-2 space. Ch 3, 2 dc, ch 2, 3 dc in same space (corner made). Ch 1, *3 dc, ch 2, 3 dc in next ch-2 space, ch 1. Repeat from * around. Join. (24 dc)
Sl st to corner space. Ch 3, 2 dc, ch 2, 3 dc in corner. Ch 1, 3 dc in ch-1 space, ch 1, *3 dc, ch 2, 3 dc in corner, ch 1, 3 dc in ch-1 space, ch 1. Repeat from * around. Join. (36 dc)
Sl st to corner. Ch 3, 2 dc, ch 2, 3 dc in corner. *Ch 1, 3 dc in next ch-1 space. Repeat from * to next corner. Continue around. Join. (48 dc)Fasten off, leaving a 12-inch tail for joining.
Chevron Texture Bands (Make 4)
These bands add visual interest and structure between the lace panels.
Ch 49 (55, 61). Dc in 4th ch from hook and in next 4 ch, 3 dc in next ch (point made), dc in next 5 ch, *skip 2 ch (valley made), dc in next 5 ch, 3 dc in next ch, dc in next 5 ch. Repeat from * across. (46, 52, 58 dc)
Ch 3, turn. Skip first st, dc in next 5 sts, 3 dc in center st of point, dc in next 5 sts, *dc2tog over next 2 sts (this is your valley), dc in next 5 sts, 3 dc in center st, dc in next 5 sts. Repeat from * across. (46, 52, 58 dc)Rows 3-6: Repeat Row 2. Fasten off. Leg Assembly Now comes the fun part, putting all those pieces together.Step 1: Arrange 3 lace motifs vertically. Whip stitch or slip stitch edges together to form a panel. Make 2 panels (one for each boot).Step 2: Attach one chevron band to bottom edge of lace panel using whip stitch.Step 3: Attach another chevron band to top edge of lace panel.Step 4: Seam the panel into a tube, joining the side edges with mattress stitch for an invisible seam.Step 5: Slip stitch the bottom edge of the leg tube to the top of the foot section, easing to fit.
Top Ribbed Cuff
Join yarn at back of leg tube. Ch 1, sc in each st around top edge. Join. (Approximately 48, 54, 60 sc)
Ch 1, working in back loops only, sc in each st around. Join.
Ch 1, sc in each st around, creating 2 evenly spaced buttonholes by chaining 3 and skipping 3 sts (for leather cord threading). Join.
Ch 1, sc in each st and ch around. Join. Fasten off and weave in ends.
Finishing Touches
Leather Bow: Thread leather cord through buttonholes created in cuff. Tie in a bow at front of boot. Add cord end caps if desired for a polished look.
Blocking: Lightly steam block the lace panels to open up the stitches and even out your work. Do not press flat.
Sole Treatment (Optional): For added durability and grip, consider adding puffy fabric paint dots to the bottom of the sole, or attach a purchased slipper sole.
Tips for Success with This Crochet Boot Pattern
Gauge matters here. Seriously. Take ten minutes to make a gauge swatch. Boots that are too loose will slip off, and boots that are too tight will be uncomfortable.
Work the lace motifs loosely. If your granny squares tend to curl or cup, go up a hook size just for those panels.
Try on as you go. Before joining the leg section, slip the foot portion on and check the fit. Adjustments are much easier before assembly.
Keep your tension consistent in the chevron sections. Uneven tension shows up clearly in these textured bands.
Customization Ideas
These crochet lace boots work beautifully in so many variations. Try a cream or ivory yarn for a bohemian bridal look. Work the lace panels in a contrasting color for a bold statement. Shorten the leg for ankle boot style, or add more lace panels for an over-the-knee version.
You could also swap the leather cord for satin ribbon, crochet i-cord, or decorative elastic.
Caring for Your Crochet Boots
Hand wash in cool water with mild detergent. Gently squeeze out excess water without wringing. Reshape and lay flat to dry. Store stuffed with tissue paper to maintain shape.
I really hope you love making these boots as much as I enjoyed designing them. They make an incredible gift, or honestly, just treat yourself. You deserve cozy feet in style. Thank you so much for choosing this pattern.
If you make these charcoal crochet lace boots, I would absolutely love to see them! Tag me on Instagram or share a photo in our Facebook group. Seeing your finished projects is genuinely the best part of my day.
Save this pattern to your Pinterest boards so you can find it whenever you’re ready to cast on. And please drop a comment below if you make these boots or if you have any questions along the way. I’m always here to help, and I love hearing from you!
14 stitches and 16 rows = 4 inches in single crochet One lace motif panel = approximately 3.5 inches square Always check your gauge before starting. Your boots need to fit snugly without being too tight.
Stitch Abbreviations and Definitions ch = chain: Yarn over, pull through loop on hook. Creates foundation or adds height.
sl st = slip stitch: Insert hook, yarn over, pull through stitch and loop on hook in one motion. Used for joining or moving across stitches invisibly.
sc = single crochet: Insert hook, yarn over, pull up a loop (2 loops on hook), yarn over, pull through both loops. The shortest and densest basic stitch.
hdc = half double crochet: Yarn over, insert hook, yarn over, pull up a loop (3 loops on hook), yarn over, pull through all 3 loops. Slightly taller than single crochet.
dc = double crochet: Yarn over, insert hook, yarn over, pull up a loop (3 loops on hook), yarn over, pull through 2 loops, yarn over, pull through remaining 2 loops. Creates an open, flexible fabric.
tr = treble crochet: Yarn over twice, insert hook, yarn over, pull up a loop (4 loops on hook), yarn over, pull through 2 loops three times. Tall stitch used in lace panels.
sc2tog = single crochet two together: Insert hook in first stitch, pull up loop, insert hook in next stitch, pull up loop (3 loops on hook), yarn over, pull through all 3 loops. This is a decrease.
dc2tog = double crochet two together: A decrease that combines two double crochet stitches into one.
FPdc = front post double crochet: Yarn over, insert hook from front to back to front around the post of the stitch below, complete as regular double crochet. Creates raised texture.
Pattern Instructions
| Rounds | 25 |
|---|---|
| Parts | 6 |
| Level | Intermediate |
| Time | 4-6 hours |
| Hook | 5.0 mm |
| Yarn | Worsted |
The sole is worked flat in rows rather than in the round because the toe and heel need independent width shaping — Rows 2 and 3 repeat to widen the toe before the piece turns to build the sides.
Part 6's decreases are concentrated in two rounds (Rounds 5 and 6) rather than spread evenly, each reducing a fixed block of stitches while sc2tog clusters handle the remainder — a shaping choice that pulls the ankle in quickly rather than gradually.
| Sole (Make 2) | about 45-60 minutes because the piece spans 9 rows of flat single crochet with shaping at both ends, doubled for the pair |
|---|---|
| Boot upper (Part 6) | about 1-1.5 hours because 6 rounds include two decrease rounds that need careful stitch tracking |
| Lace motif panel (Part 7) | about 45 minutes because the 4 rounds of treble and double crochet corners take more attention than plain single crochet rounds |
Every one was taken by whoever published the pattern, in the order the source listed them.

These answers came from whoever first published the pattern, kept word for word.