Skip to the patterns
Crochet·Rituals
Menu

Amigurumi 17 Laid out for paper No account, no download

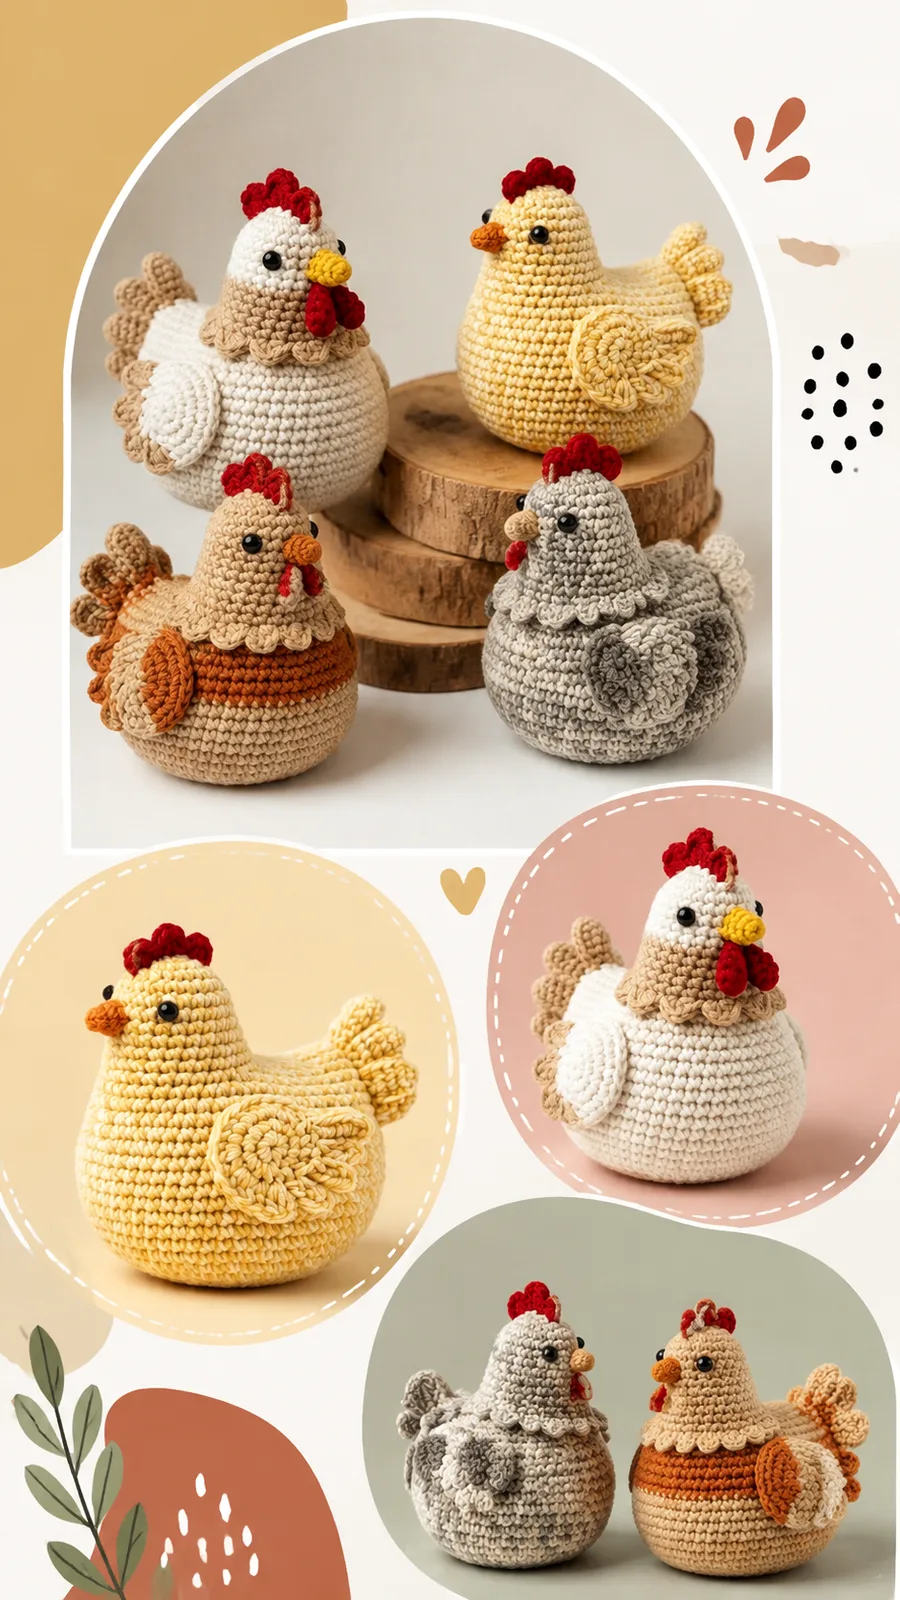
Crochet chicken amigurumi pattern for farmhouse decor

Amigurumi chicken: a 10-round continuous body, smaller hook for dense fabric that holds stuffing.

Jump to the rounds Pin it
Crochet chicken amigurumi pattern for farmhouse decor
Amigurumi · Worsted
Skill
Confident Beginner
Time
3-4 hours
Yarn weight
Worsted
Hook
3 mm
Rounds
17

Confident Beginner

What the pattern's own author called it. Nothing here is graded again.

Worsted

What the sample was worked in. Any weight works; the size moves with it.

17

Each one is typed out whole and gets its own line.

This chicken amigurumi builds from the bottom up in continuous single crochet rounds, shaping a plump oval body and rounded head in one ten-round piece without a seam. Wings are worked in three rounds around a chain foundation, the tail in four flat rows, and the comb, beak, and wattle crocheted separately from red yarn before assembly. Have about 90 yards of main color, 20 yards for wings and tail, 10 yards of red on hand, along with stuffing, a stitch marker, and either 3 mm or 4 mm safety eyes or embroidery thread for a baby-safe face.

Common mistakes and their fixes

Joining rounds that should stay continuous
Do not slip stitch to join the body rounds; this pattern spirals continuously, and joining creates a visible seam and throws off the stitch count.
Losing track of the stitch marker
Move the marker into the first stitch of each new round as soon as it is made, since nothing else marks where one round ends and the next begins.
Stuffing only at the very end
Pack stuffing in while the last few decrease rounds are still open, because once the top closes it is difficult to add more without stretching the stitches.

The materials list

Main color yarn

  1. approximately 90 yards (82 meters)
  2. Wing and tail color yarn: approximately 20 yards (18 meters)
  3. Red yarn for comb and wattle: approximately 10 yards (9 meters)

Orange yarn for beak

  1. small amount
  2. Polyester fiber stuffing
  3. 3 mm or 4 mm safety eyes, or black embroidery thread for baby-safe versions
  4. Yarn needle
  5. Stitch marker
  6. Scissors

Listed by the pattern's own author, in their words.

Key to this pattern, 9 short forms

Main Pattern

Round 1

Make MR. Work 6 sc into ring. (6)

Round 2

Inc in each stitch around. (12)

Round 3

(Sc in next stitch, inc) repeat 6 times. (18)

Round 4

(Sc in next 2 stitches, inc) repeat 6 times. (24)

Round 5

(Sc in next 3 stitches, inc) repeat 6 times. (30)

Rounds 6–12

Sc in each stitch around. (30)

Round 13

(Sc in next 3 stitches, dec) repeat 6 times. (24)

Round 14

(Sc in next 2 stitches, dec) repeat 6 times. (18)

Round 15

Begin stuffing firmly. (Sc in next stitch, dec) repeat 6 times. (12)

Round 16

Dec around. (6)

FO and close the opening. Add extra stuffing before completely closing if needed.

Main Pattern

Round 1

Sc in second ch from hook, sc across, 3 sc in last chain, rotate and work along opposite side of chain, sc across. (14)

Round 2

Inc in first stitch, sc across until curve, 3 sc in center curve, sc across, inc in last stitch. (18)

Round 3

Sc around. (18)

FO, leave a long tail for sewing.

Main Pattern

Round 1

Sc in second chain from hook and across. Turn. (4)

Round 2

Ch 1, sc across. Turn. (4)

Round 3

Ch 1, increase, sc across, increase in last stitch. (6)

Round 4

Ch 1, sc across. (6)FO and weave in ends.

Comb, Beak, and Wattle

Comb: Using red yarn, chain 8. Work 2 sc in the second chain from hook and each remaining chain to create a wavy textured strip. Sew securely to the top of the head.

Beak: Using orange yarn, make MR and work 4 sc inside. Pull closed slightly and sew between the eyes.

Wattle: Using red yarn, make a small oval by working 6 sc in MR, then sew below the beak.

Assembly, in order

Step 1After assembly, gently shape the body by pressing the stuffing into an even oval form. Light surface blocking can help smooth yarn fibers, but avoid heavy moisture that may distort stuffed pieces.
Step 2Hand wash the finished crochet chicken when needed using mild soap and cool water. Allow it to air dry completely while reshaping the body.

Check these before you start

  • Use a hook one size smaller than the yarn label suggests; this tightens the single crochet fabric so stuffing does not show through the gaps.
  • Since the body rounds are not joined, keep the stitch marker in the first stitch of every round and move it up each round, or the count will drift.
  • Add stuffing gradually as the body rounds progress rather than all at the end, so the oval shape stays even instead of lumpy near the top.

On one line

Rounds17
Parts4
LevelConfident Beginner
Time3-4 hours
Hook3 mm
YarnWorsted

Set-up

  • Check yarn quantities ahead: about 90 yards for the main body color, 20 yards for the wings and tail color, and 10 yards of red for the comb and wattle.
  • Decide now between 3 mm or 4 mm safety eyes and black embroidery thread, since that choice affects when the eyes go in during head shaping.
  • Work a small swatch with a hook one size smaller than the yarn's standard recommendation to confirm the fabric is dense enough to hold stuffing without gaps.
  • Read through the first five rounds of the Main Pattern before casting on, so the increase sequence of 6, 12, 18, 24, and 30 stitches is familiar before the count climbs further.

Finishing

  1. Weave in loose ends from the wings, tail, comb, beak, and wattle before attaching any of them to the body.
  2. Stuff the body firmly as the final decrease rounds close, pressing fiber into an even oval shape before the top is fully sewn shut.
  3. Position and sew the wings, tail, comb, beak, and wattle in place, then lightly surface block, avoiding heavy moisture that could distort the stuffed shape.

Construction

The body's first five rounds increase by six stitches each time (6, 12, 18, 24, 30), spacing one increase evenly around the round in the standard amigurumi curve that lets the shape swell before later rounds taper for the head.

The wing piece starts from a straight chain rather than a magic ring, which is why round 1 works 3 sc into the last chain to turn the corner, giving one curved tip while the opposite side of the chain stays flat.

Time per section

Body (10 rounds)about 1.5 to 2 hours because the increase-then-decrease shaping runs across all 10 rounds, with stuffing added partway through
Wings and tail (3 rounds plus 4 rows)about 45 minutes because each piece is small but the chain-turned corners and flat rows need careful shaping
Comb, beak, wattle, and assemblyabout 1 hour because the small red pieces and face details require careful placement before final sewing

Common questions

Can safety eyes be swapped for embroidery?
Yes, use black embroidery thread instead of 3 mm or 4 mm safety eyes for a baby-safe version, since the pattern lists both as options. Add embroidered eyes before the head rounds close completely.
Why is the body worked without joining rounds?
Continuous rounds avoid a seam line across the oval body, keeping the finished shape smooth. The stitch marker tracks the round boundary instead of a join.
How much yarn is needed for the wings and tail combined?
About 20 yards of the wing and tail color covers both pieces, since they share the same color and are worked from the same amount.

These answers came from whoever first published the pattern, kept word for word.