Skip to the patterns
Crochet·Rituals
Menu

Kitchen Accessories 13 Laid out for paper No account, no download

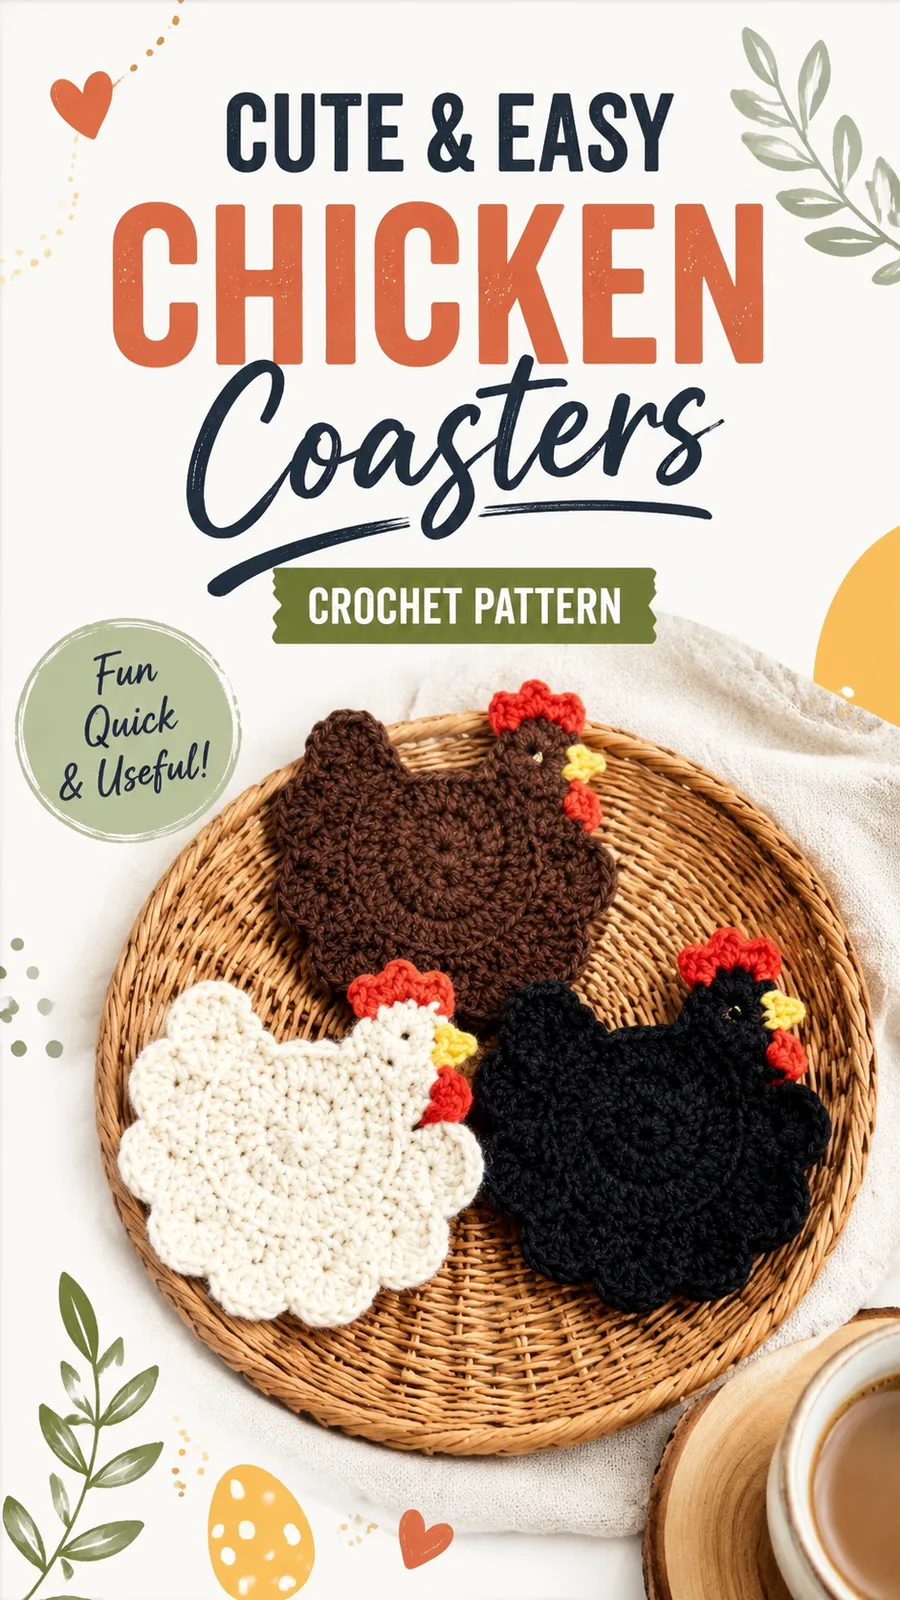
Crochet chicken potholder pattern for farmhouse kitchens

An 18-row chicken potholder worked flat with a G/6 hook and scalloped edge.

Jump to the rounds Pin it
Crochet chicken potholder pattern for farmhouse kitchens
Kitchen Accessories · Worsted
Skill
Intermediate
Time
4-6 hours
Yarn weight
Worsted
Hook
4 mm
Rounds
13

Intermediate

What the pattern's own author called it. Nothing here is graded again.

Worsted

What the sample was worked in. Any weight works; the size moves with it.

13

Each one is typed out whole and gets its own line.

This chicken potholder is a flat crochet panel worked in rows, shaped through increases and decreases rather than separate pieces. The main body runs eighteen rows, finished with a scalloped border and small attached details for the comb, beak, and an optional hanging loop. Before picking up the hook, have worsted weight cotton on hand for the body, small amounts of red and yellow for the face details, a G/6 (4 mm) hook, and a yarn needle for finishing. Cotton gives the finished piece the firmness a working potholder needs.

Common mistakes and their fixes

Uneven Shape
If the body becomes uneven, check that increases are placed evenly and count stitches at the end of every row.
Loose Fabric
A potholder should have a firm fabric. If your stitches feel loose, try a smaller hook size while keeping the same yarn.
Decorative Pieces Moving
Secure all added pieces with several stitches and weave in ends carefully so the details remain attached through washing.

The materials list

  1. Worsted weight cotton yarn in main color: approximately 70 yards (64 meters)
  2. Small amounts of red, yellow, and optional black yarn for details
  3. US G/6 (4 mm) crochet hook
  4. Yarn needle
  5. Scissors
  6. Stitch marker for optional row tracking

Listed by the pattern's own author, in their words.

Key to this pattern, 8 short forms

Main Pattern

Notes Turning chains do not count as stitches. Turn after each row.

Row 1

Ch 2. Work 6 sc into the second chain from hook. Turn. (6 sts)

Row 2

Ch 1, inc in each stitch across. Turn. (12 sts)

Row 3

Ch 1, sc across. Turn. (12 sts)

Row 4

Ch 1, (sc in next stitch, inc in next stitch) repeat across. Turn. (18 sts)

Row 5

Ch 1, sc across. Turn. (18 sts)

Row 6

Ch 1, (sc in next 2 stitches, inc in next stitch) repeat across. Turn. (24 sts)

Rows 7–12

Ch 1, sc across. Turn. (24 sts each row)

Row 13

Ch 1, (sc in next 2 stitches, dec over next 2 stitches) repeat across. Turn. (18 sts)

Row 14

Ch 1, sc across. Turn. (18 sts)

Row 15

Ch 1, (sc, dec) repeat across. Turn. (12 sts)

Row 16

Ch 1, sc across. Turn. (12 sts)

Row 17

Ch 1, dec across. Turn. (6 sts)

Row 18

Ch 1, sc across. Fasten off. (6 sts)

Special Stitch Explanation

Scallop edge: A decorative border made by working multiple double crochet stitches into one stitch, creating a rounded shell shape.

Scalloped Border

Join main color yarn at any corner.

Ch 1, work sc evenly around the entire body, placing 2 sc in each corner. Join with sl st.

Ch 1, skip 1 stitch, work 5 dc into next stitch, skip 1 stitch, sl st into next stitch.

Repeat the scallop sequence around the potholder. Join with sl st.

Fasten off and weave in ends.

Comb and Beak

Comb: Using red yarn, ch 8.

Sc in second chain from hook.

Work 2 sc in next stitch, sc in next stitch, 2 sc in next stitch, sc in next stitch, 2 sc in last stitch.

Fasten off and sew to the top of the chicken body.

Beak: Using yellow yarn, ch 3.

Sc in second chain from hook, sc in next stitch.

Fasten off and attach near the upper front section of the chicken.

Optional Hanging Loop

Join yarn at the top center of the potholder.

Ch 12.

Slip stitch back into the same joining point.

Fasten off and secure the ends.

Assembly, in order

Step 1Sew the comb and beak securely using a yarn needle. If adding eyes, embroider small stitches instead of attaching loose pieces for a safer and more durable kitchen accessory.
Step 2Pro Tip: Make two identical chicken potholders and place cotton batting between them before stitching around the edges for a thicker heat-resistant design.
Step 3After completing the crochet potholder, gently block the piece by shaping it flat and allowing it to dry completely. Blocking helps smooth the stitches and improves the overall silhouette.
Step 4Wash cotton potholders by hand or on a gentle machine cycle with similar colors. Lay flat to dry to help maintain the shape.

Check these before you start

  • Keep tension consistent across the increase rows, since a loose or tight increase stitch will show as a bump or dimple once the scalloped border pulls the edge taut.
  • Join new colors for the comb and beak at a clean stitch rather than mid-stitch, so the color change sits flat against the main-color fabric instead of distorting it.
  • Use a stitch marker on the first stitch of each row through the increase section, since miscounting a single increase early on changes the stitch count for every row that follows.
  • Approximately 6 x 5 inches (15 x 13 cm).
  • Approximately 18 single crochet stitches x 20 rows = 4 inches (10 cm).

On one line

Rounds13
Parts5
LevelIntermediate
Time4-6 hours
Hook4 mm
YarnWorsted

Set-up

  • Check that the main-color cotton yarn covers the full 70 yards before starting the body, since running short mid-row means an awkward join on a visible surface.
  • Separate the small amounts of red, yellow, and optional black yarn now so the comb and beak can be worked without pausing to wind extra yarn later.
  • Read Row 4 and the rows that follow it before starting Row 1, since the increase pattern changes from plain increases to spaced increases and the shaping only makes sense once the full sequence is visible.
  • Place a stitch marker in Row 1 if row tracking by eye is difficult, since all 18 rows are worked flat with no color change to mark progress.

Finishing

  1. Weave in all ends from the main body and the scalloped border on the wrong side, working each tail through several stitches before trimming.
  2. Attach the red comb, beak, and optional hanging loop with a yarn needle, positioning them against the body before stitching so the chicken silhouette reads correctly once secured.

Construction

The increase rows are spaced every other row (Row 2, Row 4, and onward) rather than stacked, which spreads the added stitches evenly and keeps the curve of the chicken body rounded instead of pointed.

The scalloped border starts with a full round of single crochet, placing 2 sc in each corner before the shell stitches begin; this corner increase keeps the edge flat around the panel's shape so the dc shells can sit evenly without puckering.

The chicken color is easy to personalize: use black, brown, or cream cotton yarn for different chicken breeds, since swapping the main color is the simplest way to change the look without altering the construction.

Time per section

Main bodyabout 45 to 60 minutes because the panel runs 18 rows with increase and decrease shaping to track
Scalloped borderabout 20 to 30 minutes because the shell pattern requires careful stitch placement at each corner and repeat
Comb, beak, and hanging loopabout 15 to 20 minutes because the small pieces are quick to work but need careful placement before sewing

Common questions

Can this potholder be made larger than the pattern as written?
Yes, add extra increase rows before the straight rows begin to widen the body, then add the same number of decrease rows afterward to keep the shape balanced. This keeps the chicken silhouette proportional at a larger size.
Does the main color need to be cotton?
Cotton is recommended because it handles heat near a stovetop, washes easily, and produces the firm fabric a working potholder needs. A different fiber may scorch or lose its shape with regular kitchen use.
How is the chicken shape formed without separate pieces?
The body is a single flat panel shaped entirely through increase and decrease rows, with the comb, beak, and optional hanging loop added afterward as small attached pieces. No separate panels are joined for the main body.

These answers came from whoever first published the pattern, kept word for word.