Skip to the patterns
Crochet·Rituals
Menu

Flowers & Home Decor 14 Laid out for paper No account, no download

Crochet a realistic sunflower with a textured center

A crocheted sunflower with a 12-petal textured center, shaped leaves, and a wired stem, worked with a 3mm hook.

Jump to the rounds Pin it
Crochet a realistic sunflower with a textured center
Flowers & Home Decor · Worsted
Skill
Intermediate
Time
3-4 hours
Yarn weight
Worsted
Hook
3 mm
Rounds
14

Intermediate

What the pattern's own author called it. Nothing here is graded again.

Worsted

What the sample was worked in. Any weight works; the size moves with it.

14

Each one is typed out whole and gets its own line.

This sunflower builds a dense, textured center from twelve picot-tipped petal loops worked around a joined ring, then stuffs and closes it before the sepals, leaves, and stem come together. Separate rounds shape the flower back and leaves, while a bent flower rod and thin iron wire give the finished head and foliage enough support to stand on their own. Have three colors of yarn ready, a 3mm or 2.5mm hook, fiberfill, a darning needle, hot melt adhesive, and a stitch marker before starting.

Common mistakes and their fixes

Losing count across the twelve petal loops
Mark the first loop with a stitch marker and count all twelve before fastening off, since an uneven number will keep the center from closing symmetrically.
Stuffing the center too soon
Wait until you are about three-quarters around as directed before adding fiberfill; stuffing earlier pushes the petal loops out of shape before the round is complete.
Mixing up the two R4 and R5 rounds
Check which piece you are working before following R4 or R5, since the flower center and flower sepal each use their own version with different stitch counts.

The materials list

  1. Yarn in 3 colors (e.g. pink, khaki, green or traditional brown, yellow, green)
  2. 3 mm or 2.5 mm crochet hook
  3. Flower rod (16 inches x 0.08 inches / 40cm x 2mm)
  4. Iron wire (6 inches x 0.02 inches / 15cm x 0.4mm)
  5. Darning needle
  6. Scissors
  7. Hot melt adhesive
  8. Stitch marker
  9. Polyester fiberfill

Listed by the pattern's own author, in their words.

Key to this pattern, 9 short forms

Flower Center (Make 2)

Make 2. Start with a magic ring.

Round 1

6 sc in magic ring (6)

Round 2

Inc in each st (12)

Round 3

[sc, inc] × 6 (18)

Round 4

[sc, inc, sc] × 6 (24)

Round 5

sc in each st (24)Fasten off invisibly and weave in the ends.

Petals

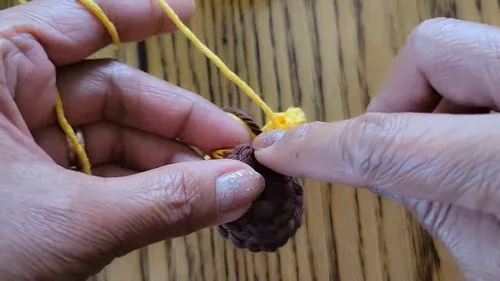
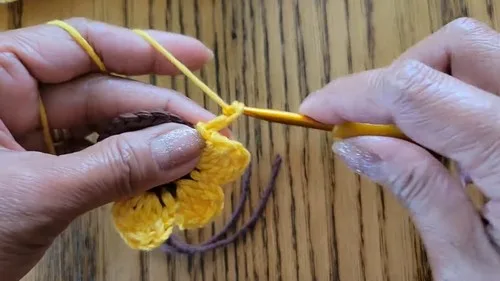
Join yellow yarn into both loops of one flower center with a sl st.

Petals (×12)

Repeat 12 times: ch 2, (dc, trc, p, trc, dc) in next st, ch 2, sl st in next stStart stuffing the center when you're over ¾ done. Continue working and fasten off. Weave in ends.

Flower Sepal

Start with a magic ring.

Round 1

6 sc into the magic ring, sl st, ch 1

Rounds 2–3

6 sc in each round, sl st, ch 1

Round 4

(2 sc in next st) × 6, sl st, ch 1

Round 5

(1 sc, 2 sc in next st) × 6, sl st, ch 1

Round 6

(1 sc, 2 sc in next st, 1 sc) × 6, sl st, ch 1

Leaves

Leaf

With green yarn, leave a yarn tail and ch 8 From second chain from hook: sl st, sc, hdc, dc, dc, dc inc 4 dc in last ch Work down other side: dc inc, dc, dc, hdc, sc, sl stFasten off leaving a long tail for sewing.

Melon Seed Detail (Texture Embellishment)

Go back to R5 (front loops of stamen only).

Round 5

(ch 3, sl st at base of ch, sk 1, sl st into next st) repeat across

Rounds 6–8

Repeat R5Mark the stitch, ch 1, cut, and leave a tail.

Assembly, in order

Step 1Bend one end of the flower rod and insert into the center of the sepals.
Step 2Repeat for two flower stems.
Step 3Secure using hot melt adhesive.

Check these before you start

  • Use the 3mm or 2.5mm hook as the yarn weight calls for; a smaller hook gives a tighter fabric that holds stuffing and holds the petal picots in shape.
  • Place a stitch marker at the start of every round, since the center and shaping rounds build on an increase count that is easy to lose in a continuous spiral.
  • Begin stuffing the center only once you are about three-quarters of the way around, as instructed, since stuffing earlier can push the petal loops out of shape before they are all formed.

On one line

Rounds14
Parts5
LevelIntermediate
Time3-4 hours
Hook3 mm
YarnWorsted

Set-up

  • Set aside enough yarn in all three colors before starting, since the center, sepals, and leaves each use a different shade and you do not want to run short mid-round.
  • Keep a stitch marker on hand to flag the start of each round in the center, where increases and petal repeats are easy to lose track of.
  • Work a small swatch with your chosen hook size first to check that the fabric is dense enough to hold stuffing without gaps showing between stitches.
  • Read through both versions of R4 and R5 before you begin, since this pattern uses each round number twice for different pieces (the flower center and the flower sepal), and mixing them up will throw off the shaping.

Finishing

  1. Weave in ends from each color change between the petal loops of the center before adding the remaining fiberfill.
  2. Finish stuffing the center once you are past three-quarters around, then fasten off and close the round firmly.
  3. Insert the bent end of the flower rod into the center of the sepals for each stem and secure it in place with hot melt adhesive.

Construction

The petal round repeats ch 2, (dc, trc, picot, trc, dc), ch 2, sl st twelve times around one joined base round, with each repeat anchored by a sl st into the next stitch; this builds twelve separate petal loops radiating outward rather than a continuous spiral, which gives the center its raised, textured look before stuffing.

R4's [sc, inc, sc] x 6 round spaces six increases evenly, one every third stitch, to grow the round to 24 stitches, which is typical spherical shaping; the alternate R4 through R6 rounds on the flower sepal instead end in sl st, ch 1, meaning they are turned and worked flat rather than in a spiral, which suits pieces like sepals and leaves that lie flat instead of building volume.

Time per section

Flower center and petals (12 repeats)about 1 to 1.5 hours because the dc, trc, picot, trc, dc repeat takes longer per stitch than plain single crochet, and there are twelve to complete
Flower sepal (R1 through R6)about 45 minutes to 1 hour because of the evenly spaced increase shaping across several short rounds
Leaves and stem assemblyabout 30 to 45 minutes because the flat leaf rounds plus bending the rod, wiring, and gluing the stem take extra handling time

Photographs of this one

Every one was taken by whoever published the pattern, in the order the source listed them.

Crochet a realistic sunflower with a textured center — photo 2
Crochet a realistic sunflower with a textured center — photo 3
Crochet a realistic sunflower with a textured center — photo 4
Crochet a realistic sunflower with a textured center — photo 5

Common questions

Can you substitute a pipe cleaner for the iron wire?
Yes, as long as it is similarly thin and bendable, close to the 0.4mm gauge called for, so the leaf shape holds without bulking up the fabric. A thicker wire will distort the crocheted leaf and make it hard to bend cleanly.
Why does the flower need a rod inserted into the center at all?
The flower rod gives the stuffed, closed center a sturdy stem it can stand on in a vase or arrangement. Without it, the finished head has no support and will flop.
What if the picots on the center keep coming loose?
Check that each picot is tightened with a firm sl st before moving to the next repeat, since a loose picot can slip once you begin stuffing. Snug the base chain of each petal loop as you go rather than fixing it afterward.

These answers came from whoever first published the pattern, kept word for word.