
Intermediate
What the pattern's own author called it. Nothing here is graded again.
 Crochet·Rituals
Accessories 33 Laid out for paper No account, no download
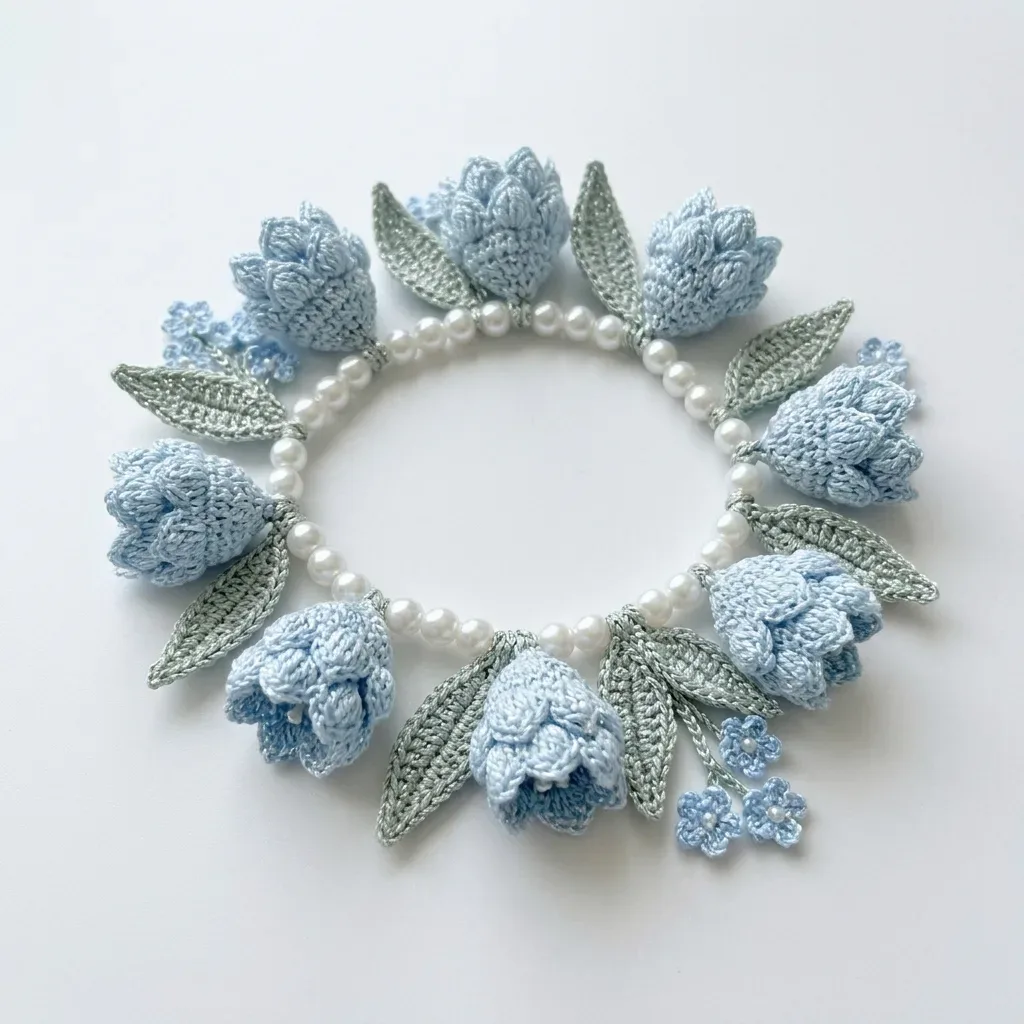
Crochet bracelet: 7 stuffed tulip buds, sage leaves, pearls on elastic, size 7 (1.65mm) steel hook.
Crochet Rituals · retyped from the source and laid out for print · added 30 Sep 2026
What the pattern's own author called it. Nothing here is graded again.

What the sample was worked in. Any weight works; the size moves with it.

Each one is typed out whole and gets its own line.
This bracelet builds each tulip bud from three separate layers worked around a stuffed core: an inner core shaped in continuous rounds, inner petals worked flat and joined into marked stitches, and outer petals finished with puff-stitch texture along the front loop. Seven buds in pale ice blue pair with sage leaves, a calyx at each base, and small forget-me-not accents in white or cream. Before starting, have size 10 crochet cotton in three colors, a size 7 steel hook, locking stitch markers, pearl beads, and elastic beading cord on hand.
Listed by the pattern's own author, in their words.
Key to this pattern, 15 short forms
Make 7 in Color A.
MR, ch 1, work 6 sc into ring, pull tail to close ring. Do not join. Place marker. (6 sts)
Inc in each st around. (12 sts)
[Sc in next st, inc in next st] 6 times. (18 sts)
[Sc in next 2 sts, inc in next st] 6 times. (24 sts)
Sc in each st around. (24 sts)
Sc in each st around. (24 sts)
[Sc in next 2 sts, sc2tog] 6 times. (18 sts)
[Sc in next st, sc2tog] 6 times. (12 sts) At this point, lightly stuff the inner core with fiberfill. Insert wire stem now. Fold a 3-inch piece of wire in half, twist the two halves together at the base to form a single stem, and insert through the open base of the bud.
[Sc2tog] 6 times. (6 sts) Sl st in next st to close. Leave a 6-inch tail and fasten off. Thread tail onto tapestry needle and weave through the 6 remaining sts, pull gently to close the top. Secure and trim.
Checkpoint: Each inner core should measure approximately 0.75 inches tall and 0.75 inches in diameter at its widest point.
Section 2: Tulip Inner Petals. Make 7 sets in Color A. Each set has 3 inner petals. With inner core held with the closed tip pointing up and wire stem pointing down, identify Round 4 (the round of 24 stitches). Divide into 3 groups of 8 stitches. Place markers at stitches 1, 9, and 17.
Join Color A with a standing sc into the first marked stitch of group 1.
(RS): Sc in same st, sc in next 7 sts. Turn. (8 sts)
Ch 1, dec, sc in next 4 sts, dec. Turn. (6 sts)
Ch 1, dec, sc in next 2 sts, dec. Turn. (4 sts)
Ch 1, [dec] 2 times. Turn. (2 sts)
Ch 1, sc2tog. (1 st) Do not fasten off. Sl st down the side edge of the petal back to the base ring (approximately 5 sl sts). Join with sl st to the first stitch of group 2.Petals 2 and 3: Work exactly as Petal 1 into groups 2 and 3. After completing Petal 3, fasten off and weave in the 6-inch tail.
Checkpoint: The three inner petals should nestle snugly around the inner core, each tapering to a rounded point.
Join Color A with a standing sc into the first marked flo stitch of group 1.
(RS): Working in flo only, [puff stitch in next st, ch 1] 4 times, sc in last 3 sts. Turn. (4 puffs, 3 sc, 4 ch-1 sps)
Ch 1, sc in each st and each ch-1 sp across. Turn. (11 sts)
Ch 1, dec, sc in next 7 sts, dec. Turn. (9 sts)
Ch 1, dec, sc in next 5 sts, dec. Turn. (7 sts)
Ch 1, dec, sc in next 3 sts, dec. Turn. (5 sts)
Ch 1, dec, sc in next st, dec. Turn. (3 sts)
Ch 1, sc3tog. (1 st) Fasten off. Leave a 4-inch tail and weave in. Sl st down the edge back to the base ring before beginning the next petal.
Ch 1, sc in next 6 sts. Turn. (6 sts)
Ch 1, dec, sc in next 2 sts, dec. Turn. (4 sts)
Ch 1, dec, dec. Turn. (2 sts)
Ch 1, sc2tog. (1 st) Fasten off. Rejoin Color B with a sl st into the next unworked stitch of Round 4 and begin the next sepal.
After all 5 sepals are complete, weave in ends. Slip the calyx over the base of the assembled tulip bud. The blo ridge of Round 3 should sit at the base of the petal layers. Sew the calyx firmly to the base using the wire stem as an anchor point. Bend the wire loop flat against the outside.
Checkpoint: The assembled tulip bud with calyx should measure approximately 1.25 inches tall.
Make 7 in Color B.
MR, ch 1, work 10 sc into ring. Do not join. (10 sts)
Inc in each st around. (20 sts)
Working in blo only, sc in each st around. (20 sts)
[Sc in next st, inc in next st] 10 times. (30 sts) Now work 5 sepal points directly into Round 4. Each sepal uses 6 consecutive stitches.
Make 14 in Color B.
Foundation chain: Ch 13.
Starting in the 2nd ch from hook, sc in next st, hdc in next st, dc in next 3 sts, tr in next 3 sts, dc in next 2 sts, hdc in next st, sc in last st. Do not turn. Work 3 sc into the very last ch at the tip. Now work back along the other side of the foundation chain: sc in next st, hdc in next st, dc in next 2 sts, tr in next 3 sts, dc in next 3 sts, hdc in next st, sc in next st. Sl st into the first sc of Row 1 to close. (28 sts around perimeter plus 3 sts at tip)
Textured Surface Ch 1. Working in blo, [sc in next 4 sts, hdc in next 2 sts, dc in next 3 sts, hdc in next 2 sts, sc in next 3 sts], sc in all 3 tip sts, [sc in next 3 sts, hdc in next 2 sts, dc in next 3 sts, hdc in next 2 sts, sc in next 4 sts]. Sl st to join. (31 sts)Fasten off. Leave a 10-inch tail for sewing.Wiring: Thread a 3-inch piece of floral wire along the center of the leaf from base to tip, weaving between the two layers. Bend tiny loops at each end using pliers to prevent poking through.
Checkpoint: Each leaf should measure approximately 1.5 inches long and 0.75 inches wide.
Make 6 in Color A with Color C centers.
Using Color A, MR ch 1, work 5 sc into ring, sl st to join to first sc. (5 sts)
For each of the 5 sts work the following petal: ch 3, work 3 dc into the same base st, ch 3, sl st into the same base st, then sl st into the next st to advance. Repeat for all 5 petals. (5 petals)Finish by sl st into the starting sc of Round 1.Center Embellishment: Thread Color C onto a tapestry needle. Bring it up through the center and work 3 or 4 small straight stitches radiating from the center. Alternatively, sew a 3 mm seed bead into the center.Fasten off Color A. Leave an 8-inch tail for sewing.
Checkpoint: Each forget-me-not should measure approximately 0.5 inches in diameter.
| Rounds | 33 |
|---|---|
| Parts | 7 |
| Level | Intermediate |
| Time | 5-7 hours |
| Hook | 1.65 mm |
| Yarn | Size 10 Thread |
The inner core is worked in continuous, unjoined rounds with increases spaced progressively wider apart (every stitch, then every second stitch, then every third), the standard spiral shaping used to build a rounded stuffed base without a seam line.
Petal 1 and Outer Petal 1 are both worked flat in turned rows anchored into the marked stitches of the inner core, which layers the inner petals under the outer ones; the front-loop-only setup on Outer Petal 1's first row leaves the back loop free for the puff stitches worked there.
| Tulip Bud Inner Core (7 buds, 9 rounds each) | about 2 to 2.5 hours because seven separate 9-round stuffed cores add up even though each round is quick |
|---|---|
| Petal 1 and Outer Petal 1 (5 rows plus 7 rows, per bud) | about 2 to 3 hours because of the puff-stitch texture row and the shaping decreases worked across two layered petal sets |
| Calyx, leaves, forget-me-nots, and stringing | about 1.5 to 2 hours because the motifs are small but the bead stringing and gluing on the elastic cord is fiddly |
These answers came from whoever first published the pattern, kept word for word.