Skip to the patterns
Crochet·Rituals
Menu

Accessories 17 Laid out for paper No account, no download

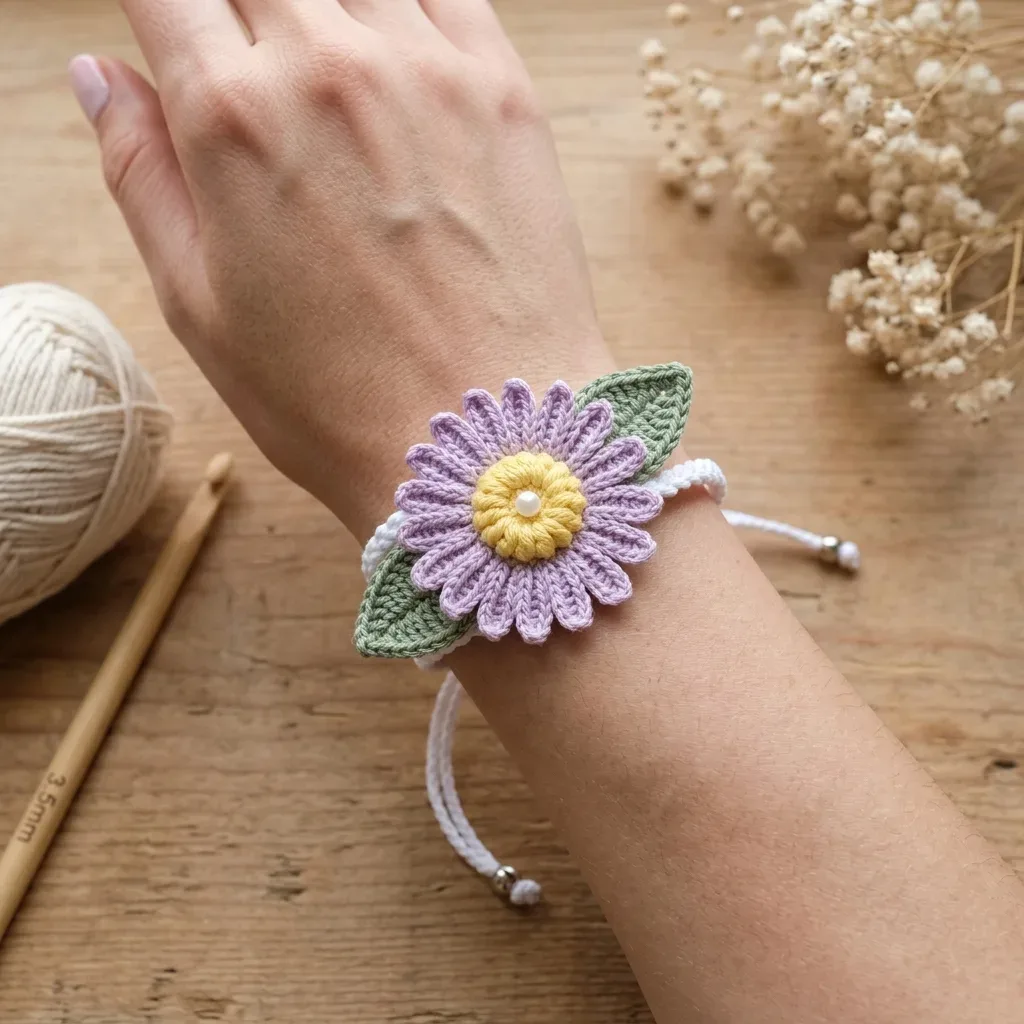
Lavender daisy wrist cuff crochet pattern with sage leaves

Thread-crochet cuff: 3-round daisy center, 9-petal layer, 10-row leaves, steel hook 7/1.65mm.

Jump to the rounds Pin it
Lavender daisy wrist cuff crochet pattern with sage leaves
Accessories · Size 10 Crochet Thread
Skill
Intermediate
Time
3-5 hours, plus 2-4 hours drying time for blocking
Yarn weight
Size 10 Crochet Thread
Hook
1.65 mm
Rounds
17

Intermediate

What the pattern's own author called it. Nothing here is graded again.

Size 10 Crochet Thread

What the sample was worked in. Any weight works; the size moves with it.

17

Each one is typed out whole and gets its own line.

This cuff builds a small lavender daisy motif in size 10 crochet cotton, worked from a yellow 3-round center outward into a 9-petal outer layer made with a raised double-petal cluster stitch. Two sage leaves are crocheted flat in 10 turned rows and joined alongside the flower. The finished motif threads onto white nylon cord, closed with sliding barrel beads, optional end-stop beads, and a pearl accent. Before starting, have your size 10 thread in all three colors, a steel hook sized to gauge, and your beads and cord sorted by color so assembly runs without pausing.

Common mistakes and their fixes

Skipping the back-loop-only instruction
Round 4 must go into back loops only of Round 3. Working into both loops removes the gap between center and petal layer that gives the flower its dimension.
Pulling through the DPC cluster too early
Complete both yarn-over-twice insertions into the same stitch before pulling through all 3 remaining loops. Finish each cluster with a firm chain 1 to lock it before moving to the next skipped stitch.
Steaming the nylon cord while blocking
Block only the flower and leaf motifs with cool water. Keep the cord away from steam or an iron, since heat distorts it.

The materials list

Yarn and Thread

  1. Color A (Lavender): approximately 15 yards of size 10 crochet cotton thread
  2. Color B (Yellow): approximately 8 yards of size 10 crochet cotton thread
  3. Color C (Sage Green): approximately 20 yards of size 10 crochet cotton thread

Hook

  1. US Steel Hook Size 7 / 1.65 mm, or the size needed to match gauge

Additional Materials

  1. Approximately 20 inches of 1.5 mm white braided nylon cord or white macrame micro cord
  2. 2 silver sliding barrel beads with approximately 3 to 4 mm inner diameter
  3. 4 small silver or white end-stop beads (optional but recommended)
  4. 1 pearl or pearl-finish bead, 4 to 5 mm diameter
  5. Sewing needle and white or matching thread
  6. Tapestry needle for weaving in ends
  7. Scissors
  8. Fabric-safe craft glue or clear nail polish (optional, for sealing cord ends)

Yarn Suggestions

  1. DMC Petra Size 5 Crochet Cotton: Widely available with excellent stitch definition
  2. Aunt Lydia’s Classic Crochet Thread Size 10: The closest match to the original design
  3. Anchor Artiste Mercer Crochet Thread Size 10: Lovely sheen that enhances the petal texture
  4. Avoid fuzzy or textured yarns for this project. The smooth surface of mercerized cotton shows off the stitch detail that makes this flower pop.

Listed by the pattern's own author, in their words.

Key to this pattern, 17 short forms

Flower Center (Color B)

Round 1

Make a MR. Ch 1 (does not count as a stitch throughout). Work 6 sc into MR. Pull tail to close ring. Join with sl st to first sc. (6 sc)

Round 2

Ch 1. Work 2 sc in each sc around. Join with sl st to first sc. (12 sc)

Round 3

Ch 1. Work 1 sc in first sc, 2 sc in next sc. Rep [1 sc in next sc, 2 sc in next sc] around. Join with sl st to first sc. (18 sc)The center circle should measure approximately 0.5 inch in diameter at this point. Fasten off Color B. Weave in ends.Checkpoint: Your yellow center should be a flat, even circle with 18 stitches visible around its edge. No cupping or ruffling. If it cups, go up one hook size. If it ruffles, go down one hook size.

Leaves (Make 2, both in Color C)

The leaf is worked flat. Each row is turned. The foundation chain counts as part of the leaf tip.

Foundation: Ch 13.

Row 1

(RS): Starting in second ch from hook, sc in each ch across. Turn. (12 sc)

Row 2

(WS): Ch 1. Sc in first sc. Hdc in next sc. Dc in next 2 sc. Tr in next 2 sc. Dc in next 2 sc. Hdc in next sc. Sc in next sc. 2 sc in last sc. Turn. (13 sts)

Row 3

(RS): Ch 1. 2 sc in first sc. Sc in next sc. Hdc in next sc. Dc in next 2 sts. Tr in next 2 sts. Dc in next 2 sts. Hdc in next st. Sc in next sc. Sc2tog over last 2 sts. Turn. (13 sts)Row 3 increases at the wide base end and decreases at the narrow tip end, beginning to taper the leaf shape.

Row 4

(WS): Ch 1. Sc2tog over first 2 sts. Sc in next sc. Hdc in next st. Dc in next 2 sts. Tr in next 2 sts. Dc in next 2 sts. Hdc in next st. Sc in next sc. 2 sc in last sc. Turn. (13 sts)

Row 5

(RS): Ch 1. 2 sc in first sc. Sc in next sc. Hdc in next sc. Dc in next 2 sts. Tr in next 2 sts. Dc in next 2 sts. Hdc in next st. Sc2tog over last 2 sts. Turn. (13 sts)

Row 6

(WS): Ch 1. Sc2tog over first 2 sts. Hdc in next st. Dc in next 2 sts. Tr in next 2 sts. Dc in next 2 sts. Hdc in next st. Sc in next sc. Sc2tog over last 2 sts. Turn. (11 sts)

Row 7

(RS): Ch 1. Sc2tog over first 2 sts. Hdc in next st. Dc in next 2 sts. Tr in next sc. Dc in next 2 sts. Hdc in next st. Sc2tog over last 2 sts. Turn. (9 sts)

Row 8

(WS): Ch 1. Sc2tog over first 2 sts. Dc in next 2 sts. Tr in next st. Dc in next 2 sts. Sc2tog over last 2 sts. Turn. (7 sts)

Row 9

(RS): Ch 1. Sc2tog over first 2 sts. Dc in next st. Tr in next st. Dc in next st. Sc2tog over last 2 sts. Turn. (5 sts)

Row 10

(WS): Ch 1. Sc2tog over first 2 sts. Sc in next st. Sc2tog over last 2 sts. Turn. (3 sts)

Row 11

(RS): Ch 1. Draw yarn through all 3 sts simultaneously (sc3tog). Fasten off. (1 st, leaf tip)

Edging Round

Join Color C to any edge stitch along the long side of the leaf. Work 1 round of sc evenly around the entire leaf perimeter, working 1 sc into each row end along the sides and 1 sc into each remaining foundation chain loop along the bottom edge. At the tip, work 3 sc into the single tip stitch to allow the corner to turn without puckering. Join with sl st to first sc. Fasten off. Weave in ends.

Checkpoint: Each finished leaf should measure approximately 1.5 inches in length and 0.75 inch at its widest point. The leaf should lie flat with a pointed tip at one end and a rounder base at the other. Make a second identical leaf.

Outer Petal Layer (Color A)

Setup: Join Color A with a sl st to the back loop only of any stitch in Round 3 of the flower center.

Round 4

Working in back loops only of Round 3. Ch 1. Work 1 sc in each sc around. Join with sl st to first sc. (18 sc)

This round is the base ring for the petals. Working into back loops causes the front loops to remain free, creating that beautiful separation between center and petals.

Round 5

Petal Round This round creates 9 petals. Ch 1. [Work 1 DPC in next sc, sk next sc] repeat 9 times. Join with sl st to base of first DPC. (9 petals)

Each DPC is worked into one stitch, then the following stitch is skipped. The 18 stitches divide evenly into 9 repetitions. The petals will naturally curve forward and upward, away from the center.

Fasten off Color A with an invisible join. Weave in ends.

Step by step for the Invisible Join (inv join): Cut yarn leaving a 6-inch tail. Thread the tail onto a tapestry needle. Insert the needle from front to back under both loops of the first stitch of the round. Then insert the needle back down through the center of the last stitch you worked. Pull gently to match the tension of the surrounding stitches. This technique closes the round without a visible seam, giving the flower a seamless, professional finish.

Checkpoint: You should have 9 evenly spaced rounded petals surrounding the yellow center. The petals should fan forward. Lay the flower flat on a surface. The diameter should measure approximately 2 inches. The center should remain visible and raised above the petal layer.

Assembly, in order

Step 1Blocking the Flower: Dampen the assembled flower motif with cool water. Gently shape the petals with your fingers, encouraging them to spread evenly. Pin the leaf tips to a foam blocking mat and allow to dry completely, approximately 2 to 4 hours. Do not apply steam or high heat to nylon cord.
Step 2Weaving in Ends: All ends should be woven securely using a tapestry needle, running the tail through at least 4 to 5 stitches in different directions before trimming. A small drop of craft glue on the woven tail provides extra security at this scale.
Step 3Cord Closure (Adjustable Sliding Knot): Take the two cord ends coming from each side of the bracelet. Cross the right cord over the left cord. With the right cord, create a small loop around the left cord. Pass the right cord end through this loop twice (a double half hitch). Pull to tighten snugly but not so tight it cannot slide. Repeat symmetrically with the left cord around the right cord. Thread one silver barrel bead onto each knot to lock it. Thread one small stop bead onto each cord end and knot or glue to prevent fraying.

Check these before you start

  • Thread weight demands more precise tension than worsted weight. Keep an even grip on the size 10 cotton throughout, especially through the small-scale rounds of the flower center.
  • Round 4 is worked into back loops only of Round 3. This is deliberate: it leaves the front loops free so the petal layer stands apart from the center instead of sitting flush against it.
  • Each DPC cluster closes with a chain 1 to lock it before you skip to the next stitch. Skipping that chain lets the cluster loosen and flattens the raised petal shape.
  • Gauge: Work the flower center (Rounds 1 and 2) in Color B. After Round 2, the diameter should measure approximately 0.75 inch / 1.9 cm. The full flower after all rounds should measure approximately 2 inches / 5 cm diameter. If your flower measures larger than 2.25 inches, go down one hook size; if smaller than 1.75 inches, go up one hook size.
  • Finished measurements: flower diameter approximately 2 inches / 5 cm; leaf length approximately 1.5 inches / 3.8 cm; bracelet total width (fully extended) approximately 7 to 8 inches / 18 to 20 cm; adjustable wrist fit approximately 5.5 to 7.5 inches / 14 to 19 cm circumference.
  • Skill level: intermediate. You should be comfortable working in a magic ring, joining rounds invisibly, and crocheting small-scale motifs with thread-weight yarn. The leaf shaping uses increases and decreases in sequence, but nothing too tricky. If you have never worked with thread yarn before, give yourself extra time.
  • Unless the pattern specifies an invisible join, join all rounds with a slip stitch to the first stitch, and do not turn at the end of rounds — the leaf rows are the one exception, since they are worked flat and turned every row.

On one line

Rounds17
Parts3
LevelIntermediate
Time3-5 hours, plus 2-4 hours drying time for blocking
Hook1.65 mm
YarnSize 10 Crochet Thread

Set-up

  • Confirm yardage before you begin: approximately 15 yards of lavender, 8 yards of yellow, and 20 yards of sage. Running short mid-motif is hard to patch invisibly in thread weight.
  • Read through the DPC stitch instructions once before working Round 5. It is worked twice into the same stitch in sequence, and knowing the full motion ahead of time keeps the rhythm steady.
  • Work Round 3 of the flower center and check it measures approximately 0.5 inch across before moving on. If it cups or ruffles, adjust your hook size a step in either direction before continuing.
  • Gather the cord, both barrel beads, the end-stop beads, and the pearl bead before you finish weaving in ends. The closure goes together faster when everything is already on hand.

Finishing

  1. Weave in ends for each color section as you complete it, running the tail through at least 4 to 5 stitches in different directions with a tapestry needle before trimming.
  2. Block the assembled flower and leaves: dampen with cool water, shape the petals by hand so they spread evenly, pin the leaf tips to a foam mat, and let dry completely, about 2 to 4 hours. Keep steam and high heat away from the nylon cord.
  3. Thread the nylon cord through the finished motif, slide on the barrel beads and end-stop beads, add the pearl accent, and secure the closure with the adjustable sliding knot described in the Assembly Instructions.

Construction

Round 4 works into the back loops only of Round 3, leaving the front loops of that round free. That untouched loop is what lets the Round 5 petal layer stand forward and separate visually from the center instead of lying flat against it.

The leaves are worked flat in turned rows rather than in the round because the shaping sequence, hdc, dc, tr, dc, hdc stepping up to a point, needs a straight edge to build against on each side. Working flat lets the same tr/dc/hdc sequence mirror symmetrically down both edges of the leaf.

Time per section

Flower Center (Color B)about 15-20 minutes because it is only 3 rounds worked to a 0.5 inch circle
Leaves (Color C, make 2)about 45-60 minutes combined because each leaf runs 10 turned rows with hdc/dc/tr shaping
Outer Petal Layer and cord assemblyabout 30-40 minutes because the DPC stitch is worked twice per petal across the round, plus stringing cord, barrel beads, and the pearl accent

Common questions

Can worsted weight yarn replace the size 10 thread?
No. The motif is scaled for size 10 crochet cotton with a steel hook sized 7/1.65 mm. Heavier yarn will not produce the fine petal detail and will change the finished cuff size.
Why do the petals look flat instead of raised?
Check that both yarn-over-twice insertions of the DPC stitch went into the same stitch before you pulled through all 3 remaining loops. The cluster only domes correctly when both halves share one base stitch.
Can the finished cuff get wet later?
Cool water is fine for occasional cleaning of the thread portions. Avoid steam or high heat near the nylon cord, since the pattern specifically warns against it during blocking and the cord can lose shape under heat.

These answers came from whoever first published the pattern, kept word for word.