
Intermediate
What the pattern's own author called it. Nothing here is graded again.
 Crochet·Rituals
Baby & Children 41 Laid out for paper No account, no download
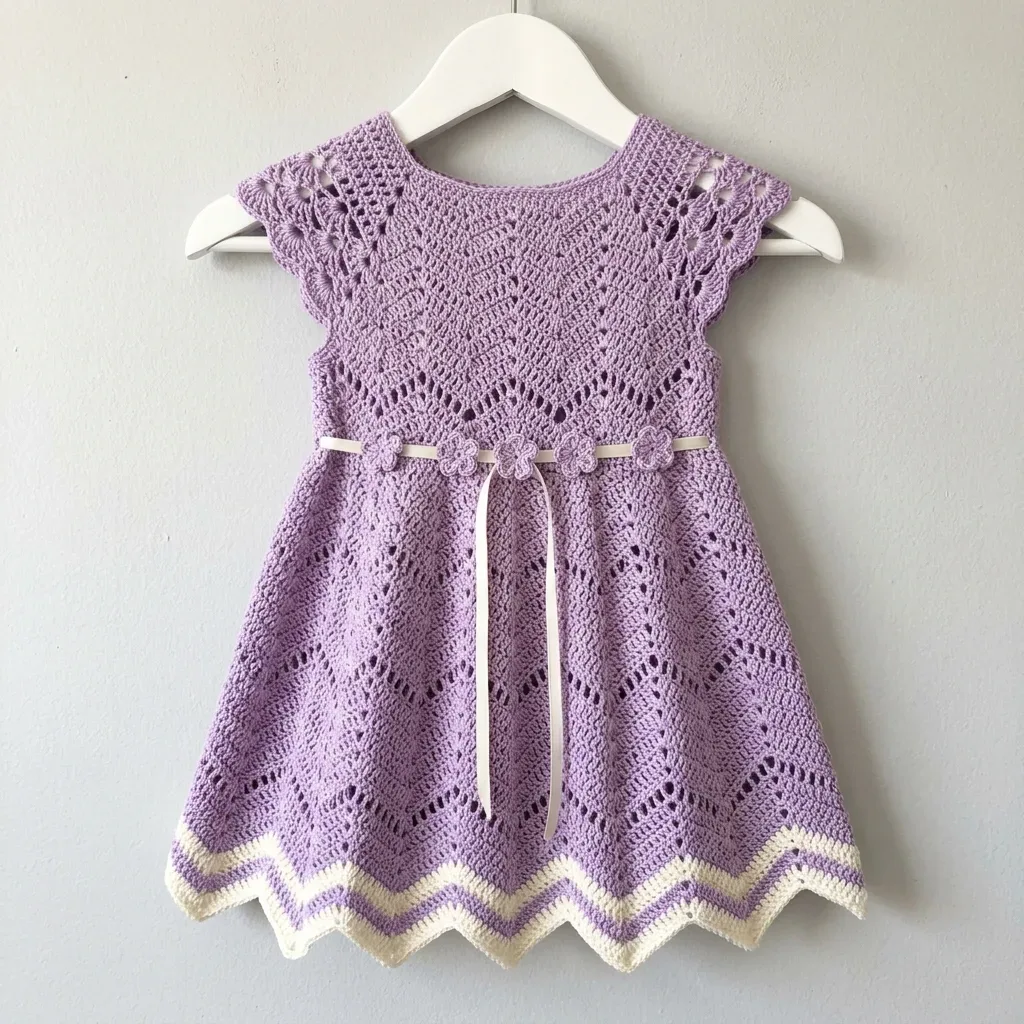
Top-down baby lace chevron dress worked in one piece: fan-stitch yoke, bodice, eyelet waistband, chevron-border skirt.
Crochet Rituals · retyped from the source and laid out for print · added 20 Oct 2026
What the pattern's own author called it. Nothing here is graded again.

What the sample was worked in. Any weight works; the size moves with it.

Each one is typed out whole and gets its own line.
This dress is built from the neckline down in one continuous piece: a magic-ring foundation grows through an 11-round fan-increase yoke, separates at the underarms for sleeves, narrows into a 5-round bodice, gathers at a 2-round eyelet waistband, and falls into an 8-round skirt finished with a 6-round chevron border. Before the first stitch, have 350 to 400 yards of MC, 50 yards of CC, a D-3 (3.25 mm) hook, at least 6 stitch markers, scrap yarn for holding sleeve stitches, ribbon, and a button or snap on hand. Plan for 18 to 24 hours across several sessions.
Listed by the pattern's own author, in their words.
Key to this pattern, 16 short forms
With MC, leaving a 12 inch tail for seaming later, make a magic ring.
Ch 3 (counts as first dc), work 71 dc into the ring, sl st to top of beg ch-3 to join. Pull the magic ring tail firmly closed. (72 dc)Place 4 stitch markers to mark the raglan increase points: After stitch 9 (right shoulder)After stitch 27 (left front shoulder)After stitch 45 (left shoulder)After stitch 63 (right back shoulder)This creates sections: 9 sts (right back), 18 sts (right sleeve), 18 sts (front), 18 sts (left sleeve), 9 sts (left back).
With MC, make a magic ring.
Ch 1, 10 sc into ring, sl st to join. (10 sc)
Petals [Ch 3, dc in same st, ch 3, sl st into next st] 5 times. (5 petals) Fasten off, leaving a 10 inch tail for sewing.
The yoke is worked over Rounds 2 through 12. Each increase round adds a Fan at each of the 4 raglan markers, adding 16 stitches total per increase round.
Increase Round Ch 3, dc in next 8 sts, [work Fan in marked st, dc in next 17 sts] 3 times, work Fan in marked st, dc in next 8 sts, sl st to join. (88 sts)
Plain Lace Round Ch 3, dc in each st around, sl st to join. (88 sts)
Increase Round Ch 3, dc in next 8 sts, [work Fan in next marked-section center st, dc in next 21 sts] 3 times, work Fan in next marked-section center st, dc in remaining 12 sts, sl st to join. (104 sts)After each increase round, move your raglan markers to the center dc of each new fan.
Plain Lace Round Ch 3, dc in each st around, sl st to join. (104 sts)
Increase Round Ch 3, work as established, working Fan at each of the 4 raglan marker positions. Sl st to join. (120 sts)
Plain Lace Round Ch 3, dc in each st around, sl st to join. (120 sts)
Increase Round Ch 3, work as established with Fan at each raglan marker. Sl st to join. (136 sts)
Plain Lace Round Ch 3, dc in each st around, sl st to join. (136 sts)
Increase Round Ch 3, work as established with Fan at each raglan marker. Sl st to join. (152 sts)
Plain Lace Round Ch 3, dc in each st around, sl st to join. (152 sts)
Increase Round Ch 3, work as established with Fan at each raglan marker. Sl st to join. (168 sts)
Checkpoint: Your yoke should measure approximately 3.5 inches from center neckline to bottom edge. You should see 6 visible fan clusters radiating from the neckline when laid flat.
Separation Round Ch 1, sc in next 26 sts (right back), place the next 36 sts on scrap yarn (right sleeve), ch 4 (underarm chain bridge), sc in next 36 sts (front), place the next 36 sts on scrap yarn (left sleeve), ch 4 (underarm chain bridge), sc in next 27 sts (left back), sl st to join. (104 working sts)
Adjustment Round Ch 3, dc in each st around, working 1 extra dc evenly into each ch-4 bridge (5 dc across each bridge instead of 4). Sl st to join. (108 sts)
Fan Lace Round Ch 1 (counts as sc), [sk 2 sts, work Fan into next st, sk 2 sts, sc into next st] 18 times, sl st to join. (108 sts)
Connector Round Ch 3, [dc into each of the 5 dc of next Fan, ch 2, sk the sc] 18 times, sl st to join. (90 dc plus 18 ch-2 sps)
Fan Lace Round Ch 1, [sc into ch-2 sp, sk 2 sts, Fan into center dc of fan below, sk 2 sts] 18 times, sl st to join. (108 sts)
Connector Round Repeat Round 16. (90 dc plus 18 ch-2 sps)
Fan Lace Round Repeat Round 17. (108 sts)
Eyelet Round Ch 3, [dc in next 2 sts, ch 1, sk 1 st] across, ending dc in remaining sts, sl st to join. (72 dc plus 36 ch-1 sps)
This creates the holes for threading your satin ribbon.
Stabilizing Round Ch 3, dc in each dc and in each ch-1 sp around, sl st to join. (108 sts)
(Skirt Increase Round 1): Ch 1, [sc in next 2 sts, 2 sc in next st] 36 times, sl st to join. (144 sts)
Fan Lace Round Ch 1, [sk 2 sts, Fan into next st, sk 2 sts, sc into next st] 24 times, sl st to join. (144 sts)
Connector Round Ch 3, [dc in each of the 5 dc of next Fan, ch 2, sk the sc] 24 times, sl st to join. (120 dc plus 24 ch-2 sps)
Fan Lace Round Ch 1, [sc into ch-2 sp, sk 2 dc, Fan into center dc of fan, sk 2 dc] 24 times, sl st to join. (144 sts)
Connector Round Repeat Round 24. (120 dc plus 24 ch-2 sps)
Fan Lace Round with Increase Work fan lace pattern as established, adding 2 extra sc into 12 evenly spaced connector sc positions. Sl st to join. (156 sts)
Connector Round Ch 3, [dc in each of 5 dc of Fan, ch 2, sk sc] 26 times, sl st to join. (130 dc plus 26 ch-2 sps)Rounds 29-32: Continue alternating Fan Lace Rounds and Connector Rounds as established. (156 sts)
Fan Lace Round with Increase Work as Round 29 for 24 repeats, then add 2 sc in the next 2 connector positions. Sl st to join. (168 sts)Rounds 34-39: Continue alternating Fan Lace Rounds and Connector Rounds as established. (168 sts)
Setup Round, MC Ch 1, sc in each st and each ch-sp around, distributing to produce 168 sc total. Sl st to join. (168 sc)
(Chevron Round 1, MC): Ch 1. [Sc2tog over next 2 sts, sc in next 2 sts, work 5 dc into next st (peak), sc in next 2 sts, sc2tog over next 2 sts] 12 times. Sl st to join. (144 sts)
(Chevron Round 2, CC): Join CC at any valley point. Ch 1. [Sc2tog over valley sts, sc in next 2 sts, 5 dc into peak dc, sc in next 2 sts, sc2tog] 12 times. Sl st to join. Drop CC. (144 sts)
(Chevron Round 3, MC): Pick up MC. Ch 1. Work chevron repeat as established. Sl st to join. (144 sts)
(Chevron Round 4, CC): Pick up CC. Work as Round 42. Sl st to join. Fasten off CC. (144 sts)
Final Chevron Round, MC Ch 1. Work as established. At each peak, work sl st into the peak dc to keep points tight. Fasten off MC. (144 sts)
Place the 36 held sleeve stitches back onto your hook with MC. Attach yarn with sl st at the center of the underarm chain bridge. Pick up and sc into each of the 4 underarm ch, then work around the 36 held sts. Join. (40 sts)
Sleeve Round 1 Ch 3, dc in each st around, sl st to join. (40 sts)
Sleeve Round 2 (Fan Round) Ch 1, [sk 2, Fan into next st, sk 2, sc into next st] 6 times, sc in remaining 4 sts, sl st to join. (40 sts)
Sleeve Round 3 (Picot Edging) Ch 1, [sc in next st, work Picot] across, sc in each remaining st, sl st to join. Fasten off.Repeat for second sleeve.
| Rounds | 41 |
|---|---|
| Parts | 9 |
| Level | Intermediate |
| Time | 18-24 hours |
| Hook | 3.25 mm |
| Yarn | DK |
The 4 raglan markers placed after stitches 9, 27, and 45 on Round 1 mark the fan-increase points; each increase round adds a fan at all 4 points for 16 new stitches, which is what produces the raglan-angled armhole shaping across Rounds 2 through 12.
The join at the end of every round (sl st to top of beg ch-3) confirms the piece is worked in continuous joined rounds rather than spirals, which is why a stitch count is given at the end of each round for checking.
| Yoke | about 3 to 4 hours, because 11 rounds of fan increases need marker checks and stitch counts after every round |
|---|---|
| Skirt | about 8 to 10 hours, because the 8 rounds cover the widest part of the dress and take the most yardage to work |
| Finishing and embellishments | about 2 to 3 hours, because sewing the button loop, flowers, ribbon, and wet blocking all happen after the last stitch |
These answers came from whoever first published the pattern, kept word for word.