
Adventurous Intermediate
What the pattern's own author called it. Nothing here is graded again.
 Crochet·Rituals
Bags 33 Laid out for paper No account, no download
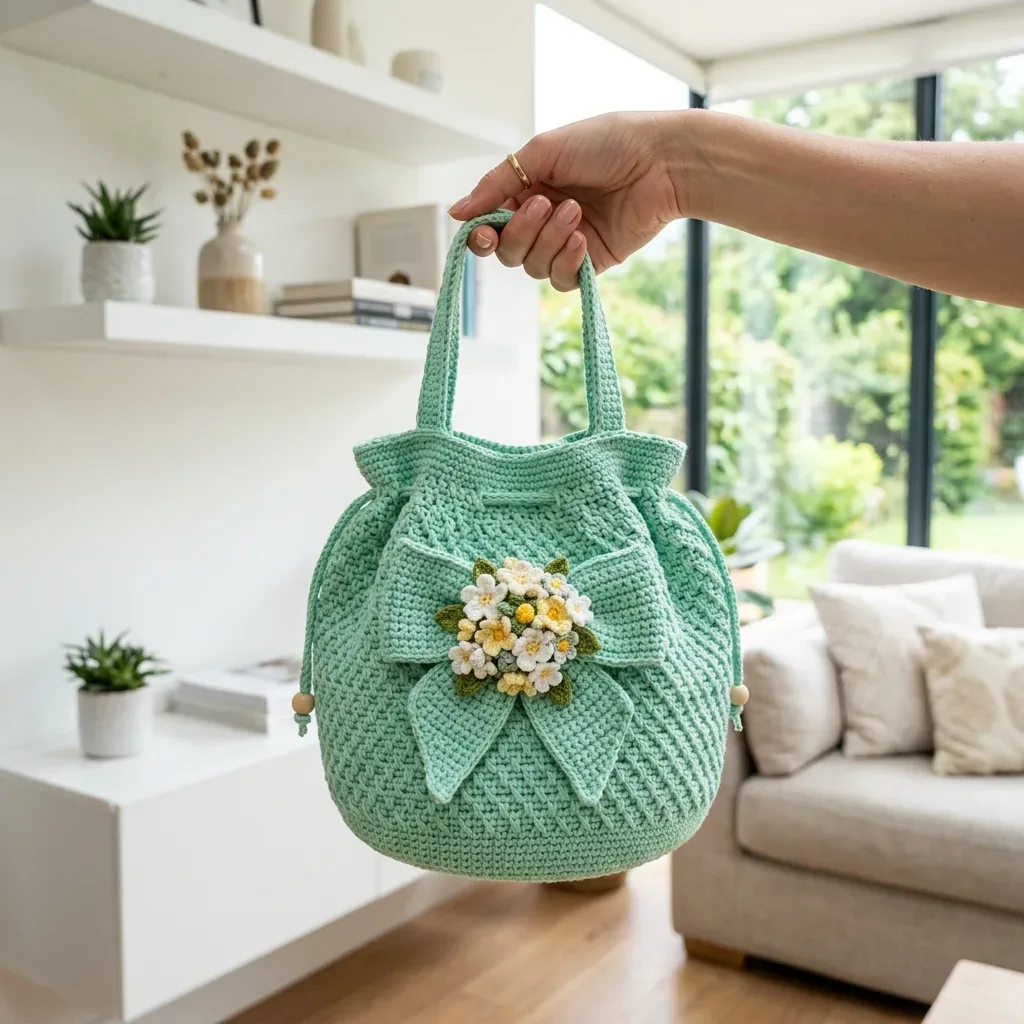
A mint bucket purse with moss-lattice texture and bow appliqué, 44 rounds, G-6 (4mm) hook.
Crochet Rituals · retyped from the source and laid out for print · added 14 Sep 2026
What the pattern's own author called it. Nothing here is graded again.

What the sample was worked in. Any weight works; the size moves with it.

Each one is typed out whole and gets its own line.
This bucket-shaped purse begins as a flat circle and grows into a body worked in moss-lattice texture, then closes under a smooth top band fitted with drawstring eyelets. A handmade bow, pinched and wrapped at the center, carries nine daisy blossoms, yellow buds, and olive leaves across the front. Two crocheted handles finish the piece, each worked flat and sewn to the inside top band. Have worsted cotton on hand for the mint body plus small amounts for the flowers, a G-6 (4mm) hook, six stitch markers, and two wooden beads for the drawstring ends before starting.
Listed by the pattern's own author, in their words.
Key to this pattern, 20 short forms
With mint, make a magic ring. Work joined rounds unless noted.
10 sc in MR, join. (10 sc)
Ch 1, inc in each st around. (20 sc)
Ch 1, sc in next st, inc in next st; rep from * around. (30 sc)
Ch 1, sc in next 2 sts, inc in next st; rep from * around. (40 sc)
Ch 1, sc in next 3 sts, inc in next st; rep from * around. (50 sc)
Ch 1, sc in next 4 sts, inc in next st; rep from * around. (60 sc)
Ch 1, sc in next 5 sts, inc in next st; rep from * around. (70 sc)
Ch 1, sc in next 6 sts, inc in next st; rep from * around. (80 sc)
Ch 1, sc in next 7 sts, inc in next st; rep from * around. (90 sc)Checkpoint: After Round 9, your base circumference should be 90 stitches and measure about 7 to 7.5 inches (18 to 19 cm) across.
Ch 1, sc in back loop only of each st. This turns the base upward. (90 sc)
Ch 1, sc in each st around. (90 sc)
Ch 1, sc in next st, ch 1, sk next st; rep from * around. (45 sc + 45 ch-sps)
Sl st into first ch-sp, ch 1, sc in next ch-sp, ch 1; rep from * around. (45 sc + 45 ch-sps each rnd)
Ch 1, sc in each sc and each ch-sp around. (90 sc)
Ch 1, sc in each st around. (90 sc each rnd)
Ch 3, dc in next 5 sts, ch 2, sk 2 sts, dc in next 8 sts; rep from * 7 times, ch 2, sk 2 sts, dc in last 2 sts, join to top of ch-3. (72 dc + 18 chs)
Ch 1, sc in each dc and 2 sc in each ch-2 sp. (90 sc)
Ch 1, sc in each st around. Fasten off after Rnd 44. (90 sc each rnd)Checkpoint: Top edge remains 90 sts. Eyelets should form 9 evenly spaced openings. Steam lightly from the wrong side, keeping the top edge round and the base flat.
With mint, ch 6.
Sc in 2nd ch from hook and across. (5 sc)
Ch 1, turn, sc in each st. (5 sc) Fasten off, leaving a long sewing tail. Each handle measures about 15 inches (38 cm) before attachment. Sew one handle to the front inside top band and one to the back, placing ends about 3.5 inches (9 cm) apart.
With mint, ch 150. Sl st in the back bump of the 2nd ch from hook and each ch across. Fasten off.Weave through the 9 eyelets, entering and exiting at one side. Add a wooden bead to each end and knot securely. If desired, make a second shorter decorative side tie by chaining 45 and slip stitching back for the opposite side.
With mint, ch 31.
Sc in 2nd ch from hook and across. (30 sc)
Ch 1, turn, sc in each st. (30 sc) Fasten off. Pinch the center and wrap with the center band below.
With mint, ch 9.
Sc in 2nd ch from hook and across. (8 sc)
Ch 1, turn, sc in each st. (8 sc) Wrap around the cinched bow center and sew ends together on the back.
Ch 13, sc in 2nd ch from hook and across. (12 sc)
Ch 1, turn, sc across. (12 sc)
Ch 1, turn, sc2tog, sc 8, sc2tog. (10 sc)
Ch 1, turn, sc across. (10 sc)
Ch 1, turn, sc2tog, sc 6, sc2tog. (8 sc)
Ch 1, turn, sc across. (8 sc)
Ch 1, turn, sc2tog, sc 4, sc2tog. (6 sc)
Ch 1, turn, sc across. Fasten off. (6 sc)Sew tails behind the bow so they angle downward. The point is softly squared.
With olive, ch 9. Sl st in 2nd ch, sc in next ch, hdc in next 2 ch, dc in next 2 ch, hdc in next ch, 3 sc in last ch. Working along the other side of chain: hdc, dc in next 2, hdc in next 2, sc, sl st. Fasten off.
| Rounds | 33 |
|---|---|
| Parts | 7 |
| Level | Adventurous Intermediate |
| Time | 8 to 10 hours |
| Hook | 4 mm |
| Yarn | Worsted |
The Front Bow Panel is worked flat over 16 rows rather than in the round, since it is pinched at the center and wrapped with the separately worked Bow Center Band to form the bow shape instead of being shaped through increases.
The base reaches 90 stitches by Round 9, and the body checkpoint at Round 44 sets the finished height at about 9.25 to 9.75 inches, showing that shaping happens early before the moss-lattice rounds run straight to the top band.
| Base and body | about 4 to 5 hours because the body runs through Round 44 in moss-lattice texture, which is slower than plain single crochet. |
|---|---|
| Handles (make 2) | about 1.5 hours because each handle is worked flat over 62 rows before seaming to the inside top band. |
| Bow, daisies, buds, and leaves | about 2 to 3 hours because nine daisy blossoms, the buds, and eight leaves are each small appliqués that need careful finishing before assembly. |
These answers came from whoever first published the pattern, kept word for word.