Row 4 calls for back loops only; skipping this changes the fold behavior at the seam. Check the row count twice before turning.
Starting waist shaping at Row 7 only
The pattern note places the start of waist shaping before Row 4, ahead of the first stated decrease row. Reread the info line for the Bodice Front panel before committing to Row 4.
Using one hook size for the whole dress
The collar and cuffs need the smaller D-3 hook for a snugger fabric than the E-4 body panels. Swatch both before you commit yarn to either section.
The materials list
Main Color (MC): Light sky blue / powder blue
Approximately 2,400 yards / 2,195 meters of DK weight (CYCA 3) smooth cotton or cotton-blend yarn
Color A (CA): Teal / medium turquoise
Approximately 180 yards / 165 meters
Color B (CB): Dark teal / deep blue-green
Approximately 120 yards / 110 meters
Color C (CC): Navy blue
Approximately 80 yards / 73 meters
Color D (CD): Light aqua
Approximately 60 yards / 55 meters
Option 1: Paintbox Yarns Simply DK (100% cotton, 137 yards per 50 g skein). Choose "Dolphin Blue" for MC, "Spearmint" for CA, "Seafoam" for CB, "Midnight Blue" for CC, and "Baby Blue" for CD.
Option 2: Lion Brand 24/7 Cotton in DK (100% mercerized cotton, 186 yards per 100 g ball). The mercerized finish gives a slight sheen appropriate for an occasion dress.
Option 3: Scheepjes Catona (100% mercerized cotton, 62 yards per 25 g ball). Use this for the surface crochet embellishment colors only.
Substitution note
Choose any smooth DK-weight cotton or cotton-blend with at least 50% cotton content. Avoid fuzzy or hairy fibers, which will obscure the surface motifs. Mercerized cotton is strongly preferred for drape and sheen.
US size E-4 (3.5 mm) for body fabric
US size D-3 (3.25 mm) for collar and cuffs
Stitch markers (at least 12)
Yarn needle
Scissors
Flexible measuring tape
Blocking mats and T-pins
Stitch holders or scrap yarn
Row counter
Listed by the pattern's own author, in their words.
Fold collar so that Row 1 and Row 6 meet. Sl st through matching stitches of Row 6 and the foundation chain to seam the collar into a band. Fasten off, leaving a long tail for attachment to bodice.
Checkpoint: Collar band measures approximately 14.5 inches / 37 cm around by 1 inch / 2.5 cm tall. It should fit snugly around the base of the neck with approximately 0.5 inch / 1.2 cm of ease.
Round 1
Sc in 2nd ch from hook and in each ch across. Turn. (80 sc)
Round 2
Ch 1, sc in each sc across. Turn. (80 sc)
Round 3
Ch 1, sc in each sc across. Turn. (80 sc)
Round 4
Ch 1, sc in BLO of each sc across. Turn. (80 sc)
Round 5
Ch 1, sc in each sc across. Turn. (80 sc)
Round 6
Ch 1, sc in each sc across. Do not turn. (80 sc)
Bodice Right Strap
Using MC and larger hook (E-4 / 3.5 mm), ch 10.
This strap measures approximately 4.5 inches / 11.5 cm long. Set aside.
The right shoulder has a strap worked separately, and the left shoulder is open.
Round 1
Sc in 2nd ch from hook and in each ch across. Turn. (9 sc)
Round 2
to 30: Ch 1, sc in each sc across. Turn. (9 sc)
Bodice Front Main Panel
Using MC and E-4 hook, ch 95.
The bodice front is worked flat in sc from the collar edge downward.
Begin waist shaping before Row 4.
Round 1
(RS): Sc in 2nd ch from hook and in each ch across. Turn. (94 sc)
Round 2
Ch 1, sc in each sc across. Turn. (94 sc)
Round 3
Ch 1, sc in each sc across. Turn. (94 sc)
Round 4
to 6: Ch 1, sc in each sc across. Turn. (94 sc)
Round 7
Decrease row Ch 1, sc2tog, sc in each sc to last 2 sts, sc2tog. Turn. (92 sc)
Round 8
Ch 1, sc in each sc across. Turn. (92 sc)
Round 9
Ch 1, sc in each sc across. Turn. (92
Assembly, in order
Step 11. Choker collar worked flat
Step 22. Bodice front worked flat from collar down
Step 33. Bodice back worked flat
Step 44. Skirt worked as a separate tube (recommended method)
Step 55. Skirt seamed to bodice
Step 66. Peplum ruffle added to bodice lower edge, covering the seam
Step 77. One-shoulder ruffle sleeve added at left armhole
Step 88. Scallop hem edging applied
Step 99. Surface crochet floral and leaf motifs applied
Step 1010. Hibiscus motifs sewn in place
Step 1111. Finishing and blocking
Check these before you start
The dress uses 2 to 3 inches of negative ease at the waist; work the decrease rows at the stated stitch counts even if the fabric feels tight on the hook.
The collar's BLO row (Row 4) changes the fabric's drape at the fold line — work it in back loops only as written, not as a regular sc row, or the seam at Row 6 will not sit flat.
Finished Measurements: size Small/Medium (US 4 to 8). Bust: 34 to 36 inches / 86 to 91 cm. Waist: 27 to 29 inches / 69 to 74 cm. Hip: 36 to 38 inches / 91 to 97 cm. Total length (shoulder to hem): 52 inches / 132 cm. Bodice length (choker to peplum hem): 16 inches / 40.5 cm. Skirt length (waist to hem): 36 inches / 91.5 cm. The dress uses negative ease at the waist, approximately 2 to 3 inches of negative ease, for a body-conscious silhouette.
Substitution note: Choose any smooth DK-weight cotton or cotton-blend with at least 50% cotton content. Avoid fuzzy or hairy fibers, which will obscure the surface motifs. Mercerized cotton is strongly preferred for drape and sheen.
Gauge: Using MC and US E-4 (3.5 mm) hook: 22 sc = 4 inches / 10 cm; 26 rows = 4 inches / 10 cm. Gauge is measured in single crochet worked flat after blocking.
Motif gauge: Each hibiscus motif measures approximately 2 inches / 5 cm across after blocking.
Take time to check gauge. A difference of even one stitch per 4 inches will alter the finished bust measurement by up to 2 inches across the full circumference.
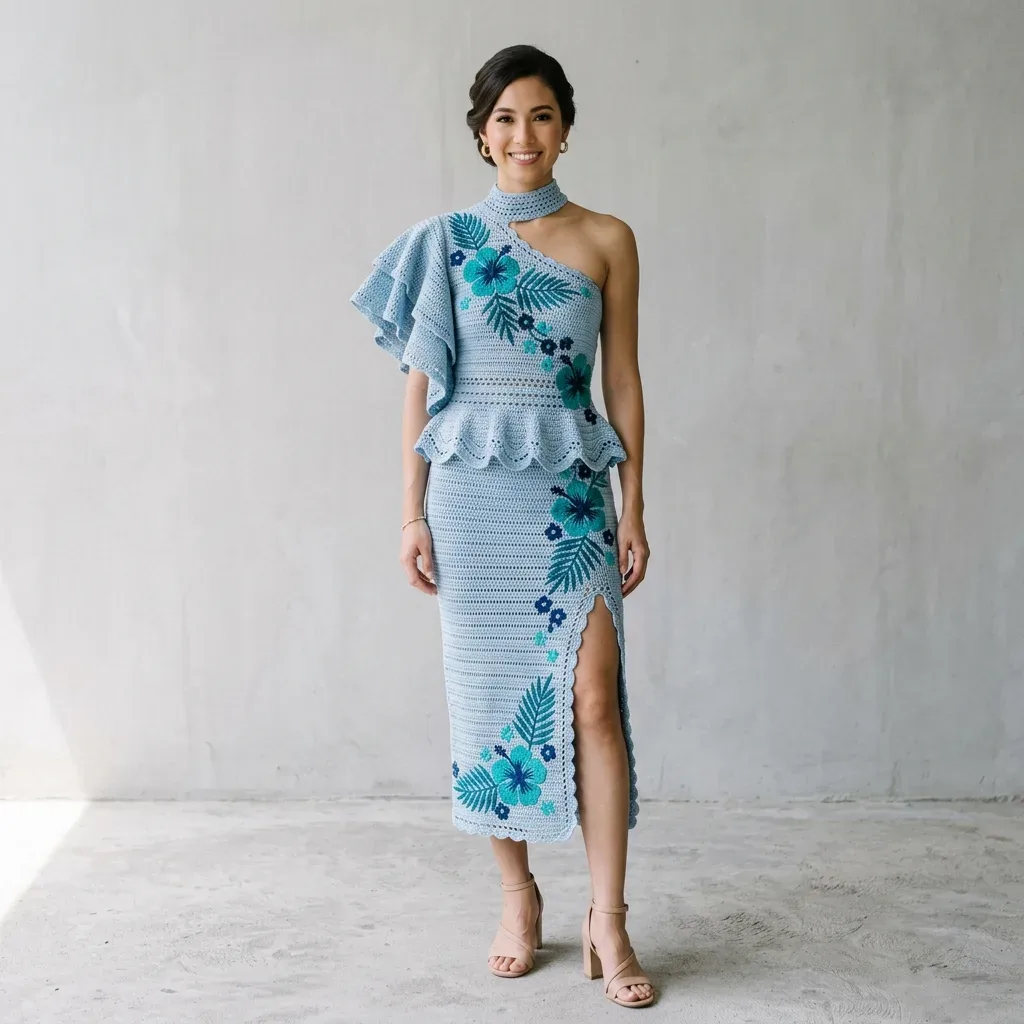
Scallop Edging (special stitch): Skip 2 sts, work 5 dc in next st, skip 2 sts, sl st in next st. Repeat across. This creates the shell scallop border seen along the peplum hem and skirt hem.
Picot Trim (special stitch): Work 1 sc, ch 3, sl st into first ch of ch-3. This creates a small decorative picot point used along the skirt slit edge.
Surface Slip Stitch (special stitch, for motif outlines): With RS facing, hold yarn behind fabric. Insert hook through fabric from front to back, draw up a loop, insert hook into next position, draw new loop through fabric and through loop on hook. This creates a raised line on the RS.
Hibiscus Motif (special stitch): Center ring: Ch 5, join with sl st to form ring. Rnd 1: Ch 1, work 10 sc into ring, join with sl st. (10 sc) Rnd 2 (petals): [Ch 4, work 3 tr into same ch-4 sp base, ch 4, sl st in next sc] 5 times. (5 petals) Rnd 3 (petal detail): Sl st into first ch-4 sp of any petal, ch 1, sc in same sp, hdc in tr, dc in tr, hdc in tr, sc in ch-4 sp. Repeat for each petal. Join. Fasten off. Each motif measures approximately 2 inches / 5 cm across.
Fern Leaf (special stitch, surface crochet): Work a foundation chain of the desired length along the fabric using CB. Then work back along the chain: [ch 4, sl st into chain at base of ch-4, advance 2 sts along main chain, sl st, ch 4, sl st into main chain] repeated for the full length, alternating sides, to form a feathered fern frond.
Ruffle Stitch (special stitch): Row 1 (base): Work sc across. Row 2 (ruffle expansion): Work 2 dc in every sc across (doubling the stitch count). Row 3 (ruffle expansion 2): Work 2 dc in every dc across (doubling again). Row 4: Work sc across, decreasing evenly back to the attachment width. This creates a full, layered ruffle.
The bodice is asymmetric. The right shoulder is covered by a strap, and the left shoulder is open. The ruffle sleeve attaches at the left arm position only.
The skirt is worked in rounds with a right-front slit created by working flat for the last 6 inches / 15 cm.
Surface crochet motifs are placed diagonally from upper right bodice to lower left skirt hem.
On one line
Rounds
15
Parts
3
Level
Intermediate
Time
20-30 hours
Hook
3.5 mm
Yarn
DK
Set-up
Confirm MC yarn amount against your gauge swatch before casting on the bodice front; 2,400 yards covers the full dress only at the stated DK gauge.
Set aside the four accent colors (CA, CB, CC, CD) in separate small balls so surface crochet and hibiscus motifs do not compete with the main panels for yarn.
Read Row 7 of the Bodice Front Main Panel before Row 4 — waist shaping begins before the decrease row itself, so the panel count drops from 94 sc to 92 sc earlier than it reads.
Place a stitch marker at the fold point of the choker collar chain (ch 81) now, so Row 1 and Row 6 line up without recounting later.
Finishing
Seam the choker collar by folding so Row 1 meets Row 6, then sl st through matching stitches and the foundation chain to close the band; leave the tail for attaching to the bodice.
Block the bodice front and back panels flat to the stated bust and waist measurements before seaming the skirt on, so the negative-ease shaping holds its line.
Weave in all ends from color changes before applying surface crochet motifs — floral and leaf embellishment sits on top of the fabric and will trap loose tails underneath.
Construction
The bodice front panel is worked flat from the collar edge downward, with waist shaping introduced before Row 4 and the first decrease row (Row 7) dropping the count from 94 sc to 92 sc — the shaping is front-loaded rather than spread evenly across all seven rounds.
The choker collar is worked flat as a long strip (80 sc across 6 rows) and then folded and seamed into a band; this join is what turns a straight strip into a closed circle that fits the neck with 0.5 inch of ease.
Time per section
Choker collar
about 1 hour, because it is only 6 rows but the fold-and-seam step at Row 6 needs careful stitch matching
Bodice front and strap
about 2 to 3 hours, because the 7-round front panel carries early waist shaping and the 30-row strap is worked separately
Skirt, peplum, and embellishment
about 10 to 15 hours, because the skirt tube, ruffle sleeve, scallop hem, and surface-crochet florals each add separate rounds of finishing work
Common questions
Why does the bodice front panel mention decreases before Row 4 if the first decrease row is Row 7?
The pattern note instructs you to begin waist shaping before Row 4, which means the shaping plan starts earlier than the first stated decrease row at Row 7. Read the panel's info line in full before working Row 4 so the stitch counts land correctly by Row 7's 92 sc.
Can the invisible zipper be skipped?
Yes, the 10-inch invisible zipper for the left side seam of the skirt is listed as optional. Without it, rely on the negative ease at the waist to keep the skirt in place.
Why does the choker collar use a smaller hook than the rest of the dress?
The collar is worked with the D-3 (3.25 mm) hook while the body panels use the E-4 (3.5 mm) hook, producing a firmer band that holds its shape snugly at the neck. A collar worked at body-panel gauge would sit looser than the stated 0.5 inch of ease allows.
These answers came from whoever first published the pattern, kept word for word.

 Crochet·Rituals