Skip to the patterns
Crochet·Rituals
Menu

Amigurumi 11 Laid out for paper No account, no download

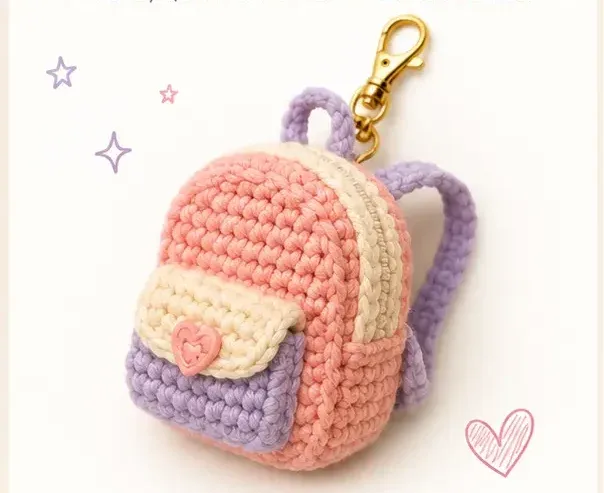
Tiny crochet backpack charm pattern for keychains

Mini amigurumi backpack charm, 4.5 cm tall, 2.0 mm hook, 5-round back panel plus flat side strip.

Jump to the rounds Pin it
Tiny crochet backpack charm pattern for keychains
Amigurumi · Sport
Skill
Intermediate
Time
4-6 hours
Yarn weight
Sport
Hook
2.0 mm
Rounds
11

Intermediate

What the pattern's own author called it. Nothing here is graded again.

Sport

What the sample was worked in. Any weight works; the size moves with it.

11

Each one is typed out whole and gets its own line.

This tiny backpack charm builds up from a flat disc into a rounded panel, then pairs it with a short flat-worked strip for the sides. Worked in sport weight cotton on a 2.0 mm hook, the finished piece stands about 4.5 cm tall. Before picking up the hook, set out three colors — Peach for the main body, Lavender for accent panels, and Cream for trim — along with fiberfill, a yarn needle, and a lobster clasp or keychain ring for attaching it once seamed.

Common mistakes and their fixes

Losing count during the Back Panel increases
Count stitches at the end of every round against the target — 6, then 12, then 18 — before moving on, since a missed increase early on throws off every later round.
Turning chains skipped on the Sides strip
Chain 1 and turn at the start of each row on the Backpack Sides; skipping the turning chain will pull the row count of 23 off and warp the band.
Overstuffing the tiny panel
Add fiberfill in small pinches and check the shape often — on a piece finishing at 4.5 cm tall, a little stuffing goes a long way and overfilling distorts the round shape.

The materials list

  1. To make this tiny crochet backpack charm, you will need:
  2. Sport weight cotton yarn
  3. Main color yarn (Peach)
  4. Accent color yarn (Lavender)
  5. Trim color yarn (Cream)
  6. 2.0 mm crochet hook
  7. Fiberfill stuffing
  8. Yarn needle
  9. Stitch marker
  10. Lobster clasp or keychain ring
  11. Small button or bead (optional)
  12. Understanding the basic crochet abbreviations will help you follow the pattern more easily.
  13. Tiny Backpack Charm Crochet Pattern
  14. Back Panel

Listed by the pattern's own author, in their words.

Key to this pattern, 6 short forms

Back Panel

Using Main Color A:

Round 1

6 sc in MR (6)

Round 2

inc around (12)

Round 3

(sc, inc) ×6 (18)Step by step: ch 1, turn, hdc across (18); Fasten off.

Round 4

(2 sc, inc) ×6 (24)

Rounds 5–7

sc around (24)Fasten off.

R5

Round 1

sc around in BLO (24)

Backpack Sides

Using Main Color A: Ch 24

Round 1

sc in 2nd ch from hook and across (23)

Rounds 2–3

ch 1, turn, sc across (23)Fasten off.

This strip forms the side and body band of the mini backpack.

Pocket Flap

Using Cream yarn: Ch 9

Round 1

sc in 2nd ch from hook and across (8)

Round 2

ch 1, turn, sc across (8)Fasten off.

Top Handle

Using Lavender yarn: Ch 10

Round 1

sc in 2nd ch from hook and across (9)Fasten off and leave a long tail for sewing.

Assembly Instructions Sew the side strip onto the back panel.

Attach the front panel to create the backpack shape.

R6

Fasten off.

Check these before you start

  • Work tightly on the 2.0 mm hook — sport weight cotton at this gauge needs a snug tension so fiberfill does not show through the fabric.
  • Move the stitch marker up at the start of every round on the Back Panel; with only 6 to 24 stitches per round, it is easy to lose your place without it.
  • Fasten off cleanly at the end of the Backpack Sides strip and leave a working tail long enough for seaming it to the Back Panel later.

On one line

Rounds11
Parts6
LevelIntermediate
Time4-6 hours
Hook2.0 mm
YarnSport

Set-up

  • Sort your yarn into three roles before starting: Peach as main color, Lavender as accent, Cream as trim — the Back Panel sample is worked in Lavender, so confirm which piece gets which color before the first magic ring.
  • Check that fiberfill and a lobster clasp or keychain ring are on hand; both are needed at finishing and are easy to forget when stitching such a small piece.
  • Read through the Back Panel rounds once before starting — the stitch count doubles from R1 to R2 and climbs steadily through R3, so knowing the target counts ahead of time makes it easier to catch a missed increase.
  • Place a stitch marker at the start of R1 and move it up each round; on a piece this small, a skipped marker is easy to lose track of within a round or two.

Finishing

  1. Weave in all loose ends from color changes and fasten-offs before assembling pieces, working each tail through a few stitches on the wrong side.
  2. Lightly stuff the Back Panel with fiberfill before closing it, filling just enough to round it out without stretching the sport weight cotton.
  3. Seam the Backpack Sides strip around the stuffed Back Panel, then attach the Top Handle and a lobster clasp or keychain ring to complete the charm.

Construction

The Back Panel is built from the center out: R1 starts with 6 sc in a magic ring, R2 doubles that to 12 with an increase in every stitch, and R3 spaces increases every other stitch to reach 18 — a standard amigurumi disc progression that keeps the panel flat and even.

The Backpack Sides are worked flat in rows rather than in the round, starting from a chain of 24 and holding steady at 23 stitches across rows 2 and 3; this produces a straight band meant to be seamed around the panel rather than shaped like the body itself.

Time per section

Back Panelabout 25-30 minutes, because it works through 5 rounds of shaping increases that need counting
Backpack Sidesabout 10-15 minutes, because the 3-row flat strip is quick straight stitching with no shaping
Pocket Flap, Top Handle, and assemblyabout 20-25 minutes, because the small pieces plus stuffing, seaming, and attaching the clasp take more care than stitch count alone suggests

Common questions

What size hook does this backpack charm use?
A 2.0 mm crochet hook is used throughout, paired with sport weight cotton yarn to keep the finished charm dense enough to hold fiberfill without gapping.
How big is the finished backpack charm?
The finished piece measures approximately 4.5 cm, or 1.8 inches, tall — small enough for a keychain, zipper pull, or bag charm.
Why is the Backpack Sides piece worked flat instead of in the round?
The Sides strip is a straight band, chained to 24 and worked back and forth for three rows, rather than a shaped round piece; this lets it wrap and seam around the Back Panel to form the body of the charm.

These answers came from whoever first published the pattern, kept word for word.