
Intermediate
What the pattern's own author called it. Nothing here is graded again.
 Crochet·Rituals
Cardigans 30 Laid out for paper No account, no download
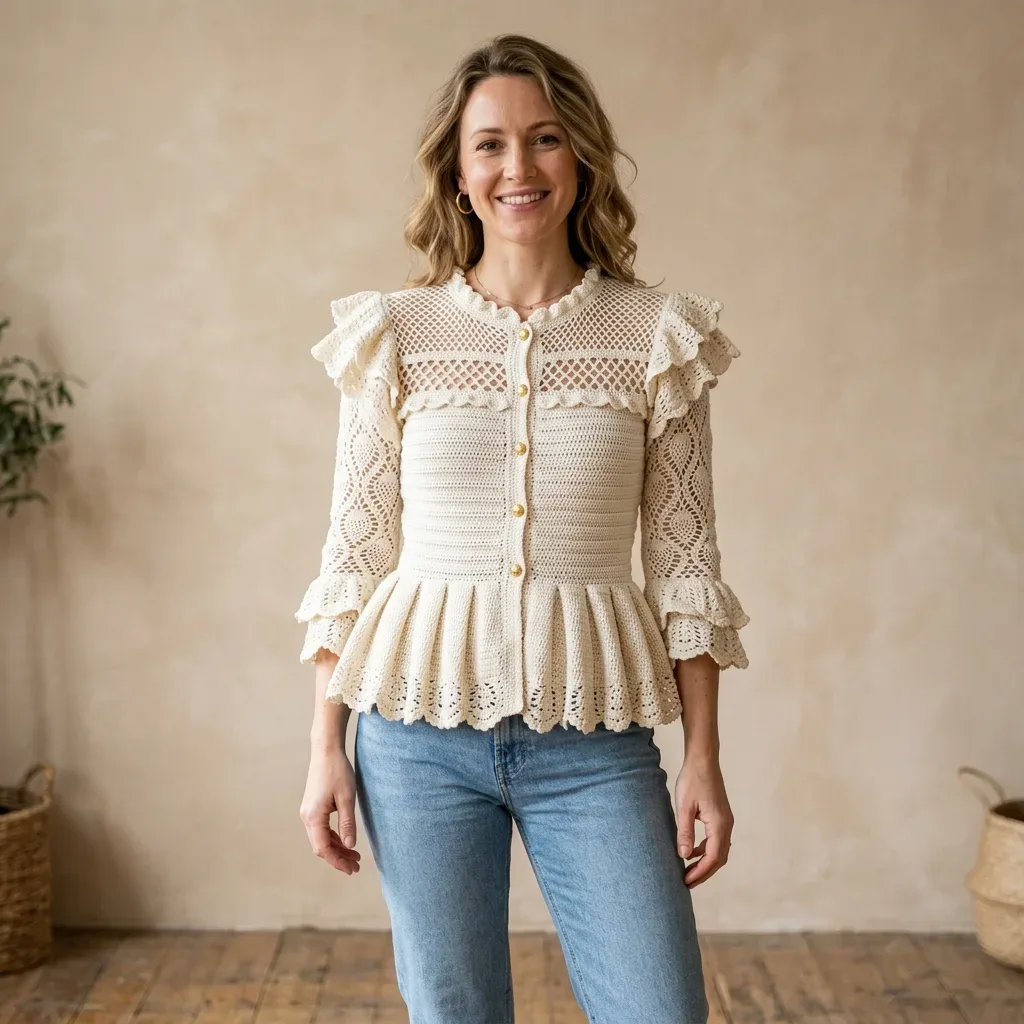
Fitted lace cardigan: 8-round ribbing, diamond mesh yoke, pineapple sleeves, E-4/F-5 hooks.
Crochet Rituals · retyped from the source and laid out for print · added 10 Oct 2026
What the pattern's own author called it. Nothing here is graded again.

What the sample was worked in. Any weight works; the size moves with it.

Each one is typed out whole and gets its own line.
Fitted lace cardigan: 8-round ribbing, diamond mesh yoke, pineapple sleeves, E-4/F-5 hooks.
Listed by the pattern's own author, in their words.
Key to this pattern, 27 short forms
(RS): Ch 1, turn. Working in BLO, sc in each st across. (94, 102, 110, 118 sc)
(WS): Ch 1, turn. Working in BLO, sc in each st across. (94, 102, 110, 118 sc)
through 10: Repeat Rows 1 and 2 four more times. (94, 102, 110, 118 sc after each row)After Row 10, the ribbing section measures approximately 1.75 inches / 4.5 cm tall. This is the narrowest point that will sit at the natural waist.Waist Shaping Increase Row (RS): Ch 1, turn. Working in BLO, sc in first 9 (10, 11, 12) sts, 2 sc in next st, [sc in next 9 (10, 11, 12) sts, 2 sc in next st] 8 times, sc in rem sts. (103, 111, 119, 127 sc)
Ch 1, turn. Working in BLO, sc across. (103, 111, 119, 127 sc)
Ch 1, turn. Working in BLO, sc across. (103, 111, 119, 127 sc)
Ch 1, turn. Working in BLO, sc across. (103, 111, 119, 127 sc)
Ch 1, turn. Working in BLO, sc across. (103, 111, 119, 127 sc)
Ch 1, turn. Working in BLO, sc across. (103, 111, 119, 127 sc) Checkpoint: After Row 16, the back panel should measure approximately 3.25 inches / 8.5 cm tall from the foundation row. The width at the widest point of the ribbing section should be approximately 18.75 (20.25, 21.75, 23.25) inches / 47.5 (51.5, 55, 59) cm when gently stretched to working width.
(RS): Ch 1, turn. Working in BLO, sc across. (47, 51, 55, 59 sc)
through 10: Ch 1, turn. Working in BLO, sc across. (47, 51, 55, 59 sc) Waist Increase Row (RS): Ch 1, turn. Working in BLO, sc in first 9 (10, 11, 12) sts, 2 sc in next st, [sc in next 9 (10, 11, 12) sts, 2 sc in next st] 4 times, sc in rem sts. (52, 56, 60, 64 sc)
through 16: Ch 1, turn. BLO sc across. (52, 56, 60, 64 sc)
Using E-4 hook, work 54 (54, 60, 60) fsc.
Cuff Ribbing Row 1 (RS): Ch 1, turn. Working in BLO, sc across. (54, 54, 60, 60 sc)
through 8: Ch 1, turn. BLO sc across. (54, 54, 60, 60 sc) Checkpoint: After Row 8, the cuff ribbing measures approximately 1.5 inches / 3.8 cm.
Switch to F-5 hook.
(RS): Ch 5, turn. Skip first 3 sts, dc in next st, [ch 2, skip 2 sts, dc in next st] across.Size S: (18 dc posts, 17 ch-2 sp)Size M: (19 dc posts, 18 ch-2 sp)Size L: (20 dc posts, 19 ch-2 sp)Size XL: (22 dc posts, 21 ch-2 sp)
(WS): Ch 5, turn. Dc in first ch-2 sp, [ch 2, dc in next ch-2 sp] across, ch 2, dc in 3rd ch of beg ch-5. (same dc post counts)Rows 17 through 22: Work 6 rows of diamond mesh same as back.
(Transition, RS): Ch 6, turn. Skip first ch-2 sp, dc in next dc post, [ch 3, dc in next dc post] across. (same dc post counts)
through 32 (WS and RS alternating): Work wide mesh (ch-3 spaces) same as back. Maintain dc post counts.
The yoke uses a wider open mesh where ch-3 spaces replace ch-2 spaces, creating a slightly more open grid that matches the upper chest texture visible in the finished garment.
RS, Transition Row Ch 6 (counts as dc plus ch 3), turn. Skip first ch-2 sp, dc in next dc post, [ch 3, dc in next dc post] across. (same dc post count as mesh section)
(WS): Ch 6, turn. Dc in first ch-3 sp, [ch 3, dc in next ch-3 sp] across, ch 3, dc in 3rd ch of beg ch-6. (same dc post count)Rows 24 through 32 (9 yoke rows total including Row 23): Work Row 24 pattern throughout.Checkpoint: After Row 32, the back panel from foundation to current row should measure approximately 8 inches / 20.5 cm tall. The piece is now at the armhole shaping point.
RS, Armhole Shaping Sl st across first 2 dc posts and into the 3rd dc post, ch 6, work wide mesh across until 2 dc posts remain at end of row, turn, leaving last 2 dc posts unworked.Size S: (31 dc posts)Size M: (34 dc posts)Size L: (36 dc posts)Size XL: (39 dc posts)
(WS): Ch 6, turn. Work wide mesh across, dc into 3rd ch of beg ch-6. (same counts as Row 33)
(RS): Ch 6, turn. Skip first ch-3 sp, sl st into first dc post, ch 6, work wide mesh across until last dc post, turn, leaving final post unworked.Size S: (29 dc posts)Size M: (32 dc posts)Size L: (34 dc posts)Size XL: (37 dc posts)Row 36 (WS): Ch 6, turn. Work wide mesh even. (same counts as Row 35)Rows 37 through 44 (even armhole rows): Work wide mesh even, no further shaping.Size S: (29 dc posts per row)Size M: (32 dc posts per row)Size L: (34 dc posts per row)Size XL: (37 dc posts per row)Checkpoint: After Row 44, the armhole opening measures approximately 4.5 inches / 11.5 cm. The back panel above the armhole shaping should measure approximately 12.5 inches / 32 cm total height from foundation.
RS, Armhole Edge Sl st across first 2 dc posts, into 3rd dc post, ch 6, work wide mesh across to end (center front edge has no shaping here).Size S: (16 dc posts)Size M: (17 dc posts)Size L: (18 dc posts)Size XL: (20 dc posts)Row 34 (WS): Ch 6, turn. Work wide mesh even. (same counts)
(RS): Sl st into first dc post, ch 6, work wide mesh across to end.Size S: (15 dc posts)Size M: (16 dc posts)Size L: (17 dc posts)Size XL: (19 dc posts)Row 36 (WS): Ch 6, turn. Work wide mesh even.Rows 37 through 44: Work wide mesh even, no shaping. (same counts as Row 35)
RS, Right Shoulder Work wide mesh across first 8 (9, 10, 11) dc posts only, turn. Leave remaining sts unworked. (8, 9, 10, 11 dc posts)
(WS): Ch 6, turn. Work wide mesh across 8 (9, 10, 11) dc posts. Fasten off. With RS facing, skip the center 13 (14, 14, 15) dc posts for the back neck opening. Rejoin yarn to the next dc post for the left shoulder.
L (RS, Left Shoulder): Ch 6, work wide mesh across remaining 8 (9, 10, 11) dc posts. (8, 9, 10, 11 dc posts)Row 46L (WS): Ch 6, turn. Work wide mesh across. Fasten off.
RS, Neck Decrease Sl st into first 3 dc posts, ch 6, work wide mesh to end.Size S: (13 dc posts)Size M: (14 dc posts)Size L: (15 dc posts)Size XL: (17 dc posts)
(WS): Ch 6, turn. Work wide mesh, stopping 1 dc post before neck edge, turn.Size S: (12 dc posts)Size M: (13 dc posts)Size L: (14 dc posts)Size XL: (16 dc posts)
(RS): Sl st into first dc post, ch 6, work wide mesh to end.Size S: (11 dc posts)Size M: (12 dc posts)Size L: (13 dc posts)Size XL: (15 dc posts)
(WS): Work wide mesh even across remaining dc posts. Shoulder rows (Row 49 through Row 50): Work wide mesh even. Fasten off.Shoulder dc post counts after neck shaping: Size S: (8 dc posts)Size M: (9 dc posts)Size L: (10 dc posts)Size XL: (11 dc posts)Buttonhole Placement: Mark the positions of 5 buttonholes evenly spaced along the center front edge before working the button band. The lowest buttonhole sits 1 inch / 2.5 cm above the waist increase row. The highest buttonhole sits 0.75 inch / 2 cm below the start of the neck shaping. Space the remaining 3 evenly between these two marks.
The back is worked from the lower torso upward. The lower section is BLO single crochet ribbing, the mid-section is diamond mesh, and the upper yoke is wider open mesh.
Using E-4 hook, work 94 (102, 110, 118) fsc. This foundation row serves as both the foundation chain and the first row of sc.
Switch to F-5 hook.
The diamond mesh repeat used here is: [dc in st, ch 2, skip 2 sts] across, ending dc in last st.
Row A (RS): Ch 5 (counts as dc plus ch 2), turn. Skip first 3 sts, dc in next st, [ch 2, skip 2 sts, dc in next st] across to last 0 (0, 0, 0) sts. Turn.
For size S (103 sts): Row A produces 35 dc and 34 ch-2 spaces. (35 dc, 34 ch-2 sp)
For size M (111 sts): (38 dc, 37 ch-2 sp)
For size L (119 sts): (40 dc, 39 ch-2 sp)
For size XL (127 sts): (43 dc, 42 ch-2 sp)
Row B (WS): Ch 5, turn. Dc in first ch-2 sp, [ch 2, dc in next ch-2 sp] across, ch 2, dc in 3rd ch of beginning ch-5. Rep Row B for mesh section. (same mesh counts as Row A)
Rows 17 through 22 (6 mesh rows total): Work Rows A and B alternately. Maintain established mesh counts throughout.
After Row 22, the mesh middle section measures approximately 2.25 inches / 5.75 cm.
The right front is half the width of the back at each section, with a vertical straight edge at center front where the button band will be added.
Using E-4 hook, work 47 (51, 55, 59) fsc.
Work exactly as Right Front Panel, reversing all shaping: armhole shaping is worked at the end of RS rows and beginning of WS rows; neck shaping is worked at the beginning of RS rows and end of WS rows. No buttonholes are worked on the left front.
The sleeves are worked flat from cuff upward. The lower sleeve features pineapple motifs, the mid-sleeve is dense sc, and the upper sleeve is plain mesh.
Switch to F-5 hook.
Pineapple Setup Row (RS): Ch 3 (counts as dc), turn. Dc in next 2 sts, [ch 3, skip 3 sts, sc in next st, ch 3, skip 3 sts, work 7 dc in next st (fan base), skip 3 sts] 4 times, ch 3, skip 3, sc in next st, ch 3, dc in last 3 sts.
Pineapple Row 1 (WS): Ch 3, turn. Dc in next 2 sts, [ch 3, sc in ch-3 sp, ch 3, dc in each of 7 dc] repeat across, ch 3, sc in ch-3 sp, ch 3, dc in last 3 sts.
Pineapple Row 2 (RS): Ch 3, turn. Dc in next 2 sts, [ch 3, sc in ch-3 sp, ch 3, skip 1 dc, dc in next 5 dc] repeat across, ch 3, sc in ch-3 sp, ch 3, dc in last 3 sts.
Pineapple Row 3 (WS): Ch 3, turn. Dc in next 2 sts, [ch 3, sc in ch-3 sp, ch 3, skip 1 dc, dc in next 3 dc] repeat across, ch 3, sc in ch-3 sp, ch 3, dc in last 3 sts.
Pineapple Row 4 (RS): Ch 3, turn. Dc in next 2 sts, [ch 3, sc in ch-3 sp, ch 3, skip 1 dc, pc in center dc] repeat across, ch 3, sc in ch-3 sp, ch 3, dc in last 3 sts.
Pineapple Row 5 (WS): Ch 3, turn. Dc in next 2 sts, [ch 5, pc at top of pineapple cluster (work pc into the ch-1 closing space of the cluster), ch 5] repeat across, dc in last 3 sts.
Pineapple Row 6 (RS): Ch 3, turn. Dc in next 2 sts, [ch 3, sc in ch-5 sp, ch 3, sc in top of pc, ch 3, sc in next ch-5 sp, ch 3] repeat across, dc in last 3 sts.
Pineapple Row 7 (WS, Fan Reset): Ch 3, turn. Dc in next 2 sts, [ch 3, skip ch-3 sp, 7 dc in sc at center of pineapple tip row] repeat across, dc in last 3 sts.
Repeat Pineapple Rows 1 through 7 once more for the second full pineapple repeat.
Switch to E-4 hook.
Close-out Row (RS): Ch 1, turn. Sc across the top of the last pineapple row, working 1 sc into each dc and 2 sc into each ch-3 sp.
Size S and M: (54 sc)
Size L and XL: (60 sc)
Increase Row: Ch 1, turn. 2 sc in first st, sc across to last st, 2 sc in last st. (adds 2 sts)
Work 1 plain row between each increase row (Ch 1, turn, BLO sc across).
Repeat Increase Row and plain row alternately until sleeve reaches: Size S: Work 10 increase rows. (74 sc)
Size M: Work 10 increase rows. (74 sc)
Size L: Work 10 increase rows. (80 sc)
Size XL: Work 10 increase rows. (80 sc)
Switch to F-5 hook.
Conversion Row (RS): Ch 5 (counts as dc plus ch 2), turn. Skip 3 sts, dc in next st, [ch 2, skip 2 sts, dc in next st] across.
Size S: (25 dc posts, 24 ch-2 sp)
Size M: (25 dc posts, 24 ch-2 sp)
Size L: (27 dc posts, 26 ch-2 sp)
Size XL: (27 dc posts, 26 ch-2 sp)
Cap Decrease Row 1 (WS): Sl st into first ch-2 sp and first dc post, ch 5, work mesh across until last dc post, turn, leaving last dc post unworked.
Size S and M: (23 dc posts)
Size L and XL: (25 dc posts)
Cap Decrease Row 2 (RS): Same as Decrease Row 1. (21 dc posts / 23 dc posts)
Cap Decrease Row 3 (WS): Same. (19 dc posts / 21 dc posts)
Cap Decrease Row 4 (RS): Same. (17 dc posts / 19 dc posts)
Cap Decrease Row 5 (WS): Same. (15 dc posts / 17 dc posts)
**Cap Decrease Row 6
| Rounds | 30 |
|---|---|
| Parts | 17 |
| Level | Intermediate |
| Time | Several weekend sessions |
| Hook | 3.5 mm |
| Yarn | DK |
The Waist Shaping Increase Row falls only after 10 rows of plain BLO ribbing, once the back panel measures approximately 1.75 inches tall; the increase lands at the narrowest point of the torso rather than being distributed through the ribbing itself, so the rib stays a constant stitch count until that single row.
Each of the five pieces, back, two fronts, two sleeves, is worked flat in rows rather than in the round, which is why ribbing sections alternate RS and WS rows with a ch-1 turn at the start of each; the pieces only come together later through seaming, after all shaping and the pineapple motifs are complete.
| Back Panel Ribbing Section | about 1 to 1.5 hours, because it runs 8 rounds plus the Waist Shaping Increase Row before the rib settles into its finished width |
|---|---|
| Right Front Mesh Section | about 45 minutes to an hour, because reading the diamond mesh repeat for the first time on the F-5 hook slows the first few rounds |
| Right Front Neck Shaping | about 30 to 45 minutes, because it covers 4 rounds of shaping that need careful stitch counting at each decrease point |
These answers came from whoever first published the pattern, kept word for word.