Skip to the patterns
Crochet·Rituals
Menu

Amigurumi 46 Laid out for paper No account, no download

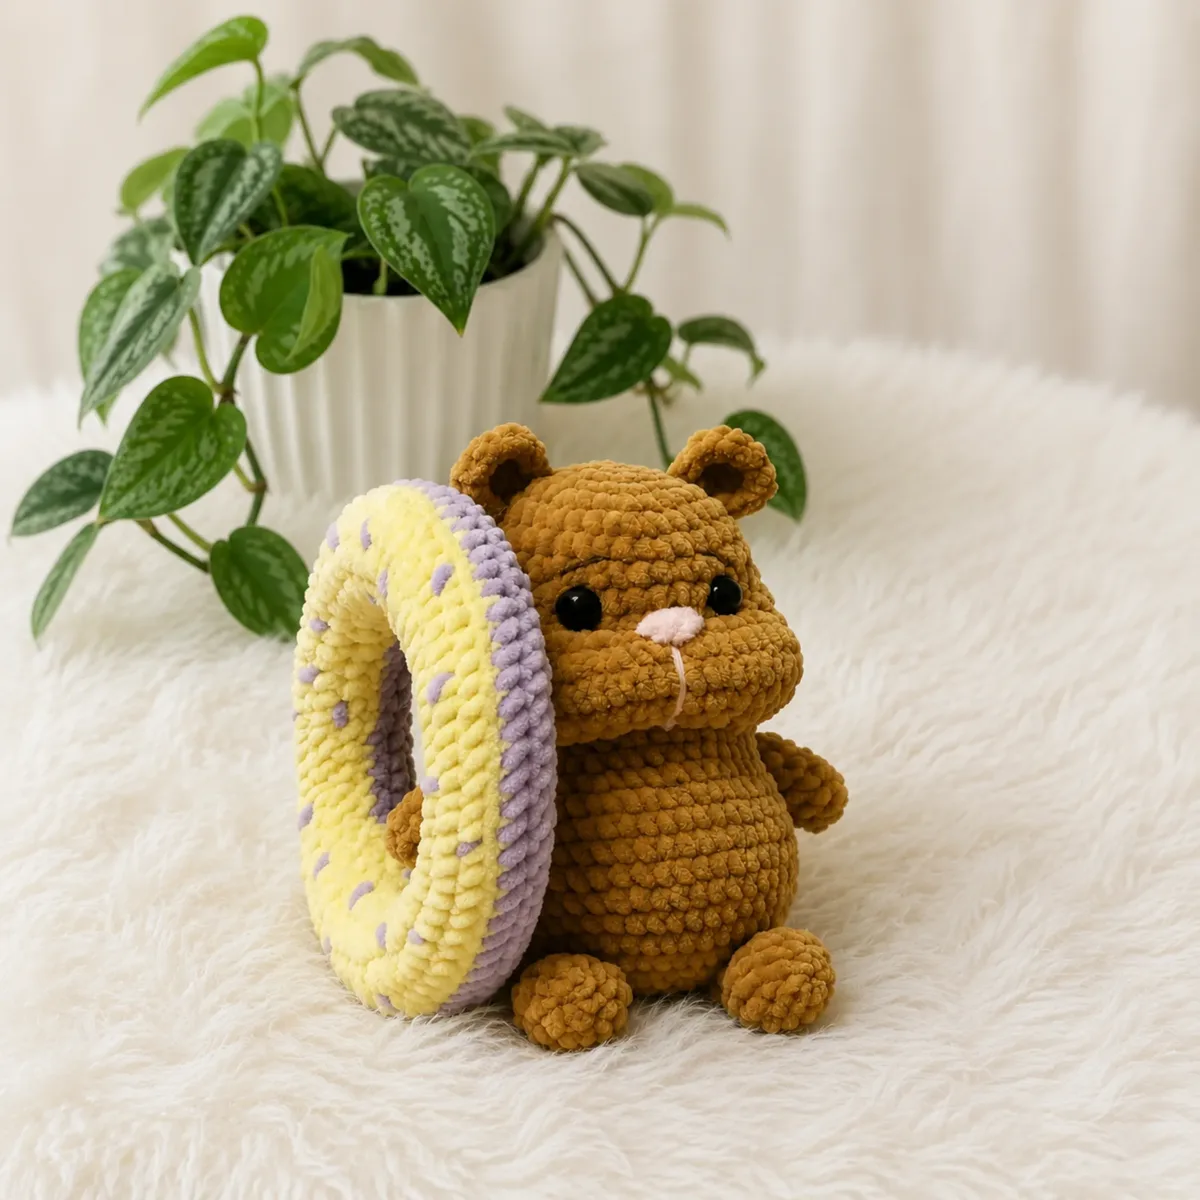
Amigurumi hamster with donut crochet pattern

Chenille hamster, head-to-body in 23 rounds, plus a 9-round donut. US D-3 hook.

Jump to the rounds Pin it
Amigurumi hamster with donut crochet pattern
Amigurumi · Super Bulky
Skill
Intermediate
Time
4-6 hours
Yarn weight
Super Bulky
Hook
3 mm
Rounds
46

Intermediate

What the pattern's own author called it. Nothing here is graded again.

Super Bulky

What the sample was worked in. Any weight works; the size moves with it.

46

Each one is typed out whole and gets its own line.

This hamster works up as a single piece from the top of the head down to the base of the body across 23 rounds, with ears, arms, legs, and a tail added afterward, plus a separate nine-round donut for it to hold. Chenille yarn in super bulky weight gives the finished animal its plush texture, worked at a tight gauge on a US D-3 hook to keep fiberfill from peeking through. Before starting, have both hook sizes on hand, 12 mm safety eyes, polyfill, and a stitch marker ready, since every part is worked in continuous spiral rounds.

Common mistakes and their fixes

Losing the round marker mid-spiral
Move the stitch marker up into the first stitch of every new round as you make it. Without it, 23 rounds worked without joins are easy to lose track of.
Loose gauge lets stuffing show
Check that your fabric is dense enough that no daylight shows through the stitches. If it does, go down a hook size on the hamster piece.
Sewing the base seam unstuffed
Add fiberfill to the body before folding and closing the base with the 4 sc seam. Once that opening is sewn shut, it cannot be stuffed further.

The materials list

  1. Yarn (Hamster): Himalaya Dolphin Baby or equivalent super bulky chenille yarn, brown — approximately ½ skein
  2. Yarn (Donut): Himalaya Dolphin Baby or equivalent super bulky chenille yarn — 2 colors of your choice (main body + glaze color)
  3. Hook (Hamster): US D-3 (3 mm)
  4. Hook (Donut): US G-6 (4 mm)

Safety eyes

  1. 12 mm — 2 pieces

Stuffing

  1. Polyfill fiberfill

Embroidery thread

  1. Pink (nose); Brown (brows)
  2. Tapestry needle
  3. Scissors
  4. Stitch marker

Listed by the pattern's own author, in their words.

Key to this pattern, 9 short forms

Head–Body(worked as one piece from top of head to base)

Round 1

8 sc in MR. (8)

Round 2

Inc in each st around. (16)

Round 3

[1 sc, inc] × 8. (24)

Round 4

[2 sc, inc] × 8. (32)

Round 5

[7 sc, inc] × 4. (36)

Rounds 6–8

Sc in each st around. (36)

Round 9

11 sc, inc × 4, 6 sc, inc × 4, 11 sc. (44)

Round 10

13 sc, inc × 6, 1 sc, dec × 2, 1 sc, inc × 6, 13 sc. (54)

Rounds 11–12

Sc in each st around. (54)

After completing Rnd 12, install safety eyes between Rnds 8 and 9. Stuff the cheek pouches firmly with fiberfill before continuing.

Round 13

13 sc, dec × 6, 4 sc, dec × 6, 13 sc. (42)

Round 14

12 sc, [dec, 1 sc] × 3, [1 sc, dec] × 3, 12 sc. (36)

Round 15

10 sc, dec, 1 sc, dec, 6 sc, dec, 1 sc, dec, 10 sc. (32)

After Rnd 15, draw a length of yarn through both sides of the face with a tapestry needle and pull gently to cinch in the cheek definition on each side. This is what gives the hamster its characteristic stuffed-cheek silhouette.

Round 16

8 sc, [1 sc, inc] × 8, 8 sc. (40)

Round 17

Sc in each st around. (40)

Round 18

8 sc, [2 sc, inc] × 8, 8 sc. (48)

Rounds 19–21

Sc in each st around. (48)

Round 22

3 sc, inc × 6, 32 sc, inc × 6, 1 sc. (60)

Rounds 23–26

Sc in each st around. (60)

Round 27

Skip the first 5 sts; insert hook into the 6th st to begin working. 5 dec, 2 sc, [2 sc, dec, 2 sc] × 5, 2 sc, 5 dec, 1 sc. (40)

Skipping those 5 sts at the start of Rnd 27 shapes the flat base of the body so the hamster sits upright.

Round 28

[3 sc, dec] × 8. (32)

Round 29

[2 sc, dec] × 8. (24)

Round 30

[1 sc, dec] × 8. (16)

Round 31

Dec × 8. (8)Fasten off, leaving a tail. Close the opening and weave in the end.

Ears(make 2)

Round 1

6 sc in MR. (6)

Round 2

Inc in each st around. (12)Fasten off, leaving a long yarn tail for sewing.

Arms(make 2)

Round 1

6 sc in MR. (6)

Round 2

[1 sc, inc] × 3. (9)

Rounds 3–4

Sc in each st around. (9)

Round 5

[1 sc, dec] × 3. (6)

Round 6

Sc in each st around. (6)Fold the piece flat. Join closed with 3 sc worked across the opening. Fasten off, leaving a long yarn tail for sewing.

Legs(make 2)

Round 1

6 sc in MR. (6)

Round 2

Inc in each st around. (12)

Rounds 3–4

Sc in each st around. (12)

Round 5

[1 sc, dec] × 4. (8)Fold flat. Join closed with 4 sc worked across the opening. Fasten off, leaving a long yarn tail for sewing.

Tail

Round 1

6 sc in MR. (6)

Round 2

Sc in each st around. (6)

Round 3

Dec × 3. (3)Fasten off, leaving a long yarn tail for sewing.

Donut

Foundation: Ch 48. Join with sl st to form a ring, being careful not to twist the chain.

Round 1

Sc in each ch around. (48)

Round 2

[2 sc, inc] × 16. (64)

Round 3

[3 sc, inc] × 16. (80)

Rounds 4–5

Sc in each st around. (80)Change to your second color (glaze color) now.

Round 6

(BLO): Sc in each st around, working through the back loop only. (80)Working through the back loop only on Round 6 leaves the front loops exposed, which creates a raised horizontal ridge around the donut. This ridge visually separates the glaze color from the dough color below it.

Round 7

Sc in each st around. (80)

Round 8

[3 sc, dec] × 16. (64)

Round 9

[2 sc, dec] × 16. (48)

Round 10

Sc in each st around. (48)Fasten off, leaving a long yarn tail for seaming.

Assembly, in order

Step 1With a tapestry needle and the yarn tail from each ear, sew the ears to the top of the head beginning at Rnd 3, spacing them 6 rounds apart from each other.
Step 2Sew the arms between Rnds 16 and 17 on either side of the body, using each arm’s yarn tail and whipstitch.
Step 3Sew the legs between Rnds 27 and 28 on either side of the lower body.
Step 4Sew the tail to the center back of the body at Rnd 23.
Step 5Using pink embroidery thread, stitch a small nose between the eyes. Use brown thread to embroider two short brow lines above the safety eyes.
Step 6To finish the donut, mattress-stitch the two open edges together — the foundation chain edge and the Rnd 10 edge — adding fiberfill gradually and evenly as you seam to maintain a full, even torus shape.
Step 7Weave in all remaining ends on both pieces.
Step 8Finished hamster measures approximately 20 cm (8 in) tall.

Check these before you start

  • Work every round of the hamster and donut in continuous spiral rounds with a stitch marker at the round start, since none of these pieces are joined or turned unless the pattern says otherwise.
  • Stuff the head-body piece firmly and evenly as you go rather than waiting until the opening is closed, since it is a single continuous shape with no side seam to adjust later.

On one line

Rounds46
Parts6
LevelIntermediate
Time4-6 hours
Hook3 mm
YarnSuper Bulky

Set-up

  • Confirm the half-skein estimate for the hamster body against your actual chenille yarn put-up, since chenille yardage varies by brand.
  • Place a stitch marker at the start of Round 1 and move it up each round; there is no join or turn anywhere in the head-body piece.
  • Read through the Head–Body section once before casting on, since it runs 23 rounds as one continuous piece with no break between head and body.

Finishing

  1. Weave in the starting tail from each ear's magic ring before sewing, then use the long working tail left at fasten-off to attach the ears to the head.
  2. Stuff the head-body piece with polyfill as the rounds progress, packing the head firmly before the neck narrows and continuing down through the body.
  3. Fold the base flat and join it closed with the 4 sc worked across the opening, then fasten off and weave in the last tail through the seam on the underside.

Construction

The head grows from 8 stitches in the magic ring to 24 by Round 3 through two rounds of straight increases, giving the rounded crown its shape before the body begins to taper.

The base of the head-body piece is worked flat rather than in the round: it is folded and closed with 4 sc across the opening, turning the last spiral round into a seam instead of a continuous decrease to nothing.

Time per section

Head–Bodyabout 2-3 hours because it runs 23 rounds as one continuous piece requiring steady stuffing as you go
Ears, arms, legs, and tailabout 1-1.5 hours because each small piece has its own magic ring, fasten-off, and tail to weave in before assembly
Donut and final assemblyabout 1-1.5 hours because the 9-round donut needs a color change plus sewing all limbs and the tail onto the body

Common questions

Can I use a different yarn for this pattern?
Yes — any super bulky chenille yarn will give you the same plush texture. Standard super bulky (weight 6) acrylic will also work, though it produces a slightly less velvety finish. Avoid cotton or linen for amigurumi this size, as they create a stiffer fabric that resists the cheek cinching technique.
The hamster's head and body are one piece — how do I know when I've moved from head to body?
Rounds 1 through 15 build the head and cheek pouches, and Round 16 begins the body expansion. The cinch pull you do after Round 15 is a helpful landmark — once you've done that, you're working on the body. Placing a stitch marker at Round 16 when you start it makes it easy to identify the transition later for arm placement.
What does working Back Loop Only on Round 6 of the donut actually do?
Working through the back loop only on Round 6 leaves the front loops exposed, which creates a raised horizontal ridge around the donut. This ridge visually separates the glaze color from the dough color below it.

These answers came from whoever first published the pattern, kept word for word.