
Intermediate
What the pattern's own author called it. Nothing here is graded again.
 Crochet·Rituals
Baby Garments 42 Laid out for paper No account, no download
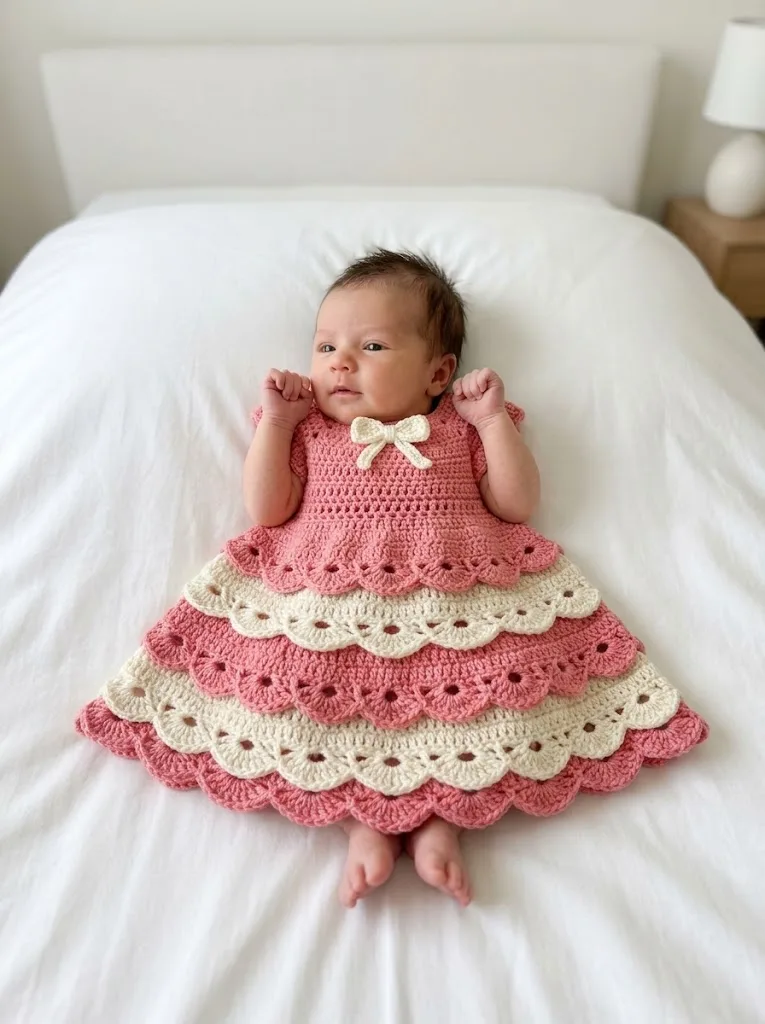
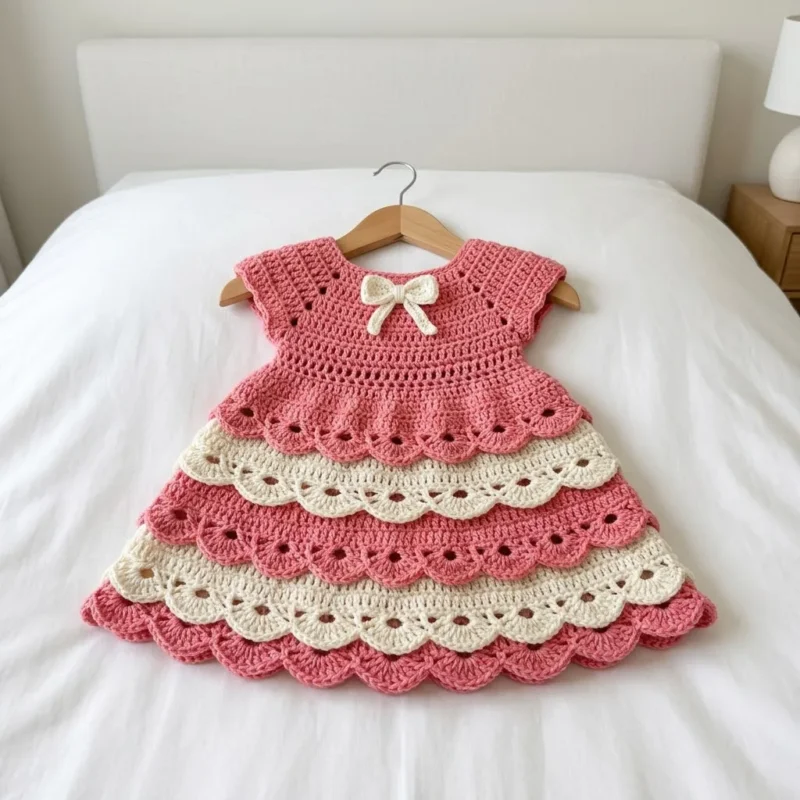
Top-down crochet baby dress, 42 rounds, five tiers, eyelet rows, 4mm hook.
Crochet Rituals · retyped from the source and laid out for print · added 14 Oct 2026
What the pattern's own author called it. Nothing here is graded again.

What the sample was worked in. Any weight works; the size moves with it.

Each one is typed out whole and gets its own line.
This dress starts at the neckline and works down: a shaped yoke, a fitted bodice divided for armholes, then five skirt tiers that alternate rose pink and cream, each joined to a specific round of the tier above. Eyelet rounds mark the transition points, sleeves and a neckline edging finish the top, and an optional bow adds a last detail. Before the first stitch, have both colors of DK cotton wound, a 4.0mm hook, and at least four stitch markers on hand.
Listed by the pattern's own author, in their words.
Key to this pattern, 10 short forms
We begin at the neckline and work downward. This section creates the shaped shoulder area.
Using Color A (Rose Pink), ch 72. Join with sl st to first ch to form a ring, being careful not to twist.
Ch 3 (counts as first dc here and throughout), dc in each ch around. Join with sl st to top of ch 3. (72 dc)
Ch 3, dc in same st, 2 dc in each st around. Join. (144 dc) Place stitch markers as follows to divide for armholes: Marker 1: Stitch 1 (center back)Marker 2: Stitch 36 (left underarm)Marker 3: Stitch 72 (center front)Marker 4: Stitch 108 (right underarm)
Ch 3, dc in each st around. Join. (144 dc)
Ch 3, *dc in next 5 sts, 2 dc in next st*, rep from * around. Join. (168 dc)
Ch 3, dc in each st around. Join. (168 dc)
Ch 3, *dc in next 6 sts, 2 dc in next st*, rep from * around. Join. (192 dc) The yoke should now measure approximately 2.5 inches from the neckline.
Join Color A to any stitch of Round 16.
Ch 3, dc in same st, dc in next st, *2 dc in next st, dc in next st*, rep from * around. Join. (216 dc)
Ch 3, dc in each st around. Join. (216 dc)
Ch 3, dc in each st around. Join. (216 dc)
Eyelet Round Ch 4 (counts as dc + ch 1), skip next st, *dc in next st, ch 1, skip next st*, rep from * around. Join to 3rd ch of ch 4. (108 dc, 108 ch-1 spaces)
(Scallop Edge): Sl st into ch-1 space, ch 1, sc in same space, *skip next dc, 5 dc in next ch-1 space (shell made), skip next dc, sc in next ch-1 space*, rep from * around. Join to first sc. (36 shells)Fasten off Color A.
This tier attaches to Round 3 of the first tier, creating that lovely layered effect.
Join Color B (Cream) to any stitch on Round 3 of the first tier (the round just before the eyelet round).
Ch 3, 2 dc in same st, dc in next 2 sts, *3 dc in next st, dc in next 2 sts*, rep from * around. Join. (288 dc)
Ch 3, dc in each st around. Join. (288 dc)
Eyelet Round Ch 4, skip next st, *dc in next st, ch 1, skip next st*, rep from * around. Join to 3rd ch of ch 4. (144 dc, 144 ch-1 spaces)
(Scallop Edge): Sl st into ch-1 space, ch 1, sc in same space, *skip next dc, 5 dc in next ch-1 space, skip next dc, sc in next ch-1 space*, rep from * around. Join to first sc. (48 shells)Fasten off Color B.
Join Color A to any stitch on Round 2 of the second tier.
Ch 3, 2 dc in same st, dc in next 3 sts, *3 dc in next st, dc in next 3 sts*, rep from * around. Join. (360 dc)
Ch 3, dc in each st around. Join. (360 dc)
Ch 3, dc in each st around. Join. (360 dc)
Eyelet Round Ch 4, skip next st, *dc in next st, ch 1, skip next st*, rep from * around. Join to 3rd ch of ch 4. (180 dc, 180 ch-1 spaces)
(Scallop Edge): Sl st into ch-1 space, ch 1, sc in same space, *skip next dc, 5 dc in next ch-1 space, skip next dc, sc in next ch-1 space*, rep from * around. Join to first sc. (60 shells)Fasten off Color A.
Join Color B to any stitch on Round 3 of the third tier.
Ch 3, 2 dc in same st, dc in next 4 sts, *3 dc in next st, dc in next 4 sts*, rep from * around. Join. (432 dc)
Ch 3, dc in each st around. Join. (432 dc)
Eyelet Round Ch 4, skip next st, *dc in next st, ch 1, skip next st*, rep from * around. Join to 3rd ch of ch 4. (216 dc, 216 ch-1 spaces)
(Scallop Edge): Sl st into ch-1 space, ch 1, sc in same space, *skip next dc, 5 dc in next ch-1 space, skip next dc, sc in next ch-1 space*, rep from * around. Join to first sc. (72 shells)Fasten off Color B.
This is the bottom tier. We add one extra round of scallops for a fuller hem.
Join Color A to any stitch on Round 2 of the fourth tier.
Ch 3, 2 dc in same st, dc in next 5 sts, *3 dc in next st, dc in next 5 sts*, rep from * around. Join. (504 dc)
Ch 3, dc in each st around. Join. (504 dc)
Ch 3, dc in each st around. Join. (504 dc)
Eyelet Round Ch 4, skip next st, *dc in next st, ch 1, skip next st*, rep from * around. Join to 3rd ch of ch 4. (252 dc, 252 ch-1 spaces)
(Scallop Edge): Sl st into ch-1 space, ch 1, sc in same space, *skip next dc, 5 dc in next ch-1 space, skip next dc, sc in next ch-1 space*, rep from * around. Join to first sc. (84 shells)Fasten off and weave in all ends.
Join Color A to the center of the underarm chain.
Ch 3, dc in each ch and each st around the armhole opening. Join. (approximately 36 dc)
Ch 3, dc in each st around. Join. (36 dc)
(Scallop Edge): Ch 1, sc in same st, *skip 2 sts, 5 dc in next st, skip 2 sts, sc in next st*, rep from * around. Join. (6 shells)Fasten off. Repeat for second sleeve.
Join Color A to center back of neckline.
Ch 1, sc evenly around entire neckline, working approximately 72 sc. Join. (72 sc)
Ch 1, sc in each st around. Join. Fasten off.
Using Color B (Cream), ch 50.
Sc in 2nd ch from hook and in each ch across. (49 sc) Fasten off, leaving a long tail. Tie into a bow shape and secure with yarn needle. Attach to center front of bodice just below the neckline.
This is where we separate the front from the back and create openings for baby’s arms. Do not worry, it is easier than it sounds.
Dividing Round Ch 3, dc in next 35 sts (back section). Ch 6, skip next 24 sts (first armhole). Dc in next 72 sts (front section). Ch 6, skip next 24 sts (second armhole). Dc in next 36 sts (remaining back). Join. (144 dc + 12 ch)
Ch 3, dc in each dc and each ch around. Join. (156 dc)
Ch 3, dc in each st around. Join. (156 dc)
Ch 3, *dc in next 11 sts, dc2tog*, rep from * around. Join. (144 dc)
through 14: Ch 3, dc in each st around. Join. (144 dc) The bodice should now measure approximately 5 inches from the shoulder. Time to add some texture.
Eyelet Round Ch 3, dc in next st, *ch 1, skip 1 st, dc in next 2 sts*, rep from * around, ending with ch 1, skip 1 st. Join. (96 dc, 48 ch-1 spaces)
Ch 3, dc in each dc and each ch-1 space around. Join. (144 dc) Fasten off Color A. The bodice is complete.
| Rounds | 42 |
|---|---|
| Parts | 10 |
| Level | Intermediate |
| Time | 4-6 hours |
| Hook | 4.0 mm |
| Yarn | DK |
Round 2 of the yoke doubles the stitch count from 72 to 144 in a single round; this increase is what gives the bodice enough width to be divided for armholes in Part 2.
Each new tier joins to the round immediately before the previous tier's eyelet round rather than to the eyelet round itself, so the solid fabric of one tier overlaps the open chain-1 spaces of the one below it.
| Yoke and bodice (Parts 1-2) | about 1 to 1.5 hours because of 13 combined rounds and the armhole division shaping |
|---|---|
| Tiered skirt (Parts 3-7) | about 2.5 to 3.5 hours because of 23 rounds across five tiers with eyelet rounds and color changes |
| Sleeves, neckline edging, and bow (Parts 8-10) | about 45 minutes to 1 hour because the round counts are small but there are three separate pieces to join |
Every one was taken by whoever published the pattern, in the order the source listed them.
These answers came from whoever first published the pattern, kept word for word.