Skip to the patterns
Crochet·Rituals
Menu

Amigurumi 9 Laid out for paper No account, no download

Happy face bucket hat crochet pattern with granny squares

Bucket hat from 6 granny squares plus 2-round crown, dc/hdc/sc, hook size your choice.

Jump to the rounds Pin it
Happy face bucket hat crochet pattern with granny squares
Amigurumi · Worsted
Skill
Intermediate
Time
4-6 hours
Yarn weight
Worsted
Rounds
9

Intermediate

What the pattern's own author called it. Nothing here is graded again.

Worsted

What the sample was worked in. Any weight works; the size moves with it.

9

Each one is typed out whole and gets its own line.

Bucket hat from 6 granny squares plus 2-round crown, dc/hdc/sc, hook size your choice.

Common mistakes and their fixes

Joining squares through both loops
Check the pattern calls for back loop only; pull out and redo the seam if the join looks stiff or the panel won't curve into a circle.
Overshooting the 96-dc crown round
Count in groups of 12 as you alternate one dc and two dc, and stop exactly at 96 rather than continuing by feel.

The materials list

  1. Crochet hook size (not specified in the text provided)
  2. Yarn in colors for the happy face, main color, smiley face, and joining (specific colors not mentioned in the text provided)
  3. Yarn needle
  4. Stitch markers (for evenly spacing the granny-square and top-round joins)

Listed by the pattern's own author, in their words.

Key to this pattern, 7 short forms

Granny Square

Repeat this process for a total of six granny squares.

Round 1

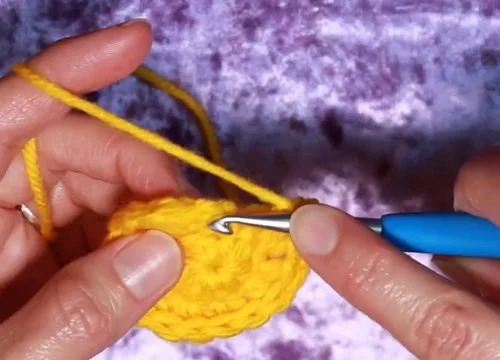
Start with a magic ring; ch 2 (counts as first dc); 7 more dc into the ring; close the magic ring (8 dc total including ch 2); sl st to top of ch 2 to join. (8 dc)

Round 2

Ch 2; 2 dc in next st and each st around except the last st; 1 dc in the last st (ch 2 counts as the second dc); sl st to join to top of ch 2. (16 dc)

Round 3

(Switch Colors): Tie on a new color; ch 2, then in the same st add 2 more dc to complete a cluster of 3 dc; ch 1, then add another cluster of 3 dc in the same st to form the first corner; ch 1, skip the next st, in the following st add a single cluster of 3 dc; repeat around, creating corners with two clusters of 3 dc and single cluster sides until the round is complete; sl st to join to the first ch 2.

Round 4

Tie on the main color; ch 2, and create corners by adding clusters of dc as in Round 3, with ch 1 spaces in between; continue adding single cluster sides and corner clusters until the round is complete; sl st to join and cut yarn.

Top and Bottom Borders of Granny Square Circle

Round 1

Continue with the main color, tying onto any stitch; ch 2 and add one sc in each st around the top and bottom; sl st to join and cut yarn once you've gone around once.

Top Round of Bucket Hat

Round 1

Begin with a magic ring and ch 2; add 11 more dc into the ring. (12 dc)

Round 2

And following rounds Continue increasing as described in previous rounds, sl st to join at the end of each round; alternate between one dc and two dc in each st as instructed until you finish with a round of 96 dc; sl st to join and cut yarn. (96 dc)

Bucket Hat Brim

Round 1

Attach the main color to the bottom of the granny square circle; ch 1 and begin hdc around, increasing every fifth st.

Round 2

And following rows Switch colors as desired in the following rows, alternating between hdc in each st and increasing rounds.

Assembly, in order

Step 1Use a yarn needle and black yarn to embroider the eyes and mouth onto your granny squares.
Step 2Create two eyes and a smiling mouth, with the eyes on the top row and the mouth just below.
Step 3Lay out your granny squares right side up.
Step 4Join them back loop to back loop using a crochet hook.
Step 5Fix the yarn and pull through both loops on the hook.
Step 6When all six squares are joined in a line, join the ends to form a circle.
Step 7Sew in the ends once completed.
Step 8Use stitch markers to evenly distribute where you will need to join the top round to the granny square circle.
Step 9Use the back loop to back loop joining method with a crochet hook to join the top round to the granny square circle.
Step 10Once joined, cut the yarn and sew in your ends.
Step 11After completing the brim rows, sl st to join, cut off the yarn, and weave in all the ends.

Check these before you start

  • The crown round builds from 12 dc to 96 dc by alternating one dc and two dc in each stitch — miscounting here throws off how the crown meets the joined squares.
  • Join the six squares back loop to back loop only; working into both loops changes the seam and the way the panel folds into a circle.
  • Crochet hook size and specific yarn colors are not specified in the original pattern text.

On one line

Rounds9
Parts4
LevelIntermediate
Time4-6 hours
YarnWorsted

Set-up

  • Work one granny square first and check it lies flat through all four rounds before committing to five more.
  • Set aside a separate ball of black yarn for embroidering the eyes and mouth after joining.
  • Read the Top Round of Bucket Hat fully before starting it — the increase pattern shifts from a plain dc round to an alternating one-dc/two-dc round.
  • Have stitch markers on hand to keep the six squares even as you join them into a line, per the assembly steps.

Finishing

  1. Embroider the eyes on the top row of a chosen square and the smiling mouth just below, using black yarn and a yarn needle.
  2. Join the last two open ends of the six-square line to close the circle, then attach the crown and brim, sewing in any remaining ends.

Construction

Each granny square increases only at its four corners (the paired 3-dc clusters), which is why the piece stays flat through all four rounds instead of cupping.

The six squares are worked flat and separately, then joined back loop to back loop into a line before the ends are closed into a circle — this seam is what turns six flat panels into the cylindrical side of the hat.

Time per section

Six granny squaresabout 2-3 hours because each square runs four rounds and there are six to complete before joining
Joining and embroidering the faceabout 45 minutes because six seams plus hand-stitched eyes and mouth take steady, careful work
Crown and brimabout 1 hour because the crown alone increases across multiple rounds up to 96 dc before the two-round brim is added

Photographs of this one

Every one was taken by whoever published the pattern, in the order the source listed them.
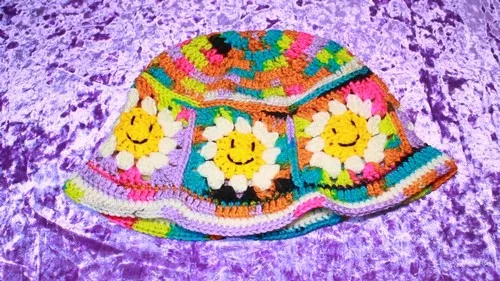
Happy face bucket hat crochet pattern with granny squares — photo 2
Happy face bucket hat crochet pattern with granny squares — photo 3
Happy face bucket hat crochet pattern with granny squares — photo 4

Common questions

Do the eyes and mouth get worked into the stitches?
No, the face is embroidered after joining, using a yarn needle and black yarn directly onto the finished granny squares. The eyes sit on the top row with the mouth stitched just below.
How do the six squares become a hat shape?
They're joined back loop to back loop in a line first, then the two open ends of that line are joined to form a circle. The crown and brim are worked separately and attached afterward to close the top and finish the bottom edge.

These answers came from whoever first published the pattern, kept word for word.