Skip to the patterns
Crochet·Rituals
Menu

Amigurumi 40 Laid out for paper No account, no download

Crochet a plush giraffe crossbody bag with flap closure

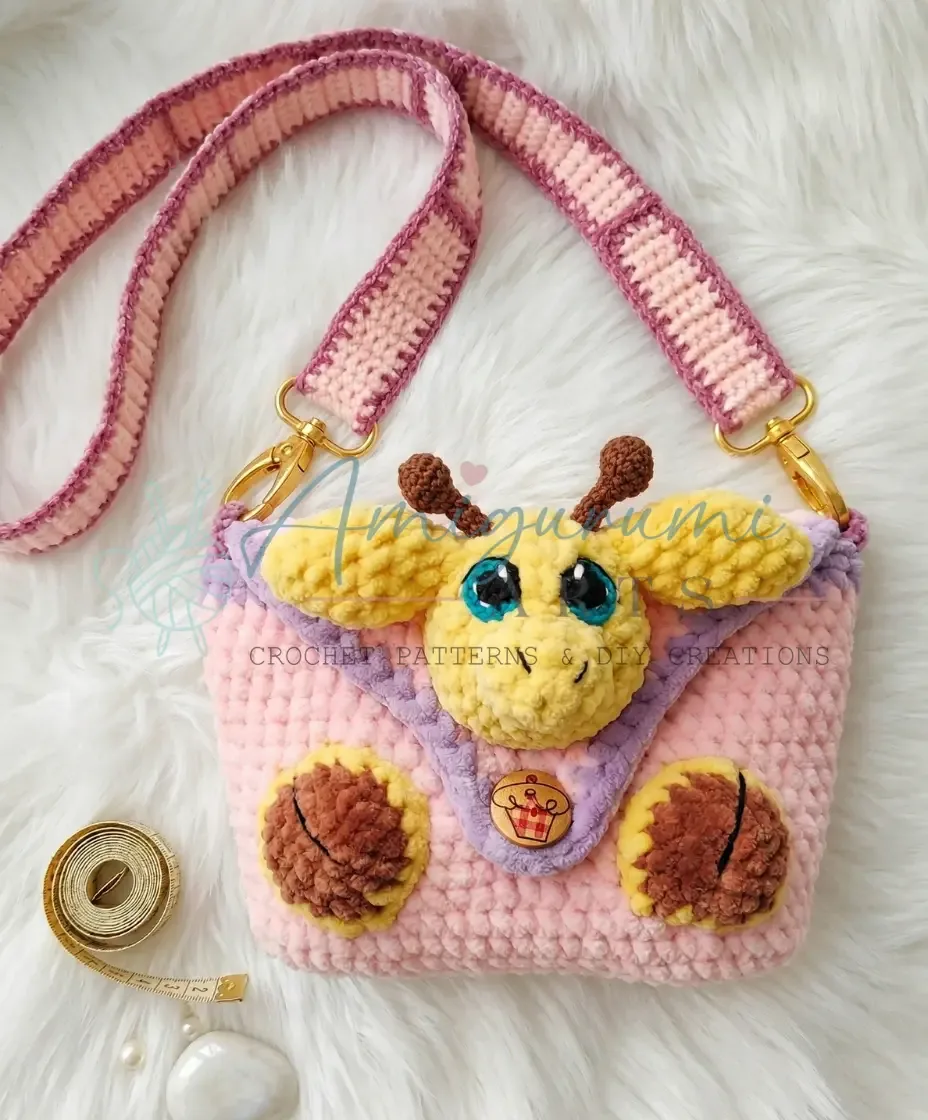
Plush crossbody bag with giraffe appliqué: 3-round oval base, 7-round head, worked on an E-4 hook.

Jump to the rounds Pin it
Crochet a plush giraffe crossbody bag with flap closure
Amigurumi · Chunky
Skill
Intermediate
Time
4-6 hours
Yarn weight
Chunky
Hook
3.5 mm
Rounds
40

Intermediate

What the pattern's own author called it. Nothing here is graded again.

Chunky

What the sample was worked in. Any weight works; the size moves with it.

40

Each one is typed out whole and gets its own line.

This is a plush crossbody bag with a giraffe appliqué face on the flap. The bag base and body work up in continuous spiral rounds on a chunky plush yarn, the flap tapers in turned rows, and the giraffe head, snout, ears, horns, eyes, and legs/hooves are separate joined-round pieces sewn on afterward. The handle is crocheted separately in a finer cotton on a smaller hook and finished with swivel clasps. Before starting, have both main hooks on hand, the steel hook for the giraffe's eyes and horns, a button for the flap closure, and stitch markers ready.

Common mistakes and their fixes

Losing the spiral starting point
Keep the stitch marker in the first stitch of every round on the base and body, since there is no slip stitch join to mark where round 1 ends.
Skipping the chain-1 turn on the flap
Chain 1 and turn at the start of every flap row, or the decrease count at the row's far edge will not match the stitch count given.

The materials list

  1. Yarn A (bag body): Chunky plush/chenille yarn (such as Dolphin Baby by Himalaya), approx. half a skein in soft pink (color 80303)
  2. Yarn B (giraffe body & hooves): Small amounts of plush yarn in yellow (80302 or 80313) and brown (80337)
  3. Yarn C (handle): Sport or DK weight cotton yarn (such as Gazzal Baby Cotton), less than half a skein
  4. Yarn D (giraffe eyes & horns): Fine thread or fingering weight yarn in brown (Vita Coco 4306), white (3851), and black (3852)

Hook sizes

  1. E-4 / 3.5 mm — for the bag
  2. B-1 / 2.25 mm — for the handle
  3. Steel hook 7 / 1.25 mm — for the giraffe’s eyes and horns
  4. 2 swivel clasps / carabiners for attaching the strap

Tools

  1. 1 button, approx. ¾ inch (2 cm) diameter for the flap closure
  2. Stitch markers
  3. Yarn needle / tapestry needle
  4. Scissors

Listed by the pattern's own author, in their words.

Key to this pattern, 8 short forms

Bag Base

Begin with Yarn A and E-4 / 3.5 mm hook. Foundation chain of 20.

Round 1

Starting in the 2nd ch from hook: inc, 17 sc, 4 sc in the last ch; rotate work to crochet along the opposite side of the foundation chain: 17 sc, inc. (42)

Round 2

2 inc, 17 sc, 4 inc, 17 sc, 2 inc. (50)

Round 3

\[1 sc, inc\] × 2, 17 sc, \[1 sc, inc\] × 4, 17 sc, \[1 sc, inc\] × 2. (58)

Bag Body

Round 4

Working in BLO throughout: 58 sc. (58)

This round creates a defined ridge that separates the base from the sides — don’t skip working in BLO here.

Rounds 5–19

Sc in each st around. (58) ×15 roundsYou can add more rounds here if you’d like a taller bag.

Bag Flap

The flap is worked flat in turned rows. Before beginning, work a few sc along the round to position yourself at one side edge of the bag opening.

Row 1

Ch 1, turn. Work sc across to the opposite edge. (27)

Row 2

Ch 1, turn. Dec, sc to last 2 sts, dec. (25)

Row 3

Ch 1, turn. Dec, sc to last 2 sts, dec. (23)

Row 4

Ch 1, turn. Dec, sc to last 2 sts, dec. (21)Continue in this manner, decreasing 1 stitch at each end of every row, until 3 sc remain.Button Loop Row: Ch 4, join to the opposite end of the last row with a sl st to create the button loop. Fasten off and weave in ends.

Once the bag is complete, work a single round of sc edging along the entire upper edge of the bag for a neat finish. Sew the button to the bag body, 7 rows up from the base, centered on the front.

Strap / Handle

Use Yarn C and B-1 / 2.25 mm hook.

Foundation: Ch 6. Starting in the 2nd ch from hook: 5 sc.

Work sc rows (no turning chain needed — simply continue sc in each st) until the strap measures approximately 32 inches (82 cm) long, or your preferred length.

Edging: Using a contrasting color, work a sc edging along all sides of the strap. At each corner, work 3 sc into the corner stitch to keep the edging flat and tidy.

Attaching the clasps: Fold approximately 15–16 rows of each short end over the bar of a carabiner/swivel clasp. Sew the folded end securely to itself using a yarn needle and matching yarn.

Strap Loops (make 2)

These small loops attach to the bag body and hold the carabiners.

Attach yarn just below the edge of the flap at the side seam. Ch 5, skip 1 stitch on the bag, join with a sl st. Turn work. Work 4 sc along the chain, then work the 5th sc into the base attachment point to close the loop. Fasten off and weave in ends.

Giraffe — Head

Use yellow yarn (Yarn B) and E-4 / 3.5 mm hook.

Round 1

6 sc in MR. (6)

Round 2

6 inc. (12)

Round 3

\[1 sc, inc\] × 6. (18)

Round 4

1 sc, inc, \[2 sc, inc\] × 5, 1 sc. (24)

Round 5

\[3 sc, inc\] × 6. (30)

Rounds 6–7

Sc in each st around. (30)At the end of Rnd 7: work 2 sl st. Fasten off and leave a long tail for sewing.

Giraffe — Snout (Muzzle)

Use yellow yarn and E-4 / 3.5 mm hook.

Round 1

6 sc in MR. (6)

Round 2

6 inc. (12)

Round 3

Sc in each st around. (12)Work 2 sl st. Fasten off and leave a long tail for sewing.

Giraffe — Ears (make 2)

Use yellow yarn and E-4 / 3.5 mm hook.

Round 1

4 sc in MR. (4)

Round 2

\[1 sc, inc\] × 2. (6)

Round 3

\[2 sc, inc\] × 2. (8)

Round 4

\[3 sc, inc\] × 2. (10)

Round 5

Sc in each st around. (10)

Round 6

\[3 sc, dec\] × 2. (8)

Round 7

\[2 sc, inc\] × 2. (6)

Round 8

\[1 sc, inc\] × 2. (4)Fasten off and leave a long tail for sewing.

Giraffe — Horns (make 2)

Use brown yarn (Yarn D) and steel 7 / 1.25 mm hook.

Round 1

6 sc in MR. (6)

Round 2

6 inc. (12)

Round 3

\[1 sc, inc\] × 6. (18)

Round 4

Sc in each st around. (18)

Round 5

\[1 sc, dec\] × 6. (12)

Lightly stuff the horn before continuing.

Round 6

6 dec. (6)

Rounds 7–10

Sc in each st around. (6)Fasten off and leave a long tail for sewing.

Giraffe — Eyes (make 2)

Begin with black yarn (Yarn D) and steel 7 / 1.25 mm hook.

Round 1

6 sc in MR. (6)

Round 2

6 inc. (12)Switch to blue or light-colored yarn.

Round 3

\[1 sc, inc\] × 3, 1 sc, sl st. (partial round)Fasten off. Using white yarn, embroider a small highlight dot onto each eye.

Giraffe — Legs/Hooves (make 2)

Begin with brown yarn and E-4 / 3.5 mm hook.

Round 1

6 sc in MR. (6)

Round 2

6 inc. (12)

Round 3

\[1 sc, inc\] × 6. (18)Switch to yellow yarn.

Round 4

Sc in each st around. (18)Fasten off and leave a long tail for sewing.

Assembly, in order

Step 1Sew the snout (muzzle) to the lower center of the head , using the yarn tail and a yarn needle. The muzzle should sit just below center.
Step 2Sew the horns to the top of the head, spacing them evenly apart.
Step 3Sew the ears on either side of the head, just below the horns.
Step 4Sew the eyes above the muzzle, one on each side of center. Using black yarn, embroider short eyelash strokes above each eye. Embroider two small nostril dots on the muzzle with brown yarn.
Step 5Sew the completed giraffe head to the front of the bag in your preferred position.
Step 6Sew the legs/hooves to the front of the bag on either side, approximately 2 rows up from the base.
Step 7Using brown yarn, embroider hoof detail lines at the bottom of each leg.
Step 8Attach the strap loops to the sides of the bag, then clip the carabiners through the loops and the strap hardware.
Step 9Sew the button to the bag front, 7 rows up from the base, aligned with the button loop on the flap.
Step 10Weave in all remaining yarn ends securely.

Check these before you start

  • Swap hooks deliberately: E-4/3.5mm for the plush bag pieces, B-1/2.25mm for the cotton handle, and steel 7/1.25mm only for the giraffe's eyes and horns in Yarn D.
  • The base and body are worked in continuous spiral rounds with no slip stitch join, so the stitch marker in the first stitch of each round is what keeps the round count honest.
  • The flap decreases at both edges of every row, so keep tension even on the turn or the taper will pull to one side instead of coming to a point.
  • This pattern is written in US crochet terminology. The giraffe appliqué pieces are worked in joined rounds where noted, unlike the bag base and body which spiral with no join.
  • Gauge: Approximately 15 sc × 17 rows = 4 inches (10 cm) using Yarn A and E-4/3.5mm hook. Exact gauge is not critical for this project, but working tightly will give the bag better structure.
  • Finished size: Approximately 6 inches (15 cm) tall × 7 inches (18 cm) wide with an E-4/3.5mm hook.
  • Magic Ring note for plush yarn: Chain 2, work 6 sc into the 2nd chain from the hook, then join with a sl st to the first stitch. This replaces the traditional magic ring on chunky chenille yarn.
  • Stuff the giraffe's horns lightly before closing. All other giraffe pieces (head, snout, ears, eyes, legs/hooves) are left unstuffed.

On one line

Rounds40
Parts11
LevelIntermediate
Time4-6 hours
Hook3.5 mm
YarnChunky

Set-up

  • Confirm you have all three hooks ready: E-4/3.5mm for the bag, B-1/2.25mm for the handle, and steel 7/1.25mm for the giraffe's eyes and horns.
  • Check yarn amounts before casting on: about half a skein of Yarn A for the bag body and less than half a skein of cotton Yarn C for the handle.
  • Read through Bag Base Rnd 1 once before chaining 20, since the two sides of the foundation chain carry different stitch counts at each end.
  • Set a stitch marker aside now, since the base and body are worked in continuous spiral with no joining stitch to mark the round for you.

Finishing

  1. Weave in all tails from the giraffe head, snout, ears, horns, eyes, and legs/hooves with the yarn needle before sewing any piece to the bag.
  2. The giraffe head, snout, ears, eyes, and legs/hooves are left unstuffed, since they are flat appliqué pieces sewn onto the bag front; only the horns get a light stuffing before their final rounds close.
  3. Sew the button to the bag front to align with the flap closure, then attach the two swivel clasps to the strap loops to complete the crossbody strap.

Construction

The Bag Base increases only at its two short ends (inc and a 4-sc fan at one end, a single inc at the other), which is what turns the straight ch-20 foundation into an oval before the spiral continues upward into the body.

The Bag Flap is worked flat in turned rows rather than in the round because it needs two decreasing edges at once to taper to a point, a shape the continuous spiral construction used elsewhere in the bag cannot produce.

Time per section

Bag Base & Bodyabout 45-60 minutes, because the two parts total only 5 rounds but the chunky plush yarn works up quickly on the E-4 hook
Bag Flapabout 30 minutes, because the decrease rows need careful counting on both edges to taper evenly to a point
Giraffe Head, Ears & Hornsabout 1.5-2 hours, because the three pieces run 7, 8, and 10 rounds respectively, each needing its own color or hook change

Photographs of this one

Every one was taken by whoever published the pattern, in the order the source listed them.

Crochet a plush giraffe crossbody bag with flap closure — photo 2
Crochet a plush giraffe crossbody bag with flap closure — photo 3

Common questions

Can you substitute a different plush yarn for Yarn A?
Yes, any chunky plush or chenille yarn that gauges at about 15 sc by 17 rows per 4 inches on an E-4/3.5mm hook will work. Confirm you have at least half a skein before starting the base.
Why does this pattern call for three different hook sizes?
The E-4/3.5mm hook suits the chunky plush yarn used for the bag, the B-1/2.25mm hook tightens the sport-weight cotton handle, and the steel 7/1.25mm hook controls the fine thread used for the giraffe's eyes and horns. Matching the hook to the yarn weight keeps tension consistent across very different fibers.
Do the bag base and body need a slip stitch join?
No, both are worked in continuous spiral rounds with no joining, so a stitch marker in the first stitch of each round is what tracks the start point. The giraffe appliqué pieces, by contrast, are worked in joined rounds where noted.

These answers came from whoever first published the pattern, kept word for word.