Skip to the patterns
Crochet·Rituals
Menu

Jewelry 6 Laid out for paper No account, no download

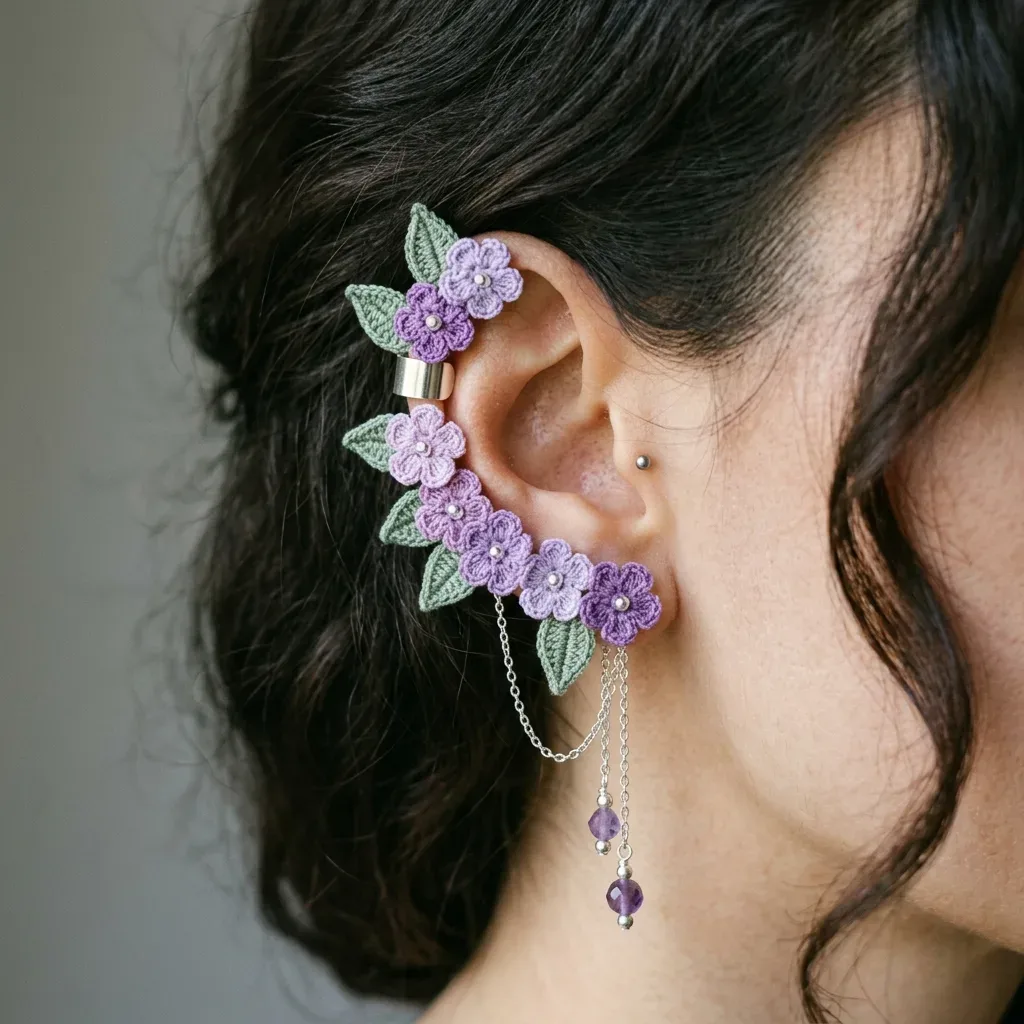
Thread crochet lavender garden ear cuff with crystal chain

Five thread-crochet flowers, eight leaves, Size 7 steel hook. One ear cuff garland, 3 rounds per flower.

Jump to the rounds Pin it
Thread crochet lavender garden ear cuff with crystal chain
Jewelry · Thread (Size 10)
Skill
Intermediate
Time
3-5 hours
Yarn weight
Thread (Size 10)
Hook
1.65 mm
Rounds
6

Intermediate

What the pattern's own author called it. Nothing here is graded again.

Thread (Size 10)

What the sample was worked in. Any weight works; the size moves with it.

6

Each one is typed out whole and gets its own line.

This garland builds from five small flower motifs in two shades of purple, each worked in three rounds from a magic ring, paired with eight sage green leaves worked flat in five rows. The motifs attach to a metal ear cuff finding and a single lobe piercing, with a silver chain and two amethyst crystal beads hanging free for movement. Before starting, have your Size 7 steel hook, all three thread colors, the ear cuff finding, chain, beads, and a foam blocking board on hand, since every motif gets pinned and stiffened before assembly. Skill level: advanced beginner to intermediate — the main challenge is keeping a tight, even tension with thin thread on a small steel hook.

Common mistakes and their fixes

Losing the join point on Round 1
Place a stitch marker in the first sc before working Round 2, since the 5-stitch magic ring join is easy to miscount at this thread weight.
Skipping the gauge check before blocking
Measure your first flower against the 0.5 inch benchmark after blocking, not before, since stiffener and pinning change the finished size.
Working the leaf foundation chain too loosely
Keep the starting chain tight and even, since a loose foundation chain distorts the leaf's two long sides and throws off the rounded tip.

The materials list

  1. Any smooth, tightly twisted size 10 cotton crochet thread will work beautifully. Here are three options I recommend:
  2. Aunt Lydia’s Classic Crochet Thread Size 10 in Soft Mauve, Purple, and Sage. This is widely available, has consistent twist, and gives excellent stitch definition for tiny motifs.
  3. DMC Petra Size 3 Crochet Cotton worked at a tighter tension on your Size 7 steel hook. It is slightly thicker but produces beautifully smooth petals with clean edges.
  4. Lizbeth Size 10 Premium Cotton Thread in Lilac Medium, Purple Dark, and Leaf Green. This brand offers hand-dyed options and has an excellent sheen for a jewelry-quality finish.

Important

  1. Do not substitute fingering weight yarn. The motifs will turn out too large to sit neatly on the ear cuff finding.

Thread

  1. Color A (Medium Lavender): Size 10 crochet cotton thread, approximately 15 yards
  2. Color B (Deep Purple): Size 10 crochet cotton thread, approximately 15 yards
  3. Color C (Sage Green): Size 10 crochet cotton thread, approximately 20 yards

Hook

  1. US Steel Hook Size 7 (1.65 mm)

Jewelry Supplies

  1. One silver adjustable ear cuff finding (plain band style, approximately 12 mm wide)
  2. One sterling silver stud earring post with butterfly back, or one 22-gauge headpin for the lobe anchor
  3. One 3-inch length of silver fine-link chain (approximately 2 mm link width)
  4. Two amethyst or purple crystal glass beads: one 6 mm round and one 4 mm round
  5. Two silver crimp beads or small jump rings for attaching chain
  6. Approximately 15 small pearl seed beads (size 6/0 or 8/0), one for each flower center

Other Notions

  1. Beading thread or fine monofilament
  2. Beading needle
  3. Sewing needle and thread in purple and green
  4. Jewelry pliers (flat nose and round nose)
  5. Fabric stiffener or diluted craft glue
  6. Straight pins and foam blocking board
  7. Scissors
  8. Stitch marker

Listed by the pattern's own author, in their words.

Key to this pattern, 21 short forms

Flower Motif

Make 5 flowers total: 3 in Color A (medium lavender) and 2 in Color B (deep purple).

Round 1

Make a magic ring. Chain 1. Work 5 sc into the ring. Pull the ring closed. Slip stitch to the first sc to join. Do not turn. (5 sc)

Round 2

Chain 1. Work 2 sc into each sc around. Slip stitch to the first sc to join. (10 sc)

Round 3

Petal Round Slip stitch into the first sc. Now work each petal as follows: Petal 1: Sl st into next st. Work Beginning Petal into same st (ch 2, 2 dc, 1 hdc all into this st). Sl st into next st. Petal 2: Sl st into next st. Work Petal into same st (1 hdc, 2 dc, 1 hdc all into this st). Sl st into next st. Petal 3: Sl st into next st. Work Petal into same st. Sl st into next st. Petal 4: Sl st into next st. Work Petal into same st. Sl st into next st. Petal 5: Sl st into next st. Work Petal into same st. Sl st to join at base of first ch-2.

You now have 5 petals total, each sitting between two slip stitches.

Fasten off, leaving a 6-inch tail.

Add the bead center: Using your beading needle and thread, sew one pearl seed bead into the center of each flower, right over the magic ring. Set flowers aside.

Checkpoint: Each finished flower, before blocking, should be slightly cupped and measure approximately 0.4 inch across. After stiffening and blocking, it will open to 0.5 inch.

Leaf Motif

Make 8 leaves in Color C.

Foundation: Chain 6.

Row 1

Right side Starting in the second ch from hook, work 1 sc. Work 1 hdc into next ch. Work 1 dc into next ch. Work 1 hdc into next ch. Work 3 sc into the last ch (this forms the tip of the leaf).Do not turn. Now work back along the opposite side of the foundation chain: 1 hdc into next ch. 1 dc into next ch. 1 hdc into next ch.Work Picot (ch 3, sl st into first ch of the ch-3) into the final ch (this is the base of the leaf).Sl st to the starting sc at the beginning of the leaf to close the oval shape.

You now have a complete leaf outline with two long sides, a rounded tip with 3 sc, and a picot at the base. (Approximately 14 sts around the perimeter, plus picot)

Fasten off, leaving a 6-inch tail.

Checkpoint: Each leaf should measure approximately 0.5 inch long and 0.25 inch wide. The picot at the base is what you will use when sewing to the cuff.

Optional Base Strip

This narrow crocheted spine runs the length of the garland and gives you a clean backing surface. If you prefer to sew motifs directly onto the ear cuff finding, you can skip this section.

Foundation: Chain 18 in Color C.

Round 1

Sc in the second ch from hook and in each ch across. Turn. (17 sc)

Round 2

Ch 1. Sc in each sc across. Turn. (17 sc) Fasten off, leaving a 10-inch tail. Checkpoint: The strip should measure approximately 2 inches long and 0.2 inch wide.

Assembly, in order

Step 1Step 1: Arrange Your Layout: Lay the five flowers in a vertical line, alternating colors from top to bottom: Flower 1: Color B (helix position, top of ear) Flower 2: Color A Flower 3: Color B Flower 4: Color A Flower 5: Color A (lobe position) Space them approximately 0.5 inch apart, center to center. Assign two leaves to each flower position, one to the left and one to the right. Angle them outward at 30 to 45 degrees.
Step 2Step 2: Attach Base Strip to Ear Cuff Finding: If using the optional base strip, slide the metal ear cuff finding through the center of the strip lengthwise so the strip wraps around the cuff. Using coordinating thread, whip stitch the strip snugly around the cuff finding. If skipping the base strip, proceed to Step 3.
Step 3Step 3: Sew Flowers to Cuff: Using the tail from each flower and a sewing needle, sew each flower to the base strip or directly to the garland body. Start with Flower 1 at the top (helix end). Use 4 to 6 small stitches through the back of the flower center and through the strip or adjacent flower. The metal cuff finding should fall at approximately the position between Flower 2 and Flower 3.
Step 4Step 4: Sew Leaves to Cuff: Using each leaf’s tail, sew the leaves into position flanking each flower. The picot at the base of each leaf should tuck behind the flower. Secure with 3 to 4 stitches. Angle each leaf so it fans outward. Once all leaves are placed, sew adjacent flowers and leaves together at their edges with one or two connecting stitches.
Step 5Step 5: Secure the Ear Cuff Finding: If the finding is not already integrated via the base strip, thread it through the assembled garland at the correct helix position now. Secure with additional whip stitches around the metal band using green thread.
Step 6Step 6: Attach the Lobe Post: Thread a stud earring post through the center of Flower 5 from front to back. Secure the post with a small dot of jewelry adhesive between the post backing and the back of the flower. Allow to cure for 30 minutes. Alternatively, loop a 22-gauge headpin through the base of the flower and create a wrapped loop at the back using round nose pliers.
Step 7Step 7: Attach Chain and Beads: Cut a 3-inch length of fine silver chain. Open a small jump ring and attach one end of the chain to the lobe post or to a small loop at the base of Flower 5. Close the jump ring securely with flat nose pliers. Thread the free end of the chain through your 4 mm amethyst bead, then your 6 mm amethyst bead. Insert a headpin through both beads from the bottom. Create a small wrapped loop at the top of the headpin and attach it to the bottom link of the chain. Trim any excess wire.
Step 8Step 8: Final Check: Hold your assembled ear cuff up and examine it from the front. The flowers should cascade in a gentle curved line. The leaves should fan out naturally on both sides. The chain should hang freely below the lobe flower. If anything has shifted, add a small stitch to adjust. Apply a tiny drop of clear nail polish or fray check to all thread knots on the back of the piece.

Check these before you start

  • Work with a Size 7 steel hook and keep tension tight and even throughout; thread crochet at this scale shows loose stitches far more than worsted weight yarn does.
  • Mark the first stitch of each round on the flower motifs, since the slip-stitch joins in Round 1 and Round 3 are easy to miscount on a 5-stitch base.
  • Check gauge against the 0.5 inch diameter benchmark after blocking your first flower; move down a hook size if it runs large, up if it runs small.
  • One leaf motif worked in Rows 1 through 5 should measure 0.5 inch long (1.25 cm) after blocking; consistent gauge across all motifs keeps the garland lying flat.
  • Finished size: each flower is about 0.5 inch across and each leaf about the same length; the assembled garland spans approximately 3.5 inches long by 1.25 inches wide, sized to sit against the curve of an adult ear.

On one line

Rounds6
Parts3
LevelIntermediate
Time3-5 hours
Hook1.65 mm
YarnThread (Size 10)

Set-up

  • Confirm you have approximately 15 yards each of Color A and Color B, and 20 yards of Color C, before starting the first motif.
  • Place a stitch marker in the first stitch of Round 1 on your first flower so you do not lose the join point while working the increase in Round 2.
  • Crochet one test flower through Round 3 and block it before committing to all five, since gauge here determines whether the finished garland lies flat.
  • Read through Round 3 of the Flower Motif pattern once before starting it, since the petal sequence repeats with small variations and is easier to follow having seen the whole round first.

Finishing

  1. Weave in all thread ends on each flower and leaf motif before blocking, leaving tails tidy against the back where they will sit against the ear cuff finding.
  2. Pin each flower open on the foam board with petals spread evenly, pin each leaf flat with the center spine straightened, then apply fabric stiffener or diluted glue and let dry fully.
  3. Attach the blocked motifs to the ear cuff finding in the planned vertical arrangement, then add the silver chain with the 6 mm and 4 mm crystal beads using crimp beads or jump rings.

Construction

The flower motif increases from 5 sc to 10 sc between Round 1 and Round 2, doubling the stitch count so the Round 3 petal round has two stitches to work with per petal position.

The leaf motif is worked flat from a foundation chain rather than in the round, with stitches worked up one side and back down the other side of the same chain, which produces the pointed tip and picot base from a single row of turning.

Time per section

Total time estimate3 to 5 hours overall, including making the motifs, blocking them, and assembling everything; experienced thread crocheters may finish closer to 2.5 hours.
Five flower motifs (3 rounds each)about 1.5 hours, because each motif has a petal round with several small variations to track
Eight leaf motifs (5 rows each)about 1 hour, because each leaf is worked up one side of the chain and back down the other
Blocking and assembly, including chain and beadsabout 1 to 2.5 hours, because stiffener needs drying time and the chain attachment uses pliers and small jump rings

Common questions

Can fingering weight yarn replace the size 10 thread?
No. The motifs will turn out too large to sit neatly on the ear cuff finding, so stick with size 10 crochet cotton and the Size 7 steel hook.
Do I need the Optional Base Strip?
No. It gives a clean backing surface if you want one, but you can sew the motifs directly onto the ear cuff finding and skip it entirely.
Why does my flower measure larger than 0.5 inch?
Your tension is likely looser than the pattern gauge. Move down one hook size and reblock a test flower until it matches the 0.5 inch diameter benchmark.

These answers came from whoever first published the pattern, kept word for word.