Skip to the patterns
Crochet·Rituals
Menu

Amigurumi 22 Laid out for paper No account, no download

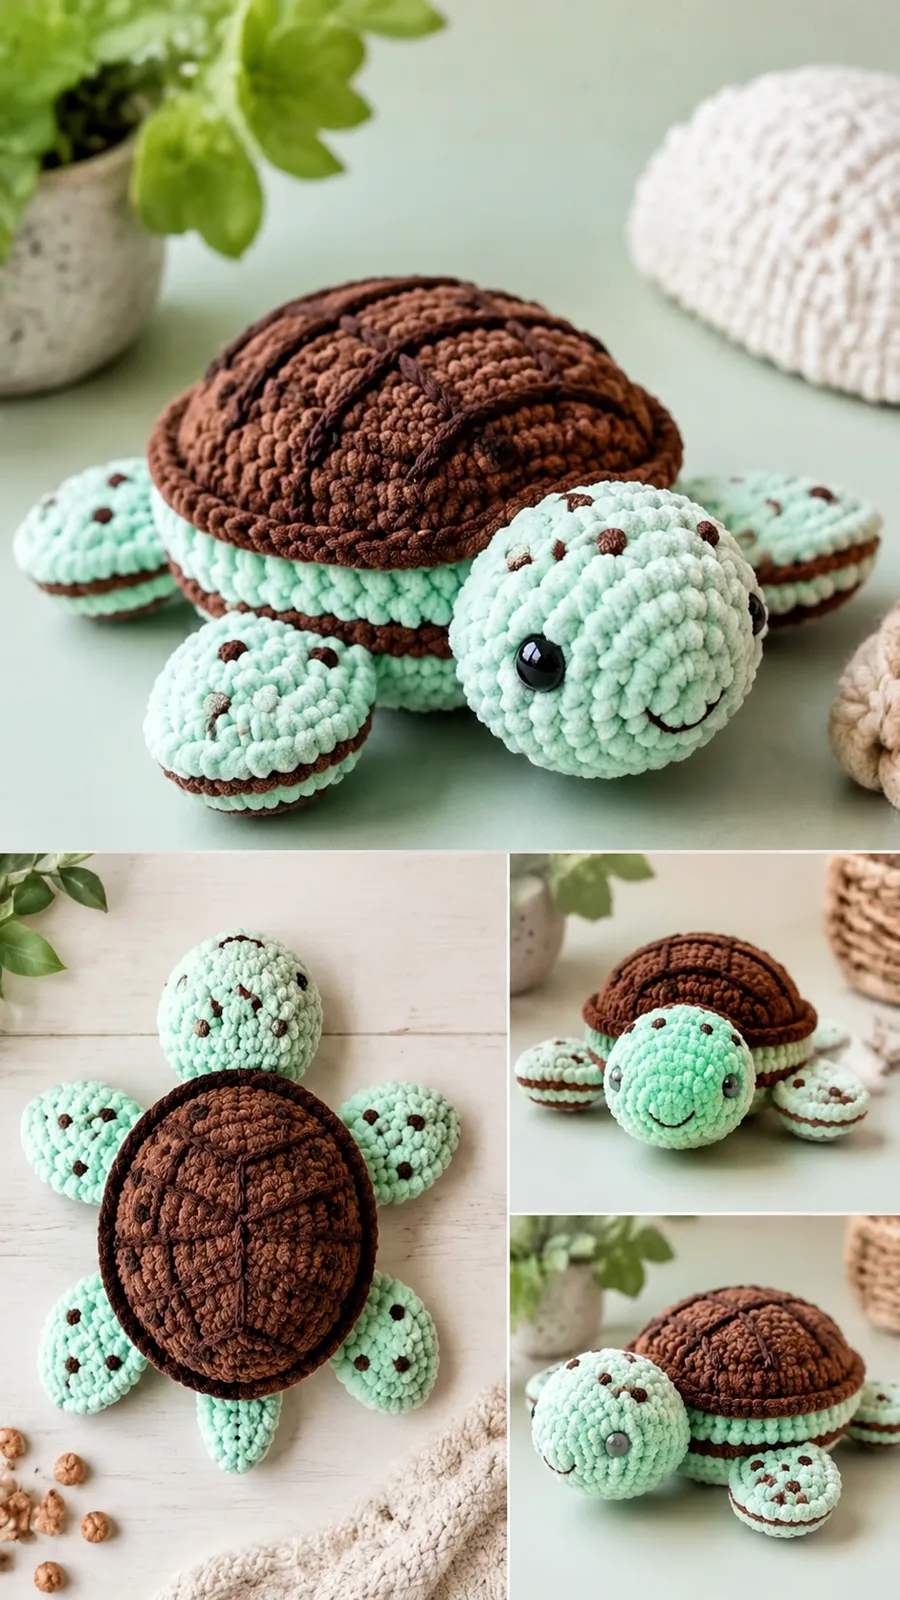
Mint chocolate chip turtle amigurumi crochet pattern

Chenille amigurumi turtle: 14-round head and body, 10-round dome shell, 4-round flippers, 4mm (G-6) hook.

Jump to the rounds Pin it
Mint chocolate chip turtle amigurumi crochet pattern
Amigurumi · Bulky
Skill
Intermediate
Time
4-6 hours
Yarn weight
Bulky
Hook
4 mm
Rounds
22

Intermediate

What the pattern's own author called it. Nothing here is graded again.

Bulky

What the sample was worked in. Any weight works; the size moves with it.

22

Each one is typed out whole and gets its own line.

This amigurumi turtle pairs a mint green chenille body with a chocolate brown dome shell, built from separate pieces worked on their own and joined at the end: a head and body crocheted as one continuous 14-round piece, a 10-round brown dome shell worked separately and sewn over the body afterward, four 4-round oval flippers, and a short chained tail. Tight single crochet rounds in bulky chenille hold polyester stuffing without show-through, and a stitch marker tracks round starts since the body spirals continuously with no joining slip stitch. Finished size is approximately 6 inches long by 4 inches wide (15 x 10 cm). Have both yarn colors, a 4mm (US G-6) hook, stuffing, a yarn needle, and black embroidery yarn or 8mm safety eyes ready before starting.

Common mistakes and their fixes

Losing count of increase rounds
Check your stitch count against the number given at the end of each round, since a miscount in the early increase rounds carries through all ten rounds of the head and body.
Shell placement looking off-center
Pin the shell in place and check the turtle's balance from multiple angles before sewing it down permanently, since shell placement is difficult to adjust once it is stitched in place.

The materials list

  1. Bulky chenille yarn in mint green, approximately 100 yards (91 meters)
  2. Bulky chenille yarn in chocolate brown, approximately 60 yards (55 meters)
  3. Small amount of black embroidery yarn
  4. Polyester fiber stuffing
  5. 4 mm crochet hook (US G-6)
  6. Stitch marker
  7. Yarn needle
  8. Scissors
  9. Optional 8 mm safety eyes

Listed by the pattern's own author, in their words.

Key to this pattern, 9 short forms

Body and Head

Work in continuous rounds. Place a stitch marker in the first stitch of each round.

Round 1

With mint yarn, make MR, 6 sc into ring. (6)

Round 2

Inc around. (12)

Round 3

(Sc, inc) repeat 6 times. (18)

Round 4

(2 sc, inc) repeat 6 times. (24)

Round 5

(3 sc, inc) repeat 6 times. (30)

Rounds 6–10

Sc around. (30)

Round 11

(3 sc, dec) repeat 6 times. (24)

Round 12

(2 sc, dec) repeat 6 times. (18)

Round 13

(Sc, dec) repeat 6 times. (12)

Round 14

Dec around. (6)Stuff firmly before closing. FO, leaving a yarn tail for sewing if needed.

Shell

Worked separately in brown yarn as a dome shape, then sewn over the stuffed body once both pieces are complete.

Round 1

With brown yarn, MR, 6 sc. (6)

Round 2

Inc around. (12)

Round 3

(Sc, inc) repeat 6 times. (18)

Round 4

(2 sc, inc) repeat 6 times. (24)

Round 5

(3 sc, inc) repeat 6 times. (30)

Rounds 6–8

Sc around. (30)

Round 9

(3 sc, dec) repeat 6 times. (24)

Round 10

Sc around. (24)

FO and leave a long tail for attaching.

Flippers (Make 4)

Round 1

With mint yarn, MR, 6 sc. (6)

Round 2

(Sc, inc) repeat 3 times. (9)

Round 3

Sc around. (9)

Round 4

(Sc, dec) repeat 3 times. (6)

FO and lightly stuff if desired.

Tail

Chain 5.

Starting in second chain from hook, work 4 slip stitches.

FO and sew onto the back center of the turtle.

Assembly, in order

Step 1Sew the shell onto the top center of the stuffed body.
Step 2Attach two front flippers near the lower sides of the shell.
Step 3Attach two back flippers slightly behind the front pair.
Step 4Sew the tail onto the back edge.
Step 5Attach safety eyes or embroider eyes between rounds 6 and 7 of the head.
Step 6Embroider a small curved smile using black yarn.
Step 7To create chocolate chip details, add small embroidered brown dots around the shell surface. Keep all embroidery secure and trim loose ends carefully.

Check these before you start

  • Use a hook one size smaller than the label recommends on bulky chenille yarn; a tighter fabric keeps polyester stuffing from peeking through the single crochet stitches.
  • Keep the stitch marker moving every round on the body and head, since continuous rounds give no joining stitch to mark where one round ends and the next begins.
  • Count stitches against the numbers given at the end of each round rather than judging by eye, since uneven increases or decreases across fourteen rounds will show as a lopsided head.
  • Plastic safety eyes may not be suitable for babies or children under three years old. For baby-safe versions, replace safety eyes with securely embroidered eyes using yarn or embroidery thread.
  • Gauge is approximately 18 single crochet stitches by 20 rounds in 4 inches (10 cm); at this gauge the finished turtle measures about 6 inches long by 4 inches wide (15 x 10 cm).

On one line

Rounds22
Parts4
LevelIntermediate
Time4-6 hours
Hook4 mm
YarnBulky

Set-up

  • Confirm you have both chenille colors on hand — approximately 100 yards (91 meters) mint green for the body and 60 yards (55 meters) chocolate brown for the shell — plus black embroidery yarn or 8mm safety eyes for the face.
  • Set a stitch marker aside and plan to move it into the first stitch of every new round, since the body and head are worked in continuous rounds with no joining slip stitch.
  • Work a small test round with the 4mm (US G-6) hook and your chenille yarn to check that single crochet stitches sit tightly enough to hide stuffing once the piece is filled.
  • Read through the full body-and-head sequence before starting: it runs 14 continuous rounds in mint yarn, beginning with a 6-stitch magic ring, moving through increase rounds and even rounds, then decrease rounds before stuffing and closing.

Finishing

  1. Weave in loose ends on the body and head, each of the four flippers, the tail, and the shell before joining any pieces.
  2. Stuff the body and head firmly with polyester fiberfill as you work toward the final rounds, then close the opening; stuff each flipper only lightly as noted in the pattern.
  3. After assembling, gently shape the body and shell with your fingers to create a smooth rounded appearance. Blocking is usually unnecessary for plush yarn, but light steaming from a safe distance can help relax uneven fibers.
  4. cleaning, follow the yarn manufacturer's care recommendations. Many plush yarns prefer gentle hand washing and air drying to protect the stuffing and maintain the turtle's shape.

Construction

The body and head are worked as one continuous 14-round piece entirely in mint yarn, while the domed shell is a separate 10-round piece worked in brown yarn and sewn over the body afterward, giving the mint-and-chocolate color contrast its name.

The tail is the only piece built from a chain and slip stitches rather than single crochet rounds, which gives it a short, flat, pointed shape instead of a stuffed one.

a different look, swap to pastel yarn shades for a nursery-friendly turtle, or use worsted weight cotton yarn for a firmer, more defined stitch texture and a slightly smaller finished toy than the bulky chenille version shown here.

Time per section

Body and headabout 2-3 hours because it runs 14 continuous rounds in mint yarn, with gradual increases followed by gradual decreases to shape the head
Flippers (make 4)about 1 hour because each of the four pieces repeats the same 4-round increase-and-decrease sequence
Shell, tail, and assemblyabout 1.5-2 hours because the brown dome shell alone takes 10 rounds, plus the short tail, embroidered details, and sewing every piece onto the body

Common questions

Why is the shell crocheted separately instead of as part of the body?
The domed shell is worked on its own in brown yarn across 10 rounds, then sewn onto the top center of the stuffed mint body afterward. Working it separately keeps the dome shape distinct and lets you pin it in place to check balance before stitching it down permanently.
How much stuffing do the flippers need?
The pattern calls for light stuffing only, or none at all, after the four rounds are complete. Keeping them lightly filled lets the flippers lie flatter against the sides once sewn on.
Why is the tail worked differently from the rest of the turtle?
The tail is made from a short chain and slip stitches instead of single crochet rounds, since it has no rounds and is not stuffed. This produces a small, pointed, flat piece suited to a tail rather than a rounded body part.

These answers came from whoever first published the pattern, kept word for word.