Skip to the patterns
Crochet·Rituals
Menu

Amigurumi 23 Laid out for paper No account, no download

Mr Heart amigurumi: a beginner-ready two-lobe heart

Heart-shaped amigurumi, 3.5mm hook, two tops joined then worked 12 rounds as one body.

Jump to the rounds Pin it
Mr Heart amigurumi: a beginner-ready two-lobe heart
Amigurumi · Worsted
Skill
Intermediate
Time
4-6 hours
Yarn weight
Worsted
Hook
3.5 mm
Rounds
23

Intermediate

What the pattern's own author called it. Nothing here is graded again.

Worsted

What the sample was worked in. Any weight works; the size moves with it.

23

Each one is typed out whole and gets its own line.

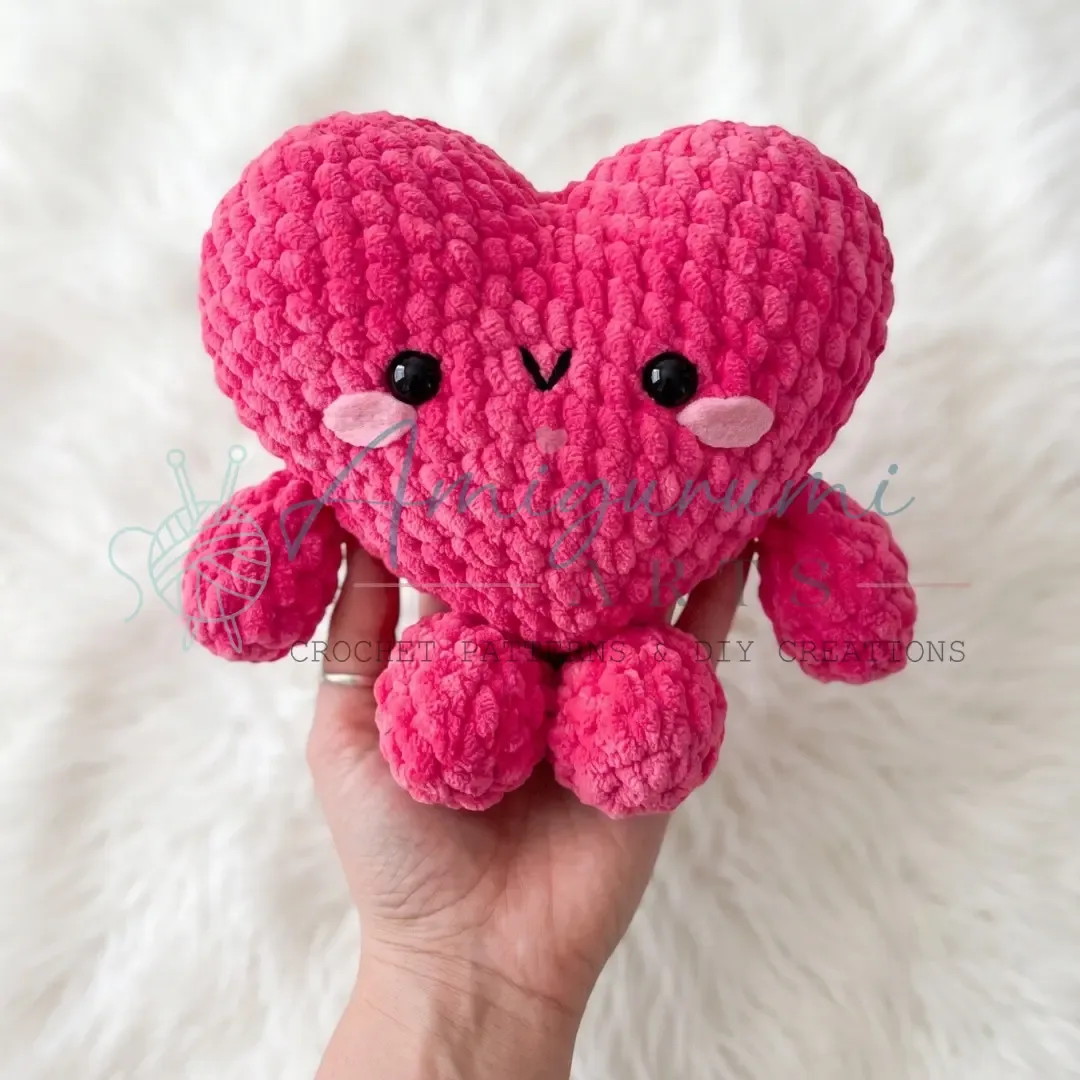
Mr Heart is a stuffed amigurumi built from two identical heart-lobe tops, each worked flat from a magic ring through five rounds, then joined edge to edge to form the center indentation of the heart. Once joined, the body continues as a single piece in continuous spiral for 12 more rounds. Four limbs are made separately and stuffed before attaching. Before starting, have worsted weight red yarn, a small amount of contrast yarn for the face, a 3.5mm hook, safety eyes, fiberfill, and a stitch marker on hand.

Common mistakes and their fixes

Fastening off both Body Tops
Leave the working tail uncut on the second top only — that yarn is what joins the two lobes, and cutting it early means rejoining new yarn at a visible seam.
Losing the round marker in spiral work
Because the body has no join or chain-up, a dropped marker means guessing where the round starts. Reset it at the first stitch immediately if it slips.
Reworking the joined stitches twice
The 4 sc worked through both layers at the join count as part of each top's edge already. Do not add extra stitches there or the count will drift from 56.

The materials list

Yarn

  1. Worsted weight yarn in red (main color) and any contrast color for embroidered facial details; small amount needed

Hook

  1. E-4 / 3.5 mm (or size needed to achieve a tight, stuffing-concealing fabric)

Safety eyes

  1. 2 safety eyes, approximately 8–10 mm

Stuffing

  1. Polyester fiberfill

Stitch markers

  1. 1–2 to mark the beginning of rounds

Tools

  1. Yarn needle / tapestry needle
  2. Scissors

Listed by the pattern's own author, in their words.

Key to this pattern, 7 short forms

Body Top — Make 2

Make both tops before beginning the body join. Fasten off and weave in ends on the first top only; leave a working yarn tail on the second top.

Round 1

8 sc in MR. (8)

Round 2

inc in each st around. (16)

Round 3

sc, inc repeat 8 times around. (24)

Round 4

2 sc, inc repeat 8 times around. (32)

Rounds 5–6

sc in each st around. (32)First top: fasten off and weave in ends securely. Second top: do not fasten off — you will use this working yarn to join the two tops together.

Arms and Legs — Make 4

All four limbs are made the same way. Stuff before closing.

Round 1

6 sc in MR. (6)

Round 2

inc in each st around. (12)

Rounds 3–4

sc in each st around. (12)Stuff the limb firmly.

Round 5

dec 6 times around. (6)

Round 6

sc in each st around. (6)Fasten off, leaving a long yarn tail for sewing.

Body (Joined from the Two Tops)

Hold both tops with their right sides facing out and align them so that 4 stitches on each side meet at the center indentation of the heart shape. Using the working yarn from the second top, crochet through both layers at the join point.

Round 7

Joining round: Working through both layers at the joined edges, sc through 4 sts. Then work 28 sc across the first top, 28 sc across the second top. (The 4 joining sc count as part of each top’s edge — do not rework those stitches.) (56)

Round 8

sc in each st around. (56)

Round 9

5 sc, dec repeat 8 times around. (48)

Round 10

sc in each st around. (48)

Round 11

4 sc, dec repeat 8 times around. (40)

Round 12

sc in each st around. (40)

Round 13

3 sc, dec repeat 8 times around. (32)

Round 14

sc in each st around. (32)Insert safety eyes between Rounds 10 and 11, spacing them approximately 7 stitches apart. Secure the backs firmly.

Round 15

2 sc, dec repeat 8 times around. (24) Begin stuffing now and continue adding fiberfill as you work the remaining rounds.

Round 16

sc in each st around. (24)

Round 17

sc, dec repeat 8 times around. (16)

Round 18

sc in each st around. (16)

Round 19

dec 8 times around. (8)Fasten off, leaving a long yarn tail. Close the remaining opening and use the tail to pull the top between the two lobes closed if a gap is visible there.

Assembly, in order

Step 1Attach the arms: Sew the two arms to the sides of the body between Rounds 11 and 12, positioning one on each side. Use the yarn tail and a tapestry needle with a whipstitch, pulling the tail through the body before weaving in to secure.
Step 2Attach the legs: Sew the two legs to the bottom of the heart body, placing them approximately 2 stitches apart at the center-bottom. Angle them slightly outward for a natural standing pose.
Step 3Embroider the face: Using a contrast color yarn and a tapestry needle, embroider a small smile and any blush marks or additional features you’d like. Satin stitch works well for cheeks; a simple backstitched curve creates a sweet smile.
Step 4Weave in all remaining ends securely throughout the body.

Check these before you start

  • Fasten off and weave in ends on the first Body Top only; leave the working tail on the second top uncut, since it is used to crochet both layers together at the join.
  • The body is worked in continuous spiral with no joining slip stitch and no chain-up between rounds — a stitch marker at the first stitch of each round is not optional.
  • Stuff the limbs firmly before closing, and stuff the body gradually as rounds progress so the finished heart holds its shape without lumps.
  • Gauge is not critical for this project, but your fabric should be tight enough that no stuffing shows through. If stuffing is visible, go down a hook size.
  • This pattern is written in US crochet terminology.

On one line

Rounds23
Parts3
LevelIntermediate
Time4-6 hours
Hook3.5 mm
YarnWorsted

Set-up

  • Confirm enough red yarn for two body tops plus 12 rounds of joined body, and a small contrast amount for facial embroidery only.
  • Set aside two stitch markers before beginning — one for the first top's round tracking, one to carry into the joined body.
  • Work a small gauge swatch in sc to confirm the 3.5mm hook produces a fabric tight enough to conceal stuffing.
  • Read the joining round before finishing the second top, since the working tail from that top is what carries the join forward.

Finishing

  1. Stuff each arm and leg firmly before closing, then stuff the joined body as the later rounds narrow toward the top.
  2. Weave in the tail left from the second Body Top after the joining round is complete and secured.
  3. Sew the arms between Rounds 11 and 12 and the legs at the center-bottom using a whipstitch, pulling tails through the body before weaving in.

Construction

Each Body Top increases every round (8, 16, 24, 32 stitches) before leveling off, which shapes the rounded lobe of the heart before the two tops meet at the center indentation.

The joining round works through both layers for 4 stitches at the center point, then continues 28 sc across each top separately — this is what fuses two flat lobes into one continuous 56-stitch body.

Time per section

Body Tops (make 2)about 45 minutes because each top is 5 rounds of shaping worked twice
Arms and Legs (make 4)about 1 hour because four identical limbs each need stuffing before closing
Body join and 12 rounds, plus assemblyabout 2 to 3 hours because of the two-layer join, 12 rounds of stuffing as you go, and attaching four limbs plus the embroidered face

Common questions

Why does the pattern make two separate Body Tops instead of one piece?
The heart shape needs two rounded lobes meeting at a center dip, which is easier to shape as two identical flat pieces than as one continuous spiral. They are joined at Round 7 through both layers before the body continues as a single piece.
Can the contrast color for the face be worked in during the rounds?
No — the pattern calls for embroidering the face with a contrast yarn and tapestry needle after the body is complete, not working it into the stitches. Only a small amount of contrast yarn is needed.
When should the limbs be attached?
Sew the arms to the sides of the body between Rounds 11 and 12, one on each side. Attach the legs after, spaced about 2 stitches apart at the center-bottom and angled slightly outward for a standing pose.
Can I make Mr. Heart in a different color?
Absolutely. Mr. Heart works beautifully in any solid color — consider deep burgundy, soft pink, lilac, or even a cheerful yellow for a sunflower-inspired version. If you want to add color variety, you could work the limbs in a contrast color before sewing them on. Stick to smooth yarn rather than textured or fuzzy fiber so your stitch counts remain easy to see as you work.

These answers came from whoever first published the pattern, kept word for word.