Skip to the patterns
Crochet·Rituals
Menu

Amigurumi 21 Laid out for paper No account, no download

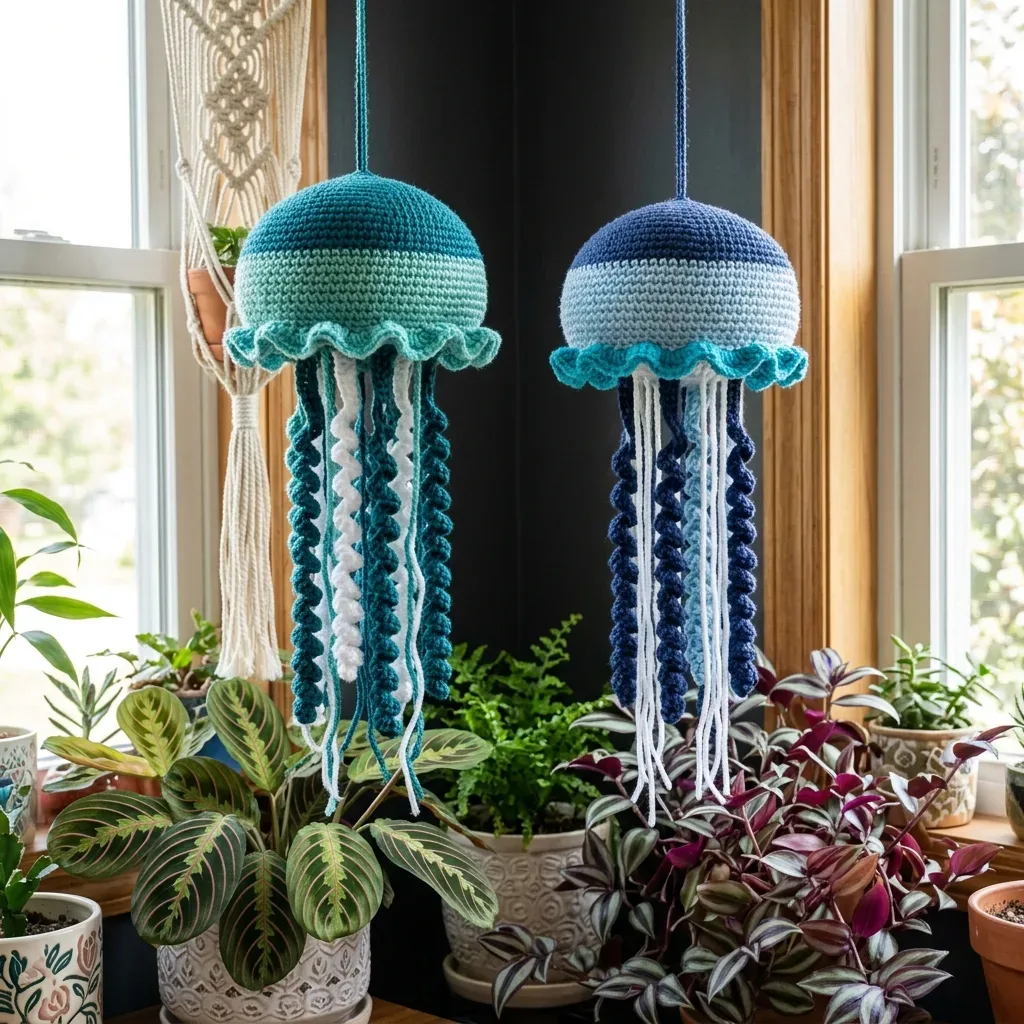
Crochet an ocean blue jellyfish amigurumi from the top down

A 13-round crocheted jellyfish bell with ruffled frill and spiral tentacles, worked with a G-6 (4.0 mm) hook.

Jump to the rounds Pin it
Crochet an ocean blue jellyfish amigurumi from the top down
Amigurumi · Worsted
Skill
Intermediate
Time
8-12 hours
Yarn weight
Worsted
Hook
4.0 mm
Rounds
21

Intermediate

What the pattern's own author called it. Nothing here is graded again.

Worsted

What the sample was worked in. Any weight works; the size moves with it.

21

Each one is typed out whole and gets its own line.

This ocean blue jellyfish amigurumi builds from the crown down: a 13-round dome worked in navy and pale blue, a crowded single-crochet frill along the base, and two tentacle styles, tight spiral corkscrews and straight hanging strands, some striped with a barber-pole twist. Work the whole bell in a continuous spiral, with a locking stitch marker tracking the first stitch of every round. Before starting, have Colors A through E wound and within reach, a G-6 (4.0 mm) hook, polyester fiberfill, and a length of cord ready for hanging the finished piece.

Common mistakes and their fixes

Losing track of round starts
Move the locking stitch marker up the moment you finish each round, before starting the next. Without it, a continuous spiral with no join gives no visual cue for where Round 18 or any other round actually begins.
Under-stuffing the bell
Pack the fiberfill firmly enough that the dome feels solid under light pressure before you close it. A loosely stuffed bell flattens at the top instead of holding its rounded shape.

The materials list

Yarn (all worsted weight)

  1. Color A (Bell Top): Navy blue, approximately 40 yards
  2. Color B (Bell Bottom): Pale or light blue, approximately 35 yards
  3. Color C (Frill): Bright turquoise or cyan, approximately 25 yards
  4. Color D (Spiral Tentacles): Navy blue, approximately 80 yards
  5. Color E (Straight Tentacles): White or off-white, approximately 60 yards

Color A

  1. Deep teal

Color B

  1. Mint or sage green

Color C

  1. Bright aqua or cyan

Color D

  1. Deep teal
  2. Color E: White

Hook

  1. US size G-6 / 4.0 mm

Notions

  1. Locking stitch marker
  2. Polyester fiberfill stuffing, approximately 1 oz per jellyfish
  3. Yarn needle
  4. Scissors
  5. Strong hanging cord or twisted yarn, approximately 1 yard

Yarn Suggestions

  1. Lion Brand Vanna’s Choice works beautifully for this project. The colors Navy, Dusty Blue, Aqua, and Off White give you the full palette. This yarn has excellent stitch definition, which matters for amigurumi where you want each stitch to show clearly.
  2. Paintbox Yarns Simply DK held doubled also works well. Drops Safran Cotton at sport weight held doubled gives a crisper, stiffer fabric that holds the dome shape particularly well.
  3. Avoid fuzzy or hairy yarns. You want smooth yarn where individual stitches are visible.

Listed by the pattern's own author, in their words.

Key to this pattern, 13 short forms

Part 1: The Bell

The bell is worked from the top down. You start with Color A for the darker dome top, then switch to Color B for the lighter lower section.

With Color A, make a magic ring.

Round 1

6 sc into MR, pull ring closed tight. (6 sc)

Round 2

Inc in each st around. (12 sc)

Round 3

(Sc in next st, inc in next st) 6 times. (18 sc)

Round 4

(Sc in next 2 sts, inc in next st) 6 times. (24 sc)

Round 5

(Sc in next 3 sts, inc in next st) 6 times. (30 sc)

Round 6

(Sc in next 4 sts, inc in next st) 6 times. (36 sc)

Round 7

(Sc in next 5 sts, inc in next st) 6 times. (42 sc)

Round 8

(Sc in next 6 sts, inc in next st) 6 times. (48 sc)

Round 9

(Sc in next 7 sts, inc in next st) 6 times. (54 sc)

Round 10

(Sc in next 8 sts, inc in next st) 6 times. (60 sc) Checkpoint: After Round 10, the crown should measure approximately 4.75 to 5 inches in diameter. This is the widest point of the bell.

Round 11

through 13: Sc in each st around for 3 rounds with no increases or decreases. (60 sc each round)

Color A is complete. Change to Color B at the end of Round 13. Cut Color A leaving a 6 inch tail to weave in later.

Round 14

through 17: With Color B, sc in each st around for 4 rounds. (60 sc each round)

Round 18

(Sc in next 8 sts, dec) 6 times. (54 sc) Do NOT fasten off. Round 18 is the base edge of the bell. The frill will be worked into the front loops of this round.

Stuffing and Cord Attachment

Before working the frill and closing, attach your hanging cord. Thread approximately 12 inches of cord onto a yarn needle. Insert the needle from the outside of the bell down through the center top, going through the magic ring at the crown. Pull the cord so equal lengths hang on each side. Tie a double knot inside the bell to secure it.

Now stuff the bell firmly with polyester fiberfill. The dome should hold its shape and feel solid when pressed lightly. Do not under-stuff or the top will flatten.

Part 2: The Frill

The frill is worked into the front loops only of Round 18.

With Color B still on your hook, join Color C by drawing it through the front loop of the first stitch.

Round 1

Frill Round: Working into FLO of each stitch of Round 18: (5 sc in next st, sk next st) 27 times. (135 sc total)

Round 2

After the last frill stitch, sl st into the first frill sc to join. Fasten off Color C, leaving a 6 inch tail.

The frill will naturally ruffle and wave outward from the base of the bell.

Closing the Bell

Return to the back loops of Round 18. Rejoin Color B at any back loop.

Round 1

Closing Round 1: (Sc in next 7 sts, dec) 6 times, working into BLO. (48 sc)

Round 2

Closing Round 2: (Sc in next 6 sts, dec) 6 times. (42 sc)

Round 3

Closing Round 3: (Sc in next 5 sts, dec) 6 times. (36 sc)

Round 4

Closing Round 4: (Sc in next 4 sts, dec) 6 times. (30 sc)

Round 5

Closing Round 5: (Sc in next 3 sts, dec) 6 times. (24 sc)

Round 6

Closing Round 6: (Sc in next 2 sts, dec) 6 times. (18 sc)

Part 3: Spiral Tentacles

Make 8 spiral tentacles total. For variety, make 5 two-color tentacles (holding Color D and Color E together) and 3 solid Color D tentacles.

Make 2 tentacles using ch 51 Make 3 tentacles using ch 61 Make 3 tentacles using ch 71 For each tentacle: Using your chosen color(s), make the specified foundation chain.

Beginning in the second chain from the hook, work 3 sc in each chain stitch across.

Fasten off, leaving a 12 inch tail for attachment.

The tentacle will immediately coil into a tight corkscrew spiral.

Part 4: Straight Tentacles

Cut 12 lengths of Color E (white), each approximately 18 to 20 inches long.

These will be attached in pairs, folded in half, creating 6 doubled trailing strands. You may also cut a few lengths of Color D for additional dark straight tentacles if you want more fullness.

Assembly, in order

Step 1Attaching Spiral Tentacles:
Step 2Thread the long tail on each spiral tentacle onto a yarn needle. Insert the needle up through the base of the bell, then back down through an adjacent stitch to secure. Pull snug so the top of the spiral sits flush against the underside near the frill. Tie a double knot inside if needed. Weave in all tails.
Step 3Distribute the 8 spiral tentacles evenly around the base, spacing them approximately every 6 to 7 stitches. Place longer spirals toward the center front and center back. Place shorter spirals at the sides for a natural cascading effect.
Step 4Attaching Straight Tentacles:
Step 5Fold each 18 to 20 inch length of Color E in half. Using a crochet hook, pull the folded loop through a stitch at the base of the bell between the spiral tentacles. Draw both cut ends through the loop and pull to tighten. This creates a lark’s head knot. Distribute the 6 doubled straight tentacles evenly between the spirals.
Step 6Finishing the Hanging Cord:
Step 7Tie the two ends of the hanging cord together in an overhand knot approximately 6 to 8 inches above the crown, creating a loop for hanging. Trim any excess.
Step 8Trimming Tentacles:
Step 9Trim the straight tentacles to varied lengths ranging from approximately 8 to 12 inches. This creates a natural, flowing silhouette. The spiral tentacles hang at their natural length. Allow some straight tentacles to hang longer than the spirals for layered depth.

Check these before you start

  • Check gauge before casting on. At 5 stitches and 5 rounds per inch, a loose gauge leaves the bell floppy with stuffing showing through, and a tight gauge makes it stiff and undersized; change hook size rather than force the tension.
  • Move the locking stitch marker up after every round of the bell. The bell is worked in a continuous spiral with no slip-stitch join, so the marker is the only way to tell where one round ends and the next begins.
  • Change color only at the final yarn-over step of the last stitch worked in the old color. Dropping the old strand and drawing the new one through at that exact point is what keeps the color change clean at the start of the next round.

On one line

Rounds21
Parts6
LevelIntermediate
Time8-12 hours
Hook4.0 mm
YarnWorsted

Set-up

  • Wind Colors A through E separately and check yardage against the list: 40 yards A, 35 yards B, 25 yards C, 80 yards D, 60 yards E.
  • Set a locking stitch marker aside before Round 1; you will move it up at the start of every round of the bell.
  • Work the gauge swatch first: 10 sc by 10 rounds should measure 2 inches by 2 inches with a G-6 (4.0 mm) hook.
  • Read through the frill instructions before you begin the bell so you know Round 18 is worked into front loops only.

Finishing

  1. Thread the hanging cord through a yarn needle and insert it down through the magic ring at the crown, knotting it inside the bell, before you stuff.
  2. Stuff the bell firmly with fiberfill so the dome holds its shape under light pressure, then close the bell and fasten off, weaving in the Color C frill tail.
  3. Space the 8 spiral tentacles evenly around the base, roughly every 6 to 7 stitches, pull each tail snug against the underside near the frill, knot inside if needed, and weave in every remaining tail.

Construction

Round 2 increases in every stitch to double the base from 6 to 12, then Round 3 spaces increases every other stitch to reach 18; the shift from increasing every stitch to increasing every two stitches is what widens the dome gradually instead of stepping it outward.

The frill is worked into the front loop only of Round 18, which leaves that round's back loops intact underneath the ruffle; the frill sits as an added layer on the bell's lower edge rather than replacing the round it grows from.

Time per section

Part 1: The Bellabout 3 to 4 hours, because it is 13 rounds of continuous dome shaping with a color change from A to B partway through
Part 2: The Frillabout 1 hour, because it is a single round of 27 crowded repeats worked into the front loops only of Round 18
Tentacles and assemblyabout the remaining hours of the 8 to 12 hour total, because the 8 spiral tentacles and the straight tentacles each need their own foundation chain and corkscrew or triple-sc rounds before attaching

Common questions

What makes the frill ruffle instead of lying flat?
The frill round crowds 5 sc into a single stitch, then skips the next stitch, 27 times around Round 18. Forcing that many extra stitches into a fixed length of fabric is what pushes the edge into a wave.
How do the barber-pole tentacles get the twisted look?
Hold one strand of Color D and one strand of Color E together as a single working yarn and work the corkscrew as normal. The two colors twist around each other naturally as the spiral forms, with no extra steps.

These answers came from whoever first published the pattern, kept word for word.