
Intermediate
What the pattern's own author called it. Nothing here is graded again.
 Crochet·Rituals
Amigurumi 29 Laid out for paper No account, no download
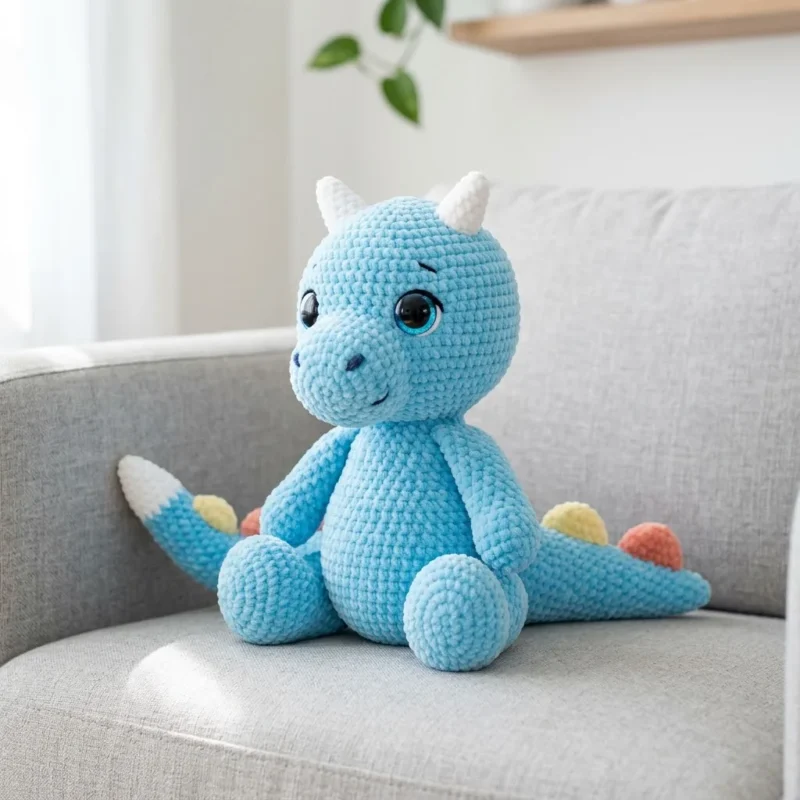
Chenille dragon plush: head in 15 rounds, tail in 11, 5 spikes. 5.0mm hook.
Crochet Rituals · retyped from the source and laid out for print · added 20 Oct 2026

What the pattern's own author called it. Nothing here is graded again.

What the sample was worked in. Any weight works; the size moves with it.

Each one is typed out whole and gets its own line.
This dragon comes together from three separate pieces: a 15-round head built around a rounded snout, an 11-round tail that shifts from white to sky blue, and five small spikes worked flat and sewn along the back and tail. Bulky chenille yarn in sky blue forms the body, with navy embroidery thread for the face and 18mm safety eyes set before any stuffing goes in. Before the first stitch, have the chenille wound, the hook on hand, stuffing within reach, and pins ready for placing eyes and spikes.
Listed by the pattern's own author, in their words.
Key to this pattern, 7 short forms
MR, 6 sc into ring. (6 sts)
Inc in each st around. (12 sts)to 5: Sc in each st around. (6 sts) FO, leaving a tail. Stuff very lightly or leave unstuffed.
*Sc 1, inc* repeat around. (18 sts)Step by step: to 6: Sc in each st around. (18 sts) Work 3 rounds even; *Sc 1, invdec* repeat around. (12 sts).to 14: Sc in each st around. (12 sts) Work 7 rounds even. FO, leaving a long tail. Stuff the hand portion firmly, leave the arm portion lightly stuffed so it bends naturally.to 6: Sc in each st around. (18 sts) Work 3 rounds even. FO, leaving a long tail for sewing. Stuff lightly. Pin to the lower front of the head below the eyes and sew in place.
*Sc 2, inc* repeat around. (24 sts)Step by step: to 8: Sc in each st around. (24 sts) Work 4 rounds even.
*Sc 3, inc* repeat around. (30 sts)
*Sc 4, inc* repeat around. (36 sts)
*Sc 5, inc* repeat around. (42 sts)Step by step: to 18: Sc in each st around. (42 sts) Work 11 rounds even; *Sc 5, invdec* repeat around. (36 sts); Sc in each st around. (36 sts).
*Sc 6, inc* repeat around. (48 sts)
to 16: Sc in each st around. (48 sts) Work 8 rounds even.
*Sc 6, invdec* repeat around. (42 sts)
*Sc 5, invdec* repeat around. (36 sts) Insert safety eyes between rounds 12 and 13, approximately 8 stitches apart. The placement shown has them slightly toward the front of the face for that sweet look.
*Sc 4, invdec* repeat around. (30 sts)Step by step: Sc in each st around. (30 sts).*Sc 3, invdec* repeat around. (24 sts) Begin stuffing the body firmly. You want him nice and plump.*Sc 2, invdec* repeat around. (18 sts) FO, leaving a long tail. Do not close the opening yet. You will attach the head here.
*Sc 3, invdec* repeat around. (24 sts) Begin stuffing the head firmly.
*Sc 2, invdec* repeat around. (18 sts)to 16: Sc in each st around. (18 sts) Work 7 rounds even. FO, leaving a long tail. Stuff the foot firmly, upper leg medium stuffed.
*Sc 1, invdec* repeat around. (12 sts) Add more stuffing to achieve a nice round shape.Rnd 23: Invdec around. (6 sts) FO, leaving a long tail. Sew the hole closed and weave in the end.
Start with the tail tip in white, then transition to sky blue.
In White:
MR, 4 sc into ring. (4 sts)
*Sc 1, inc* repeat around. (6 sts)
Sc in each st around. (6 sts)
*Sc 1, inc* repeat around. (9 sts) Change to sky blue.
In Sky Blue:
Sc in each st around. (9 sts)
*Sc 2, inc* repeat around. (12 sts)
to 9: Sc in each st around. (12 sts)
*Sc 3, inc* repeat around. (15 sts)
to 13: Sc in each st around. (15 sts)
*Sc 4, inc* repeat around. (18 sts)
to 18: Sc in each st around. (18 sts) FO, leaving a long tail. Stuff lightly so the tail drapes naturally.
Make spikes in assorted colors: pale yellow, coral, and light green. Vary the colors as shown.
MR, 4 sc into ring. (4 sts)
Inc in each st around. (8 sts)
to 4: Sc in each st around. (8 sts) Sl st to next st, FO leaving a tail. Flatten the opening and do not stuff.
| Rounds | 29 |
|---|---|
| Parts | 3 |
| Level | Intermediate |
| Time | 4-6 hours |
| Hook | 5.0 mm |
| Yarn | Bulky |
The head's early rounds increase from 6 to 18 stitches in standard amigurumi progression, then level off into straight single crochet rounds, which shapes the rounded muzzle described for the snout.
The spikes are worked flat with a slip stitch join at the end of their final round instead of continuous rounds, which flattens the opening so each spike lies closed and ready to sew on without stuffing.
| Head | about 90-120 minutes because it runs 15 rounds including the snout shaping and firm stuffing |
|---|---|
| Tail | about 45-60 minutes because of the white-to-sky-blue color change partway through 11 rounds |
| Spikes and assembly | about 60-90 minutes because five spikes are small but working flat and placing them evenly takes care |
Every one was taken by whoever published the pattern, in the order the source listed them.

These answers came from whoever first published the pattern, kept word for word.