
Intermediate
What the pattern's own author called it. Nothing here is graded again.
 Crochet·Rituals
Cardigans 75 Laid out for paper No account, no download
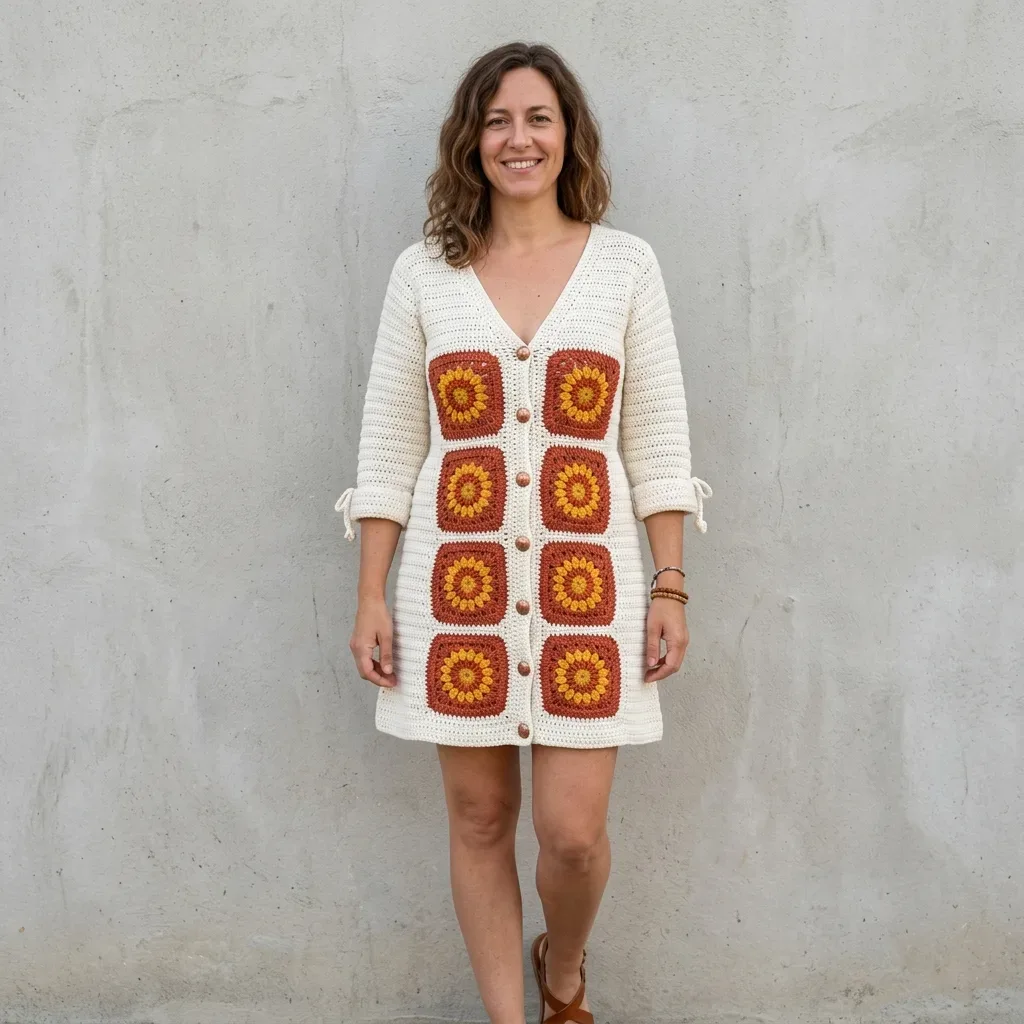
Long cardigan with a sunflower granny panel down the front. 4-round squares, J and I hooks.
Crochet Rituals · retyped from the source and laid out for print · added 23 Oct 2026
What the pattern's own author called it. Nothing here is graded again.

What the sample was worked in. Any weight works; the size moves with it.

Each one is typed out whole and gets its own line.
This cardigan pairs a dense single crochet body with a column of sunflower granny squares down the center front. Sleeves start at the cuff and build upward; the body is shaped flat with armhole, shoulder, and V-neck shaping before everything is seamed. Have Color A, B, and C on hand, a J hook for the body and sleeves, an I hook for the squares and button bands, 9 wooden buttons, and stitch markers ready before the first chain.
Listed by the pattern's own author, in their words.
Key to this pattern, 20 short forms
This is a 4-round granny square with a circular sunflower motif at the center, creating the radiating petal effect visible on the finished cardigan. Work in rounds without turning. Join each round with a slip stitch.
Color C, golden yellow Make a magic ring (or ch 4, join with sl st to form ring). Ch 3 (counts as first dc), work 11 more dc into ring, join with sl st to top of beg ch-3. (12 dc)
Color C Ch 1, sc in same st. Ch 2, sk 1 st, sc in next st, rep (ch 2, sk 1, sc in next st) around, ending with ch 2, join with sl st to first sc. (6 sc, 6 ch-2 sps) Fasten off Color C.
Color B, terracotta Join Color B in any ch-2 sp. Ch 3 (counts as dc), work 4 dc into same ch-2 sp (petal cluster begun), ch 1. Work 5 dc into next ch-2 sp, ch 1. Rep (5 dc in ch-2 sp, ch 1) around all 6 ch-2 sps, join with sl st to top of beg ch-3. (6 petal clusters of 5 dc each, 6 ch-1 sps)
Color B This round transforms the circle into a square with corner chains. Sl st across to first ch-1 sp between petals. In this sp work: sc, ch 3 (corner), sc. This creates the first corner. Work sc evenly across the top of the next petal cluster: sc in each of the 5 dc of next petal = 5 sc. Work (sc, ch 3, sc) in next ch-1 sp (corner). Work 5 sc across next petal. Rep (corner, 5 sc across petal) two more times to complete all 4 sides, join with sl st to first sc. (4 corners each with ch-3 sp, 7 sc on each side between corners) Fasten off Color B. Weave in ends.
Color A, cream, worked with J hook Join Color A in any corner ch-3 sp. Ch 3 (counts as dc), work 2 dc in same corner sp, ch 2, 3 dc in same sp (first corner shell complete). Work dc in each sc across to next corner sp (7 dc). In corner sp work (3 dc, ch 2, 3 dc). Rep dc across side and corner shells around all 4 sides. Join with sl st to top of beg ch-3. Fasten off Color A. (Each side has 13 dc between corner ch-2 sps, 4 corner ch-2 sps)
After blocking, each square measures 4.5 in x 4.5 in / 11.5 cm x 11.5 cm.
Make 8 squares total.
of armhole: Ch 1, turn. Sl st across first 5 sts, ch 1, sc in same st, sc to last 5 sts, leave last 5 sts unworked. (64 sc) [72 sc]
of armhole: Ch 1, turn. Sc2tog, sc to last 2 sts, sc2tog. (62 sc) [70 sc]
of armhole: Ch 1, turn. Sc across. (62 sc) [70 sc]
of armhole: Ch 1, turn. Sc2tog, sc to last 2 sts, sc2tog. (60 sc) [68 sc]
of armhole: Ch 1, turn. Sc across. (60 sc) [68 sc]
of armhole: Ch 1, turn. Sc2tog, sc to last 2 sts, sc2tog. (58 sc) [66 sc]
of armhole: Ch 1, turn. Sc across. (58 sc) [66 sc] Work even on 58 sc [66 sc] until armhole measures 8 in / 20 cm from bind-off row. End on a WS row.
Mark center 20 sts [22 sts] for back neck.
Left shoulder: Ch 1, turn. Sc across first 19 sts [22 sts], leave remaining sts unworked. (19 sc) [22 sc]
Next row: Ch 1, turn. Sc2tog, sc across. (18 sc) [21 sc]
Next row: Ch 1, turn. Sc across. Fasten off. (18 sc) [21 sc]
Right shoulder: Join yarn at inner edge of right shoulder, leaving the 20 [22] center neck sts unworked for back neck.
Ch 1, sc across 19 sts [22 sts] to outer edge. (19 sc) [22 sc]
Ch 1, turn. Sc to last 2 sts, sc2tog. (18 sc) [21 sc]
Ch 1, turn. Sc across. Fasten off. (18 sc) [21 sc]
of armhole: Ch 1, turn. Sl st across first 5 sts, ch 1, sc in same st, sc across to end. (32 sc) [36 sc]
of armhole: Ch 1, turn. Sc to last 2 sts, sc2tog. (31 sc) [35 sc]
of armhole: Ch 1, turn. Sc across. (31 sc) [35 sc]
of armhole: Ch 1, turn. Sc to last 2 sts, sc2tog. (30 sc) [34 sc]
of armhole: Ch 1, turn. Sc across. (30 sc) [34 sc]
of armhole: Ch 1, turn. Sc to last 2 sts, sc2tog. (29 sc) [33 sc]
of armhole: Ch 1, turn. Sc across. (29 sc) [33 sc] Work 2 more rows even. (29 sc) [33 sc]
of V-neck: Ch 1, turn. Sc to last 2 sts at center front edge, sc2tog. (28 sc) [32 sc]
of V-neck: Ch 1, turn. Sc across. (28 sc) [32 sc]
of V-neck: Ch 1, turn. Sc to last 2 sts, sc2tog. (27 sc) [31 sc]
of V-neck: Ch 1, turn. Sc across. (27 sc) [31 sc]
of V-neck: Ch 1, turn. Sc to last 2 sts, sc2tog. (26 sc) [30 sc]
of V-neck: Ch 1, turn. Sc across. (26 sc) [30 sc]
of V-neck: Ch 1, turn. Sc to last 2 sts, sc2tog. (25 sc) [29 sc]
of V-neck: Ch 1, turn. Sc across. (25 sc) [29 sc]
of V-neck: Ch 1, turn. Sc to last 2 sts, sc2tog. (24 sc) [28 sc]
of V-neck: Ch 1, turn. Sc across. (24 sc) [28 sc]
of V-neck: Ch 1, turn. Sc to last 2 sts, sc2tog. (23 sc) [27 sc]
of V-neck: Ch 1, turn. Sc across. (23 sc) [27 sc] Work even on 23 sc [27 sc] until armhole matches back armhole depth of 8 in / 20 cm total. End on a WS row.Shoulder: Work 18 sc [21 sc] for outer shoulder stitches. Fasten off. (18 sc) [21 sc]
Ch 1, turn. Sl st across 4 sts, ch 1, sc in same st, sc to last 4 sts, leave last 4 sts unworked. (36 sc) [40 sc]
Ch 1, turn. Sc2tog, sc to last 2 sts, sc2tog. (34 sc) [38 sc]
Ch 1, turn. Sc across. (34 sc) [38 sc] Continue decreasing every other row until you have (20 sc) [24 sc] . Fasten off.
With RS of Left Front facing, Color A, and I / 5.5 mm hook, join yarn at hem edge of center front.
Work sc evenly up the entire center front edge, approximately 1 sc per row end. (Approximately 110 sc for S/M, 114 sc for L/XL)
Ch 1, turn. Sc in each sc across. Fasten off.
Ch 1, turn. 2 sc in first st, sc to last st, 2 sc in last st. (30 sc) [34 sc]
Ch 1, turn. Sc across. (30 sc) [34 sc]
Ch 1, turn. Sc across. (30 sc) [34 sc]
Ch 1, turn. 2 sc in first st, sc to last st, 2 sc in last st. (32 sc) [36 sc] Continue this pattern (increase every 3rd row) until you have (44 sc) [48 sc] .Work even until sleeve measures 14 in / 35.5 cm from foundation. End on a WS row.
Ch 1, turn. Sc2tog over first 2 sts, sc to last 2 sts, sc2tog. (72 sc) [80 sc]
Ch 1, turn. Sc across. (72 sc) [80 sc]
Ch 1, turn. Sc2tog, sc to last 2 sts, sc2tog. (70 sc) [78 sc]
Ch 1, turn. Sc across. (70 sc) [78 sc]
Ch 1, turn. Sc2tog, sc to last 2 sts, sc2tog. (68 sc) [76 sc]
Ch 1, turn. Sc across. (68 sc) [76 sc]
Ch 1, turn. Sc2tog, sc to last 2 sts, sc2tog. (66 sc) [74 sc]
Ch 1, turn. Sc across. (66 sc) [74 sc]
Ch 1, turn. Sc2tog, sc across. (36 sc) [40 sc]
Ch 1, turn. Sc across. (36 sc) [40 sc]
Ch 1, turn. Sc2tog, sc across. (35 sc) [39 sc]
Ch 1, turn. Sc across. (35 sc) [39 sc]
Ch 1, turn. Sc2tog, sc across. (34 sc) [38 sc]
Ch 1, turn. Sc across. (34 sc) [38 sc]
Ch 1, turn. Sc2tog, sc across. (33 sc) [37 sc]
Ch 1, turn. Sc across. (33 sc) [37 sc]
Ch 1, turn. 2 sc in first st, sc to last st, 2 sc in last st. (68 sc) [76 sc]
Ch 1, turn. Sc across. (68 sc) [76 sc]
Ch 1, turn. 2 sc in first st, sc to last st, 2 sc in last st. (70 sc) [78 sc]
Ch 1, turn. Sc across. (70 sc) [78 sc]
Ch 1, turn. 2 sc in first st, sc to last st, 2 sc in last st. (72 sc) [80 sc]
Ch 1, turn. Sc across. (72 sc) [80 sc]
Ch 1, turn. 2 sc in first st, sc to last st, 2 sc in last st. (74 sc) [82 sc]
onwards: Ch 1, turn. Sc across even with no shaping. Continue until piece measures 24 in / 61 cm from foundation row hem edge. End on a WS row. (74 sc) [82 sc]
Ch 1, turn. 2 sc in first st, sc across. (34 sc) [38 sc]
Ch 1, turn. Sc across. (34 sc) [38 sc]
Ch 1, turn. 2 sc in first st, sc across. (35 sc) [39 sc]
Ch 1, turn. Sc across. (35 sc) [39 sc]
Ch 1, turn. 2 sc in first st, sc across. (36 sc) [40 sc]
Ch 1, turn. Sc across. (36 sc) [40 sc]
Ch 1, turn. 2 sc in first st, sc across. (37 sc) [41 sc]
onwards: Work even until piece measures 24 in / 61 cm from foundation. End on a WS row. (37 sc) [41 sc]
| Rounds | 75 |
|---|---|
| Parts | 12 |
| Level | Intermediate |
| Time | 4-6 hours |
| Hook | 6 mm |
| Yarn | Worsted |
The armhole and waist shaping rows both use sc2tog at the start and end of the row rather than a single center decrease, which pulls the stitch count in evenly from both edges over several rows (64 to 60, 62 to 60, and similar runs in the waist sections).
The granny square is worked in rounds and joined with a slip stitch at the end of each round, but the body and button bands are worked flat with a turning chain — the square's corner ch-3 spaces in Round 4 are what convert its circular Round 1-3 shape into a joinable square edge.
| Sunflower Granny Square panel | about 45-60 minutes per square because each square runs 4 color-worked rounds with a fastened-off color change between Rounds 2 and 3 |
|---|---|
| Armhole and waist shaping on the body | about 1-1.5 hours because the armhole runs 7 rows and each waist decrease or increase section runs 8 rows of paired edge shaping |
| Seaming and finishing | about 1 hour because shoulders, sleeve caps, side seams, the granny panel, tie cuffs, and 9 buttons all attach in sequence |
These answers came from whoever first published the pattern, kept word for word.